
In this tutorial, we’ll be exploring URL Structures, static files (such as CSS, JavaScript, and images) and media files (like those uploaded by users in form submissions) in Django, as well as the Django Admin Interface and authentication and authorization functionalities.
Understanding URL Patterns in Django
Let’s pick up where we left off in the previous article and delve more in-depth into the URL structure in Django.
In Django, URLs are structured as ‘<url-path>/’, with the URL route consistently ending with a forward slash. However, it’s important to note that the URL route does not begin with a forward slash.
urlpatterns = [
    #path(‘url-path-string/’,view_function, name=’shorthand-name’)
    path('leave-us-a-message/', contact_us_view, name=’contact’)
]
Routing and Connecting Views to URLs
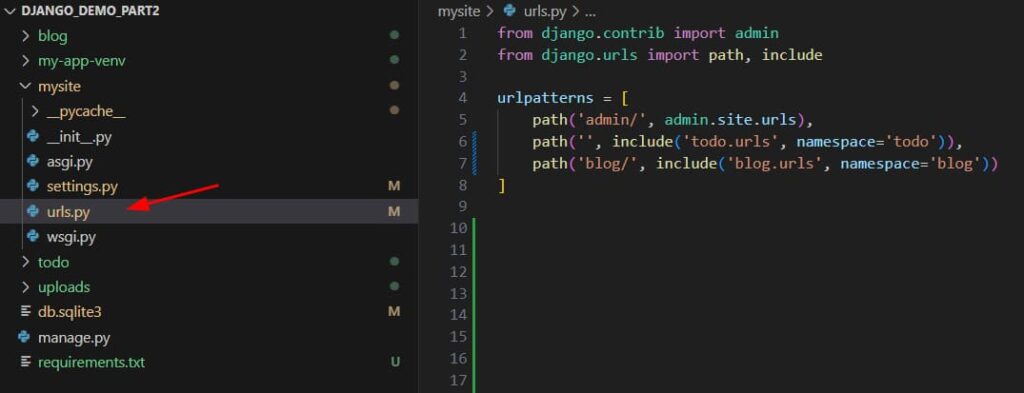
When you initiate a new Django project using the ‘django-admin startproject <project_name>’ command, Django sets up your project by generating a scaffold setup containing the necessary configurations for your project’s settings, routing, and server. Specifically, the urls.py file within your project plays a crucial role in defining the URL routing for your application. This is what it looks like in urls.py from the mysite project.
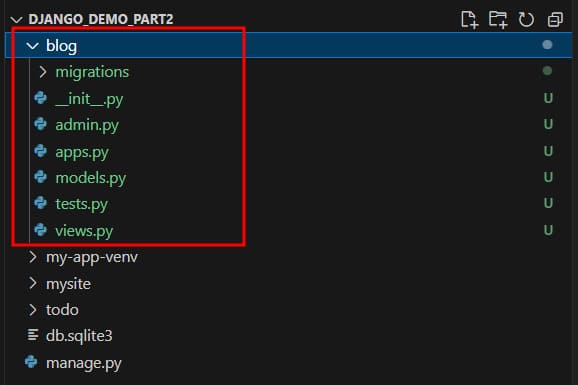
Assuming your project is named ‘mysite’ (as referenced in the codebase we’ve been using), the root structure of your project should resemble the following:
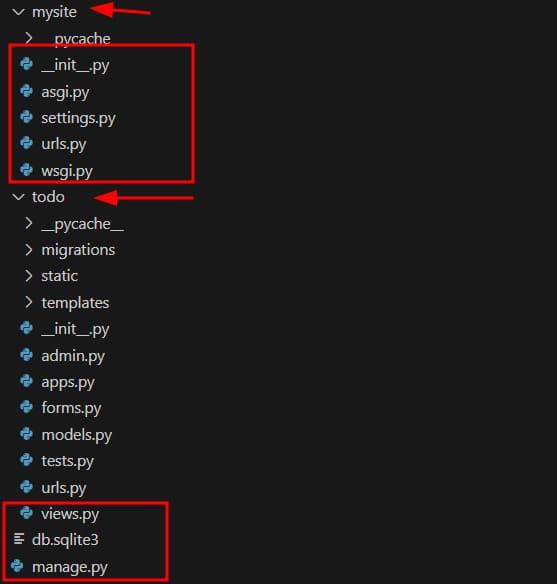
I have highlighted the main file you need to be noted on the current solution. You can download the source code from the previous article, which you can find below.
Download the source code from this article.
In mysite urls.py file, you can define your project’s routing structure using the path() function, this function can be used in two ways:
1. Direct View approach: This approach would require you to import a view function from a module and direct a route to that function, the function is then executed when the URL from a browser request matches the route you defined. See an example below:
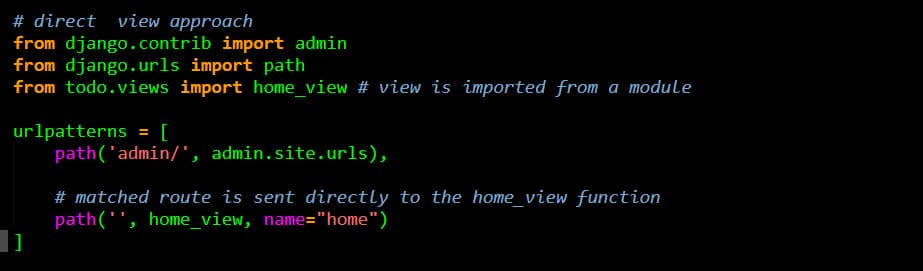
This is a straightforward approach and it’s great for handling single routes and small applications, in this example, we’re matching an empty route to the home view function, which means if your site is hosted at https://example.com, this function would run at exactly https://example.com/ and any route that begins with ‘/admin’ would be handled by the admin URL config.
2. Nested-routes: This approach allows you to separate your URLs according to their apps and is easily maintainable.
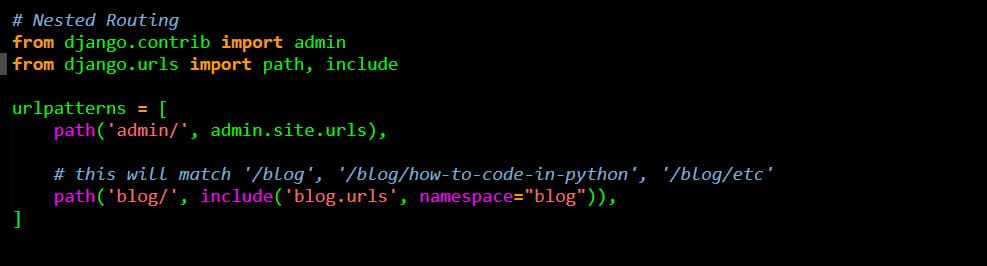
The namespace argument is required when using the include() function, and it tells Django how to reverse your URLs whenever you use a URL shorthand.
Run the script in Visual Studio Code
If you try to activate your Virtual Environment in Visual Studio code and you find this error.
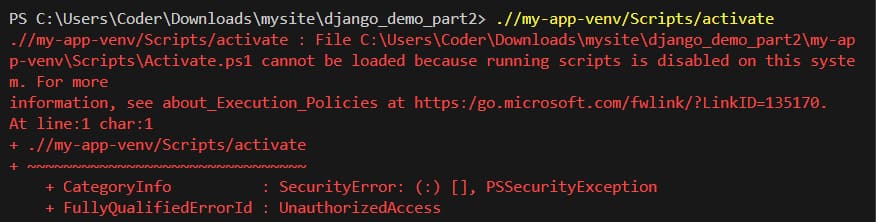
It says, my-app-venv\Scripts\Activate.ps1 cannot be loaded because running scripts is disabled on this system. To enable it on your system, Follow the steps below.
1. Open PowerShell as an Administrator
Right-click on the PowerShell icon and select “Run as Administrator”.
2. Check Current Execution Policy:
You can check the current execution policy by running the following command:
Get-ExecutionPolicy3. Change Execution Policy
If the current policy is restricted, you can change it to allow script execution. For example, to set the execution policy to RemoteSigned, which allows local scripts to run but requires remote scripts to be signed by a trusted publisher, run the following command:
Set-ExecutionPolicy RemoteSignedIf you’re in an organization with strict security policies, consult with your IT department before changing the execution policy.
4. Confirm Change:
Confirm the change by typing “Y” and pressing Enter.
5. Run the Script in Visual Studio:
After changing the execution policy, try running the script again in Visual Studio. It should now execute without the previous error.
Remember to be cautious when changing execution policies, especially in environments with strict security requirements. Make sure you understand the implications of the chosen execution policy for your system’s security.
Build A Django App
Exploring URL Structures, Static files and Media files in Django would be much clearer if we create a sample app and execute all the topics we covered above. So, let’s see how this works by building a blog application in our existing Django project. To build a blog application within your existing project, follow these steps:
1. Open your terminal.
2. Navigate to your project root directory, If you download the source code from the previous article the root directory is Django_demo_part2.
3. Activate your virtual environment if it already exists, or create one if it doesn’t.
Create Virtual Environment:
py -m venv my-app-venvActivate Virtual Environment:
.//my-app-venv/Scripts/activate4. Use the startapp command to create a new app named ‘blog’ within your project:
py manage.py startapp blogThis command will generate the necessary files and folders for the ‘blog’ app in your project directory. You can now proceed to develop your blog application within this newly created app.
5. Now in your ‘blog/models.py’ create a simple BlogPost model like so:
Blog Post Model:
from django.db import models
from django.shortcuts import reverse
from django.contrib.auth.models import User


# Create your models here.
class BlogPost(models.Model):
    title = models.CharField(max_length=250)
    author = models.ForeignKey(User, on_delete=models.CASCADE)
    published = models.BooleanField(default=False) # in draft by default
    content = models.TextField(blank=True, null=True)
    display_image = models.ImageField(upload_to='blog/images', blank=True, null=True)
    date_created = models.DateTimeField(auto_now=True)
    date_published = models.DateTimeField(blank=True, null=True)


    def __str__(self):
        return self.title


    def get_absolute_url(self):
        url = reverse('blog:read', kwargs={'post_title': self.title})
        return url
Here are a couple of things to note:
We’re importing the User model from ‘django.contrib.auth.models’. This model facilitates the creation of users for authentication, authorization, and authors for our blog posts.
This defines the BlogPost model with several fields:
- title: A character field for the title of the blog post.
- author: A foreign key field referencing the User model, representing the author of the blog post.
- published: A boolean field indicating whether the blog post is published or in draft mode.
- content: A text field for the content of the blog post.
- display_image: An image field for the display image of the blog post.
- date_created: A DateTime field that automatically stores the date and time when the blog post is created.
- date_published: A DateTime field to specify the date and time when the blog post is published.
6. To enable the creation of blog posts in the Django Admin Interface, we need to make the BlogPost model available. In your ‘blog/admin.py’ file, import your BlogPost model and register it on the admin site. Registering it on the admin site allows for CRUD operations through the Django Admin interface.
Your admin.py should look like this:
from django.contrib import admin
from .models import BlogPost

# Register your models here.
admin.site.register(BlogPost)
Create Blog Tables
Before we create the table in our database by making migrations, we need to ensure that our Django project is aware of the new ‘blog’ app. We can achieve this by adding the ‘blog’ app to the INSTALLED_APPS list in our ‘mysite/settings.py’ file, next to our existing ‘todo’ app. Here’s how you can do it:
1. Open your ‘mysite/settings.py’ file.
2. Locate the INSTALLED_APPS list.
3. Add ‘blog’ to the list, ensuring it is placed next to the ‘todo’ app:
INSTALLED_APPS = [
    ...
    'todo',
    'blog',
    ...
]
4. Save the changes to the file.
With the ‘blog’ app added to the INSTALLED_APPS list, Django will now recognize and include the app in the project. We can proceed to create migrations and apply them to the database to create the necessary tables.
Now, let’s proceed with running the migrations to apply the changes to the database.
Create Migration:
py manage.py makemigrations Run Migration:
py manage.py migrateHowever, you may encounter an error similar to the one described below, which is a dependency error in Django. This error typically arises if you’re trying to use an ‘ImageField’ in any of your models.py files.
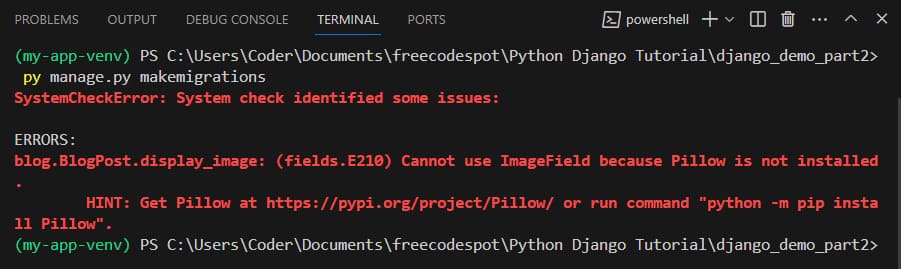
The error message may indicate that Pillow is not installed. Pillow is a Python Imaging Library (PIL) fork, which is required for handling images in Django applications. To resolve this error, you need to install Pillow.
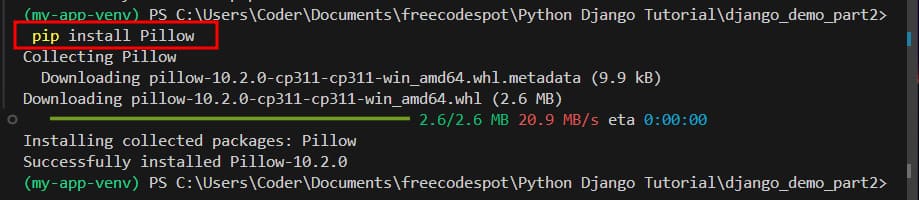
In your terminal, execute the following command to install Pillow using pip:
pip install Pillow
This command will install Pillow and resolve the dependency error. If you have an error in using pip you can make sure that it is installed by running the following command.
py -m pip install --upgrade pip
Then you can verify the pip version by executing py -m pip --version. Now, try running the pillow installation again.
If Pillow is already installed in your environment, great! However, it’s still a good practice to update your requirements.txt file to reflect all the dependencies of your project. You can do this by running the following command:
pip freeze > requirements.txtThis command will update your requirements.txt file with the current list of installed packages and their versions, including Pillow. It helps maintain consistency across environments and ensures that all necessary packages are installed when deploying your project.
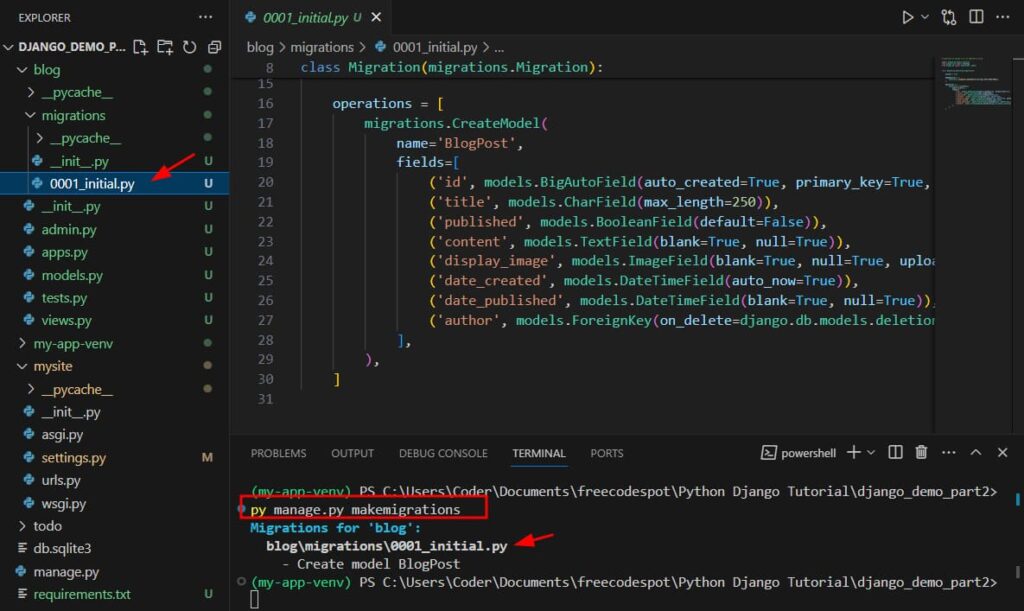
After updating the requirements.txt file, you should try running your migrations again. This time, it should work without any issues. You can execute the migrations using the following command:
Create Migration:
py manage.py makemigrationsThis will generate a migration file. Check the screenshot below for your reference.
Run Migration:
python manage.py migrate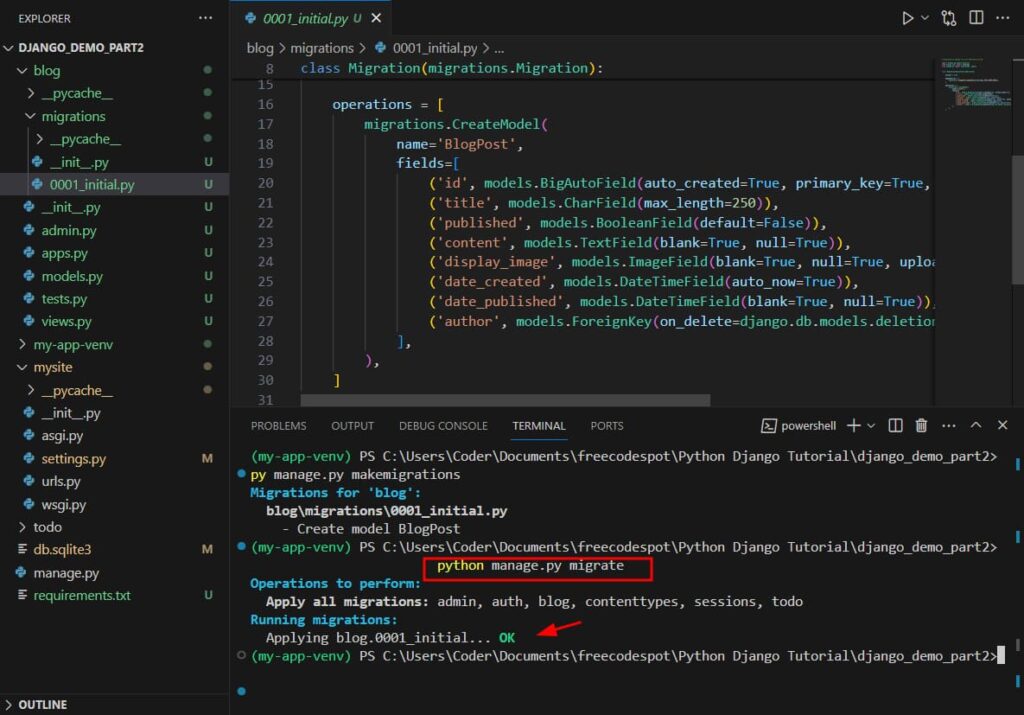
This command will apply any pending migrations to your database, including the changes related to the ‘blog’ app that we added earlier. If all goes well, your database schema should be updated successfully.
Create a Django Admin User
To create a user for the admin interface in Django, follow these steps:
1. Open your terminal.
2. Use the Django management command createsuperuser to create a user for the admin. Enter the following command and follow the prompts to provide the required information such as username, email, and password:
python manage.py createsuperuser
3. After creating the user, run your server using the runserver command. Enter the following command:
py manage.py runserver
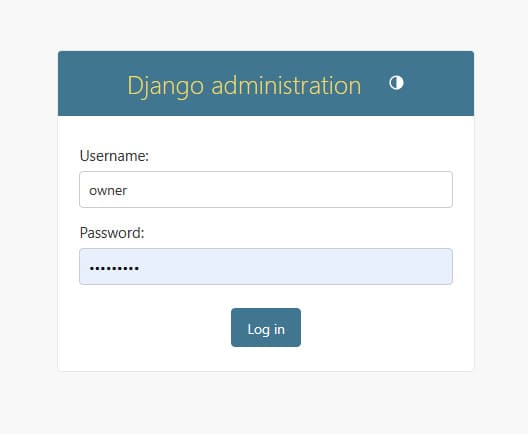
4. Once your server is initialized, visit the admin interface by navigating to http://localhost:8000/admin/ in your web browser.
5. You’ll be prompted to log in. Use the login credentials of the user you just created to log in.
6. You should now have access to the Django admin interface, where you can manage various aspects of your Django project.
7. After successfully logging in to the admin interface, you should see the admin dashboard resembling the following:
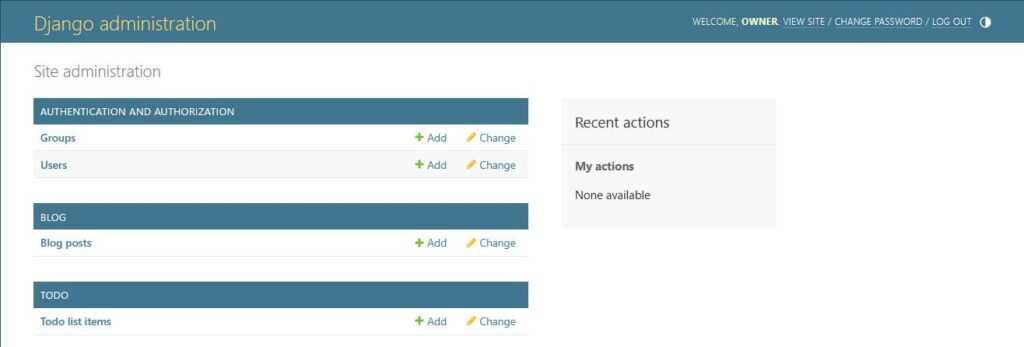
The admin dashboard typically provides an overview of the various models registered with the admin site, allowing you to perform CRUD operations and manage your Django project’s data effectively. From here, you can navigate through different sections to add, edit, or delete items as needed.
Create Blog Post
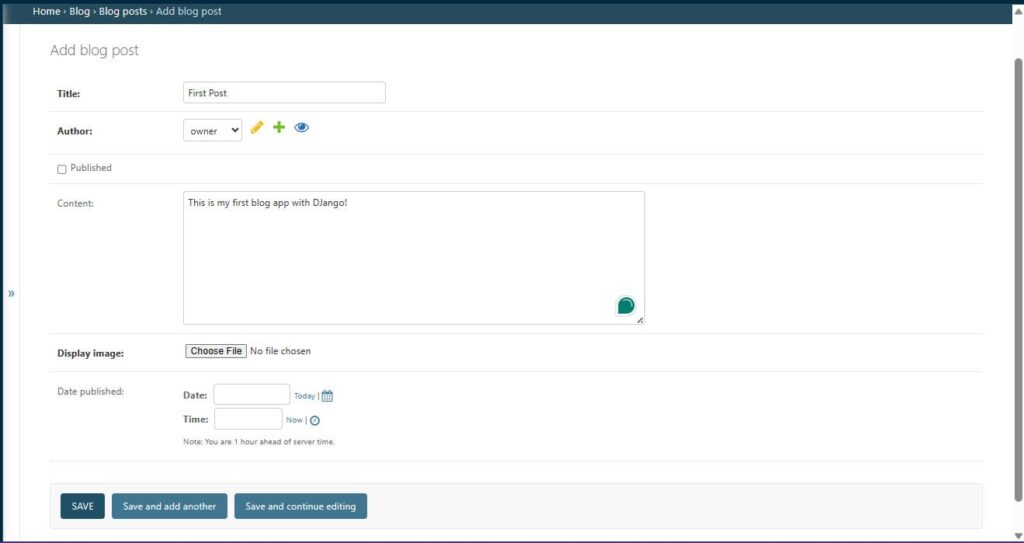
To create a blog post in the admin interface:
1. Navigate to the Blog Post section, typically located under a “Blog” or similar heading.
2. Click on the ‘+ Add’ button to create a new blog post.
3. Fill in the Title, Author, and Content fields with the relevant information for your blog post. You can leave the display image and publish date/time fields empty for now.
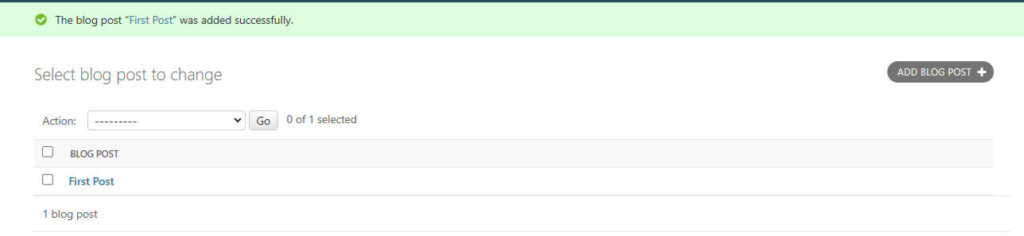
4. Once you’ve added the necessary information, click the “Save” button to save your blog post.
Your blog post should now be saved in the admin interface. You can further edit it later to add a display image or set a publish date/time if needed.
Customize Blog Admin
To customize the admin interface to display more information about blog posts and add additional functionality, follow these steps:
1. Open your ‘blog/admin.py’ file.
2. Create a Custom BlogPost Admin class as shown below:
from django.contrib import admin
from .models import BlogPost
from datetime import datetime
# Custom Admin InterFace for Blog Posts
class BlogPostAdmin(admin.ModelAdmin):
list_display = ['id', 'title', 'post_author', 'published', 'date_created']
search_fields = ['title', 'author']
list_filter = ['author', 'published', 'date_created']
list_display_links = ['title', 'post_author']
actions = ['publish_all_posts', 'unpublish_all_posts']
@admin.display(ordering="author__first_name")
def post_author(self, obj):
if obj.author.first_name:
return f'{obj.author.first_name} {obj.author.last_name}'
return obj.author.username
def save_formset(self, request, form, formset, change):
instances = formset.save(commit=False)
if not change:
for instance in instances:
instance.author = request.user
instance.save()
formset.save_m2m()
def publish_all_posts(self, request, queryset, **kwargs):
queryset.update(published=True, date_published=datetime.now())
return queryset
def unpublish_all_posts(self, request, queryset, **kwargs):
queryset.update(published=False, date_published=None)
return queryset
# Register your models here.
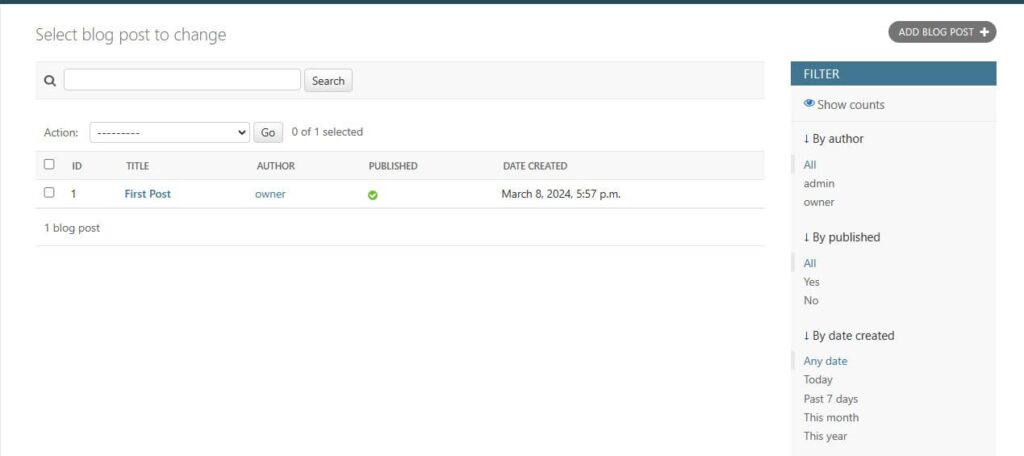
admin.site.register(BlogPost, BlogPostAdmin)In this Custom BlogPost Admin class:
- list_display: Specifies which fields to display in the list of blog posts in the admin interface.
- search_fields: Enables searching blog posts by title and author username.
- list_filter: Provides filtering options for blog posts by author and publishing state.
- actions: Defines custom actions for bulk operations on blog posts, such as publishing and unpublishing.
3. Save your changes to the ‘blog/admin.py’ file.
Now, when you navigate to the admin interface and view the list of blog posts, you should see more information displayed, including the author, published date, and publishing state. You can also use the search functionality and filtering options to find specific blog posts. Additionally, you can select multiple posts and use the “Publish selected posts” or “Unpublish selected posts” actions from the Actions dropdown list to manage the publishing state of your posts. Try using the “Publish All Posts” action to publish your first blog post.
Customize Admin Interface
To customize the appearance of your admin interface, including the site title, header, and index title, follow these steps:
1. Navigate to any admin.py file within your Django project.
2. Utilize the admin.site object to set the custom values for site_title, site_header, and site_index_title, as shown below:
- site_title: This represents the title displayed in the title bar of your browser.
- site_header: This represents the header displayed at the top of the admin interface.
- site_index_title: This represents the text displayed on the main/first page of the admin.
You can configure these attributes as follows:
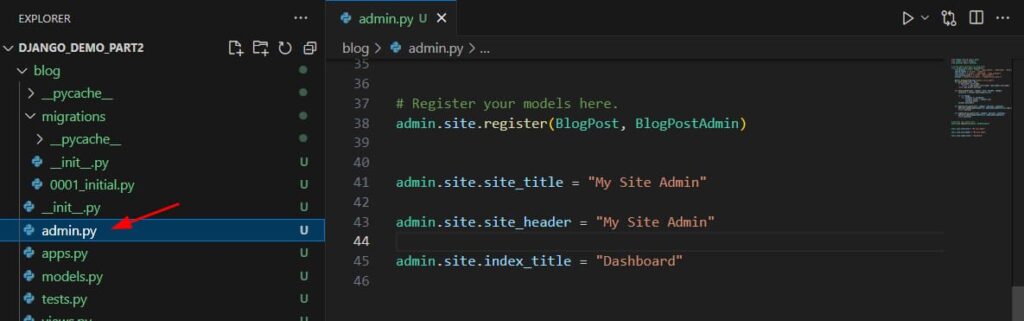
3. Save the changes to the admin.py file.
By setting these custom values, you can personalize the appearance of your admin interface according to your preferences. Remember that these values can be adjusted as needed, and you can set them from any admin.py file within your project.
Now your admin should be looking like this.

Implementing User Authentication
Implementing user authentication and authorization in Django is straightforward, as much of the functionality is provided by default. When you create your initial migrations, Django automatically generates three models for this purpose: User, Group, and Permissions.
Authentication is handled by the User model, which comes equipped with all the necessary fields for basic user authentication. Authorization, on the other hand, is managed through the Group and Permission models.
In Django’s authorization system, a group is essentially a collection of permissions, each with a descriptive name. Users who belong to a particular group inherit the permissions associated with that group.
Let’s consider a practical example: In our blog application, we may want to grant certain users the ability to write, view, and edit blog posts, while restricting them from performing other actions such as adding new users or modifying permissions. To achieve this, we can create a group called “Editors” and assign specific permissions to it. Then, when we need to designate multiple users as editors, we simply add them to the “Editors” group, streamlining the process of granting permissions.
Setting Up User Permissions and Roles
Having learned the concept of Authentication and Authorization, let’s go ahead and implement our editor role and add new editors to our blog, follow these steps:
1. Navigate back to the main page of your admin interface. You can do this either through the breadcrumb navigation bar at the top or the sidebar on the left.
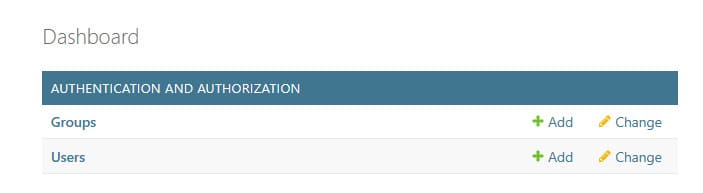
2. Locate the Authentication and Authorization app, which contains the necessary models for managing user permissions and groups. These models were automatically created by Django.
3. Click on the “+Add” button next to the Groups model. This action will take you to the group creation page, where you can define new user roles and groups.

4. On the group creation page, you’ll be prompted to provide a name for the new group. Enter a descriptive name for the role you want to create, such as “Editors”.
5. To add permissions to the group, click on the permissions you want to assign from the list of available permissions. Then, use the “->” arrow to move them to the “Chosen Permissions” list.
6. For the Editor role, you’ll likely want to grant permissions related to creating, viewing, and changing blog posts. Add the following permissions to the “Chosen Permissions” list:
- “Blog | Blog post | can add blog post”
- “Blog | Blog post | can change blog post”
- “Blog | Blog post | can view blog post”
7. Once you’ve selected the desired permissions, save the group.
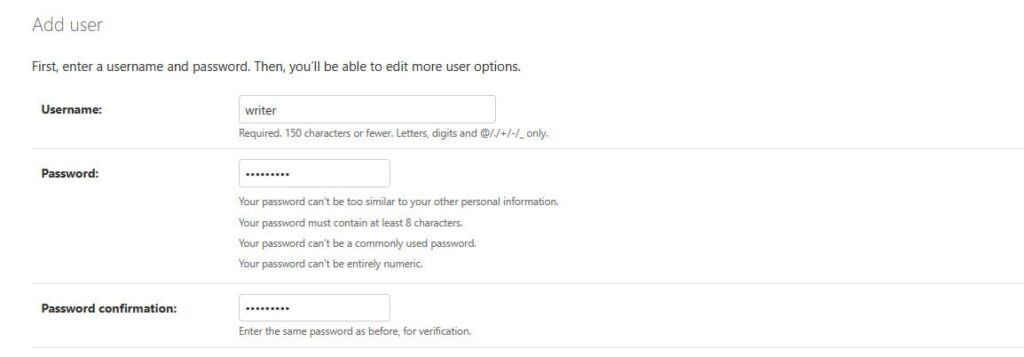
Create a Writer Blog User
Now, to create a new user to test out the Editor role:
1. Click on the “+Add” button next to the Users model in the Authentication and Authorization app.
2. Fill in the required information for the new user, such as username, and password.
After creating a new user, you’ll be directed to the user detail page, where you can make changes to the user’s information, assign them to groups, and add permissions. Follow these steps to configure the user:
1. Fill in the first name and last name fields with the appropriate information for the new user.
2. Make sure to select the “Staff Status” checkbox. This grants the user access to the admin interface.
3. Add the “Editors” group to the user’s chosen groups by selecting it from the available groups list and moving it to the “Chosen Groups” list.
4. Click the “Save” button to save the changes.
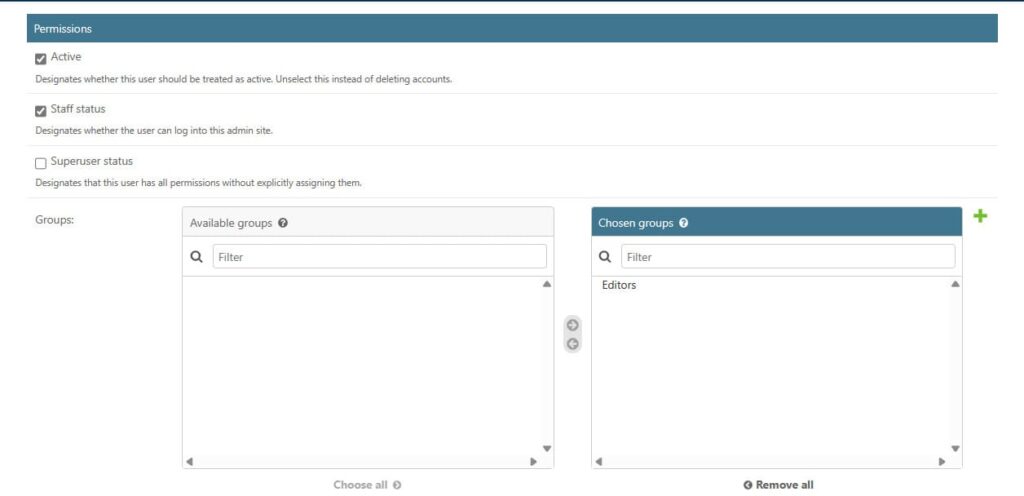
By completing these steps, you’ve configured the new user with the necessary information and assigned them to the “Editors” group, granting them the appropriate permissions for their role as an editor.
Now using the navbar at the top, Log out and log in again into the admin using the new user(the editor) you just created.

As you can see, this user only sees the Blogpost model and they’re only allowed to perform the operations we specified in their permission group (aka roles).
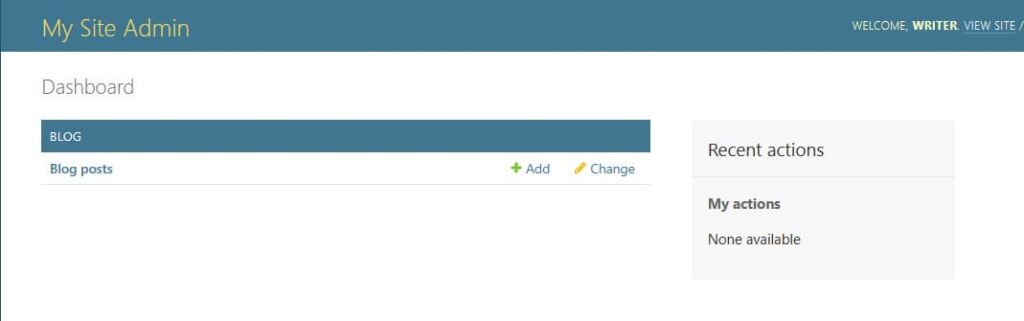
Feel free to create a new blog post or edit the content of the previous one.
While we’ve successfully developed a functional blog application, currently only admins or writers can access and read our blog. To address this, we need to implement templates and views for our blog app, allowing others to view and read our blog content.
Static Files Config(css, js and image assets)
In your settings.py, scroll down to where you find the STATIC_URL settings and add this code snippet like so:
Create Static Folder
1. Using File Explorer navigate to your project root directory and open blog app.
2. Inside the Blog folder create a new folder and name it static.
3. Open the static folder and create another folder named blog. This is where we placed all of our assets like CSS,JS and images.
4. Create three more folders inside blog. “css”, “js”, “img
Download Bootswatch
Now, let’s download bootstrap, I’m going to use a bootswatch template. To set it up, follow the steps below.
1. Go to the GitHub bootswatch repository.
2. Choose a theme that you want to use. In my case, I’ll choose cerulean.
3. Open your preferred theme and download the bootstrap.min.css.
4. Now, copy the downloaded files inside static » blog » css folder.
Your blog app structure should now look like this:
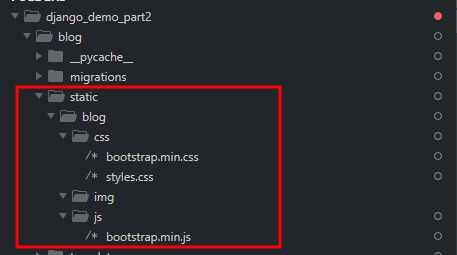
We’ve created a subfolder named “blog” within the “static” directory to accommodate multiple apps in our Django project, thus preventing file naming conflicts. Similarly, we’ve added another subfolder named “todo” for our other app. With this structure, we can easily reference our static files in the template like so:
<link rel="stylesheet" type="text/css" href="{% static 'blog/css/styles.css' %}">For the todo app, we can call the CSS files like this:
<link rel="stylesheet" type="text/css" href="{% static 'todo/css/styles.css' %}">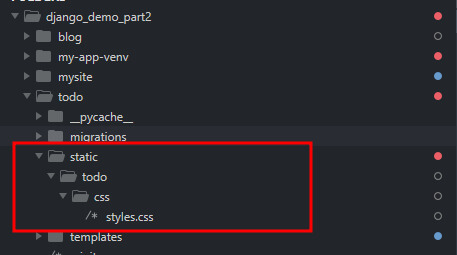
Create custom CSS
Create a new file “styles.css” inside CSS folder and add this code:
.post-image{
    width: 100%;
    height: 150px;
    margin-bottom: 10px;
}

.post-image .img{
    width: 100%;
    height: 100%;
}
Now, we are done with the assets dependency.
Create The Blog Templates
Now, before we proceed on creating our template let’s add the following app on our DJango project. Although this app comes pre-packaged with Django, it’s not automatically installed, requiring us to manually append its path to the list. To do that, open mysite » settings.py and look for INSTALLED_APPS config settings then add the following line.
'django.contrib.humanize',This app provides tools to help you make data more human-readable. This is all the default app in our INSTALLED_APPS settings, most of them are added during the creation of the app.
INSTALLED_APPS = [


    # your app and third party apps can also go here
    'todo',
    'blog',


    # django's default applications
    'django.contrib.admin',
    'django.contrib.humanize',
    'django.contrib.auth',
    'django.contrib.contenttypes',
    'django.contrib.sessions',
    'django.contrib.messages',
    'django.contrib.staticfiles',
]
Now we need to create a new template – this will be the base template from which “blog-list” and “blog-read.html” will inherit the styling and basic structure of our site from.
1. Base Template
This template contains the navigation menu and the header.
{% load static %}
<!DOCTYPE html>
<html>
<head>
  <meta charset="utf-8">
  <meta name="viewport" content="width=device-width, initial-scale=1">
  <link rel="stylesheet" type="text/css" href="{% static 'blog/css/bootstrap.min.css' %}">
  <link rel="stylesheet" type="text/css" href="{% static 'blog/css/styles.css' %}">
  <title> My Site | Blog </title>
</head>
<body>
    <nav class="navbar navbar-expand-lg navbar-dark bg-primary px-2">
        <a class="navbar-brand" href="#">DJango Demo(Blog App)</a>
        <button class="navbar-toggler" type="button" data-toggle="collapse" data-target="#navbarColor01" aria-controls="navbarColor01" aria-expanded="false" aria-label="Toggle navigation">
          <span class="navbar-toggler-icon"></span>
        </button>

        <div class="collapse navbar-collapse" id="navbarColor01">
          <ul class="navbar-nav mr-auto">
                <li class="nav-item">
                    <a class="nav-link" href="{% url 'admin:index' %}"> Admin Dashboard</a>
                </li>
                <li class="nav-item">
                    <a class="nav-link" href="{% url 'blog:home' %}"> All Blog Posts </a>
                </li>
        <li class="nav-item">
                    <a class="nav-link" href="/"> To-do App </a>
                </li>
          </ul>
        </div>
      </nav>


  <div class="container pt-3">
    {% block content %}{% endblock content %}
  </div>
  <script type="text/javascript" src="{% static 'blog/js/bootstrap.min.js' %}"></script>
</body>
</html>
Notice the {% static %} tag; this tag tells Django that you’re trying to load a static file and it helps you find the static file throughout your project directory. So {% static ‘blog/css/styles.css’ %} would be the same as “mysite/blog/static/blog/css/styles.css’ written in shorthand.
2. Blog List Template
Create another template file in “blog/templates” and save it as “blog-list.html”
{% extends 'base.html' %}
{% load humanize %}


{% block content %}
<div class="py-5">
    <h5> Recent Posts  {{ posts.count }} </h5>


    <div class="row">
    {% for post in posts %}
    <div class="col-sm-6 col-lg-4">
        <div class="card-body bg-white rounded-0 p-3 rounded border shadow">
            <div class="post-image">
                <img class="img" src="{{ post.display_image.url }}" />
            </div>


            <div>
                <h5> {{ post.title }} </h5>
                <small class="text-muted"> - {{ post.author.get_full_name|default:post.author|title }} </small>
                <p> {{ post.content|truncatewords:"10" }} </p>
                <a href="{% url 'blog:read' post.title %}" class="btn btn-primary"> Read More </a>
            </div>
        </div>
    </div>
    {% endfor %}
    </div>
</div>
{% endblock content %}
This template is responsible for displaying the list of blog posts.
Blog Read Template
Add another template in the same folder named “blog-read.html” and add the following code:
{% extends 'base.html' %}
{% block content %}

<div class="py-3">
    <h5 class="mb-3"> {{ post.title }} - By {{ post.author.get_full_name|default:post.author|title }} </h5>
    <img src="{{ post.display_image.url }}" class="w-100" style="height: 450px;">
    <p class="p-2"> {{ post.content }} </p>
</div>

{% endblock content %}
Using the {% extends %} template tag allows us to inherit the structure and static files (CSS and JavaScript) from the template we’re extending, akin to inheriting methods from a Python class.
When showcasing post content on the blog list page, we employ a filter called “truncatewords”. This filter is made available through the humanize app, which we’ve included in the installed apps. Additionally, we explicitly load it into the template file at the outset using the {% load %} tag. But what exactly is a filter, and how does it differ from a tag?
A tag is a special markup that performs specific functions within your template, enabling the usage of Pythonic logic as well.Conversely, a filter is a function applied to a template variable (values passed into the template context by the view, denoted as {{ var }}), altering the display of that variable. Filters are appended to a variable’s end using the vertical bar symbol ” | “, and they can be chained together. For instance: {{ user.first_name | title | truncatechars:"20" }}. The “truncateword” filter is utilized to exhibit a certain number of words from a larger collection, commencing from the start. You can envision it as crafting a concise description from the full one, appending an ellipsis (“…”) at the conclusion. This filter mandates an argument—the number of words to display—specified after a colon “:”. It’s recommended, though optional, to enclose the word count in double quotes.
Create Views
Now, let’s set up the views. The views handle rendering templates to display lists of blog posts and individual blog posts based on data retrieved from the BlogPost model. They utilize Django’s render function to render HTML templates with context data.
Open “blog/views.py” files and use the code snippet below.
from django.shortcuts import render
from .models import BlogPost

# Create your views here.
def blogpost_list_view(request):
    template = 'blog-list.html'
    blogposts = BlogPost.objects.all().exclude(published=False)
    context = {
        'posts': blogposts,
    }
    return render(request, template, context)

def blogpost_read_view(request, post_title):
    template = 'blog-read.html'
    blogpost = BlogPost.objects.get(title=post_title)
    context = {
        'post': blogpost,
    }
    return render(request, template, context)
The code above will render the blog-list.html template which will display the list of blogs we publish on our app and blog-read.html which is responsible for displaying specific blog post.
Handling Media Files (aka Uploaded files e.g png, pdf)
Now, we also need to handle uploaded files and make them available in our templates using Django’s static method, follow these steps:
Expose Upload Files
1. Open the “mysite/urls.py” file in your Django project.
2. Find the urlpatterns list in the file. It typically contains various URL patterns for your project.
3. Below the urlpatterns list, add the following code:
from django.conf import settings
from django.conf.urls.static import static

if settings.DEBUG:
    urlpatterns += static(settings.MEDIA_URL, document_root=settings.MEDIA_ROOT)
By adding this code, Django will serve uploaded files during development. This means that when you upload files using your Django application, they will be accessible through the URL specified in the MEDIA_URL setting.
4. Create the “uploads” Folder:
In your project root directory (where the “manage.py” file is located), create a new folder named “uploads”. This is where the uploaded files, like post display images, will reside.
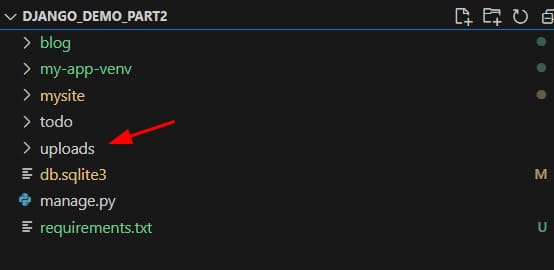
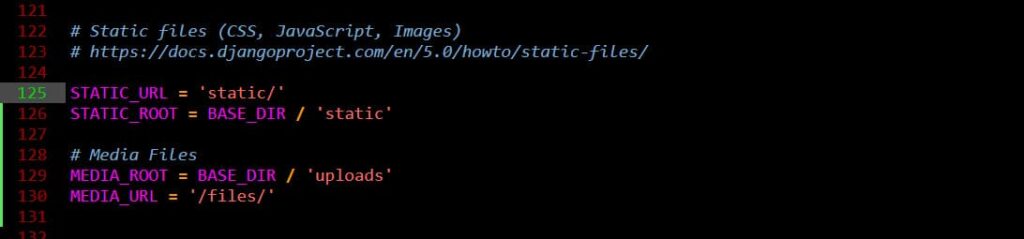
Now, to make Django aware of this folder, and also tell it which URL route we want our uploaded files available at; in your “mysite/settings.py” add this code – just beneath the Static Files settings:
- The BASE_DIR variable always points to your project root (the folder where “manage.py” is)
- The MEDIA_ROOT variable should point to your uploads folder (or whatever you named the uploads folder as)
- The MEDIA_URL variable tells Django what URL path to serve uploaded files at – in this case http://localhost:8000/files/.
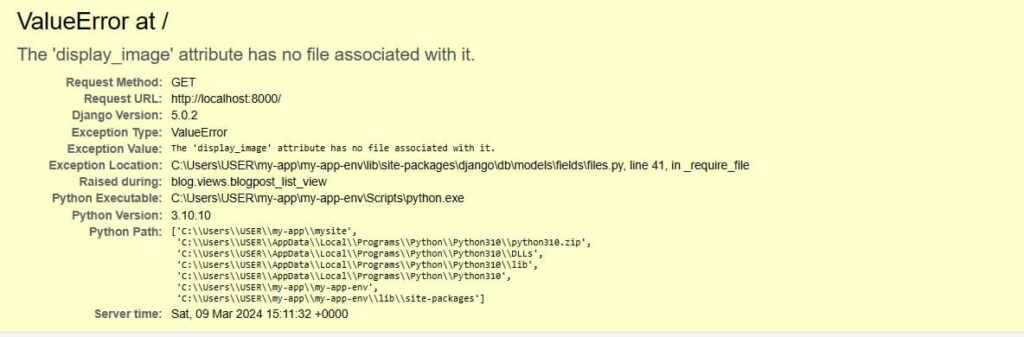
At this point, you can head back to the BlogPosts in the Admin and add /upload the display images for each of your blog posts:

Always remember to set the display image for a post before you publish it; If you try to view your site without setting a display image for any published post you will see an error like this one:
Making The Blog Public
To make our blog accessible to users, we need to create a routing pattern for our blog. To do that, follow these steps:
1. Create urls.py in the blog app:
Create a new file named “urls.py” inside the “blog” app directory. You can find the “blog” app directory within your Django project structure. If it doesn’t exist, create it.
In the "blog/urls.py" file, add the following code snippet:
from django.urls import path
from .views import (
    blogpost_list_view,
    blogpost_read_view,
)

app_name = 'blog'

urlpatterns = [
    path('', blogpost_list_view, name="home"), # ie blog:home blog/
    path('read/<post_title>/', blogpost_read_view, name="read"), # ie blog:read -> ex: blog/My First Post
]
2. Configure Nested Routing in mysite/urls.py:
Now, in your main “mysite/urls.py” file, add a nested route configuration to the urlpatterns list for the blog app. Make sure the namespace corresponds with the app_name defined in the "blog/urls.py" file.
Here’s how your “mysite/urls.py” file should look like:
urlpatterns = [
    path('admin/', admin.site.urls),
    path('blog/', include('blog.urls', namespace='blog'))
]
This configuration sets up the routing pattern for the blog app. Any URL starting with “/blog/” will be routed to the URLs defined in the “blog/urls.py” file.
The Blog in Action
At this point, you can run your server; go to your terminal and run the runserver management command.
py manage.py runserverIf you visit your application at http://localhost:8000/ you should still see your todo application, but if you change the URL to ‘/blog/’ i.e http://localhost:8000/blog/ you should see your blog application showing up like this:
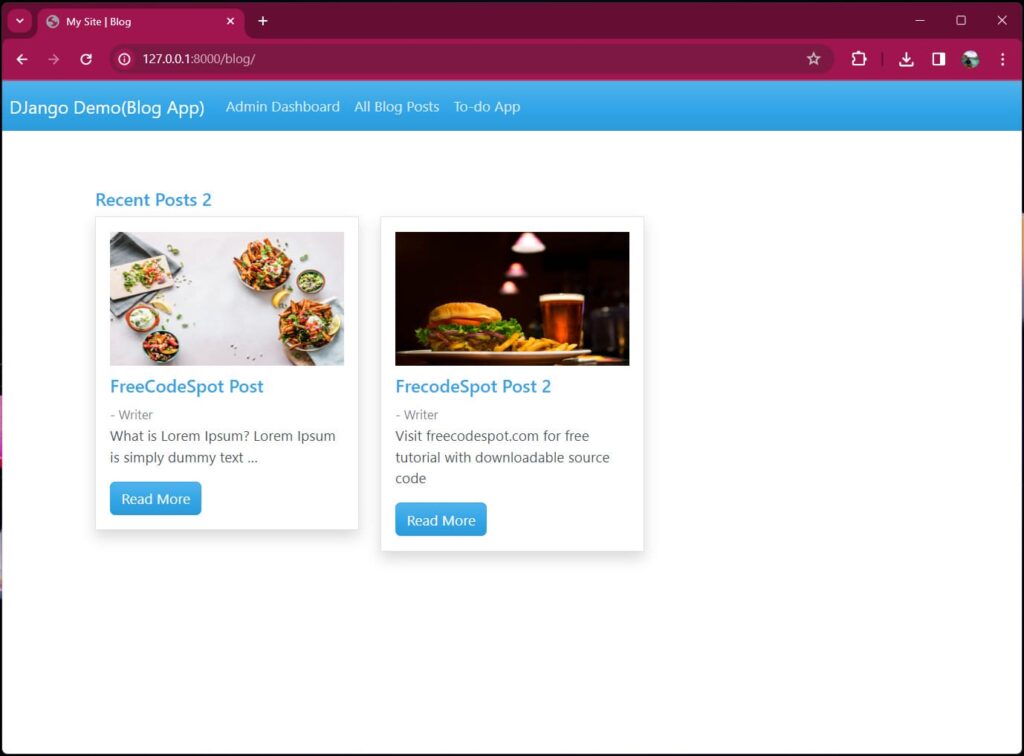
If you want your blog app to show up on the base route when you visit http://localhost:8000; you can remove/comment out the todo URL router from the main router in “mysite/urls.py” and change the blog path from “blog/” to an empty string like so:
urlpatterns = [
    path('admin/', admin.site.urls),
    path('todo/', include('todo.urls', namespace='todo')),
    path('', include('blog.urls', namespace='blog'))
]
Or you can retain the base URL() set to open the todo app by default and add the blog app URL menu on the todo app.
urlpatterns = [
    path('admin/', admin.site.urls),
    path('', include('todo.urls', namespace='todo')),
    path('blog/', include('blog.urls', namespace='blog'))
]
Navigate to todo app and open index.html inside templates folder. Add a menu with the blog app route by using the code snippet below.
 <li class="nav-item">
                    <a class="nav-link" href="{% url 'blog:home' %}">Blog App</a>
                </li>
Now, when you open http://localhost:8000, it will still open the todo app but with the Blog App menu.
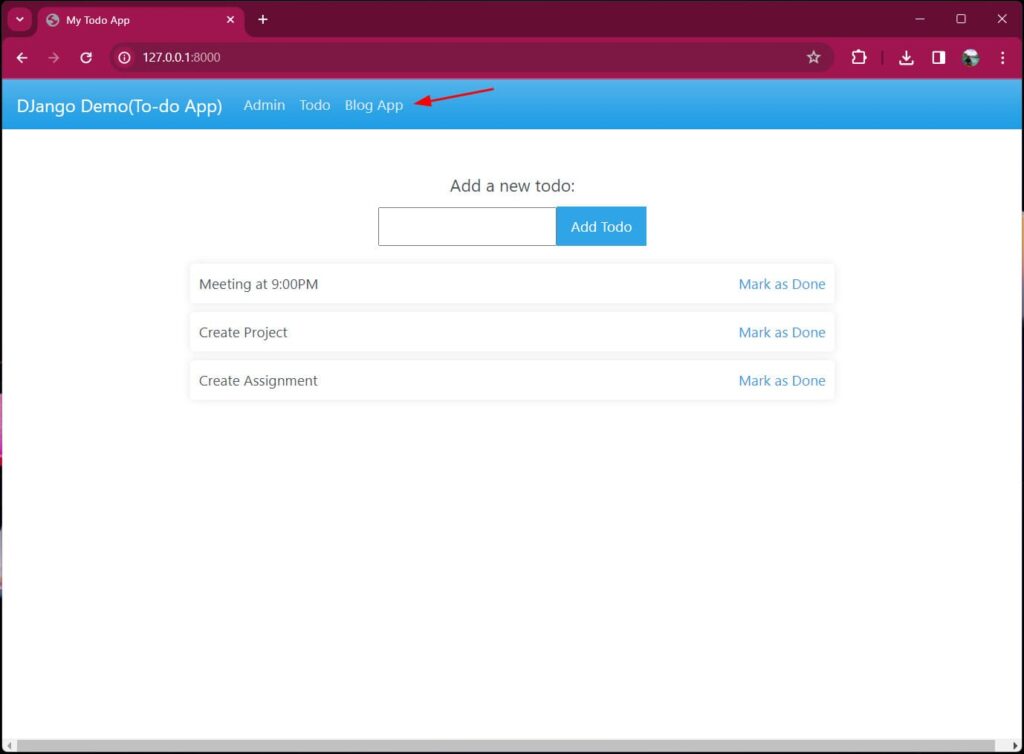
All you need to do now is click on the Blog App menu and you will be redirected to the http://localhost:8000/blog/ url.
Also, edit your “blog/urls.py” and change the “read” URL to look like this:
urlpatterns = [
    path('', blogpost_list_view, name="home"), # ie blog:home blog/
    path('read/<post_title>/', blogpost_read_view, name="read"), # ie blog:read -> ex: blog/My First Post
]
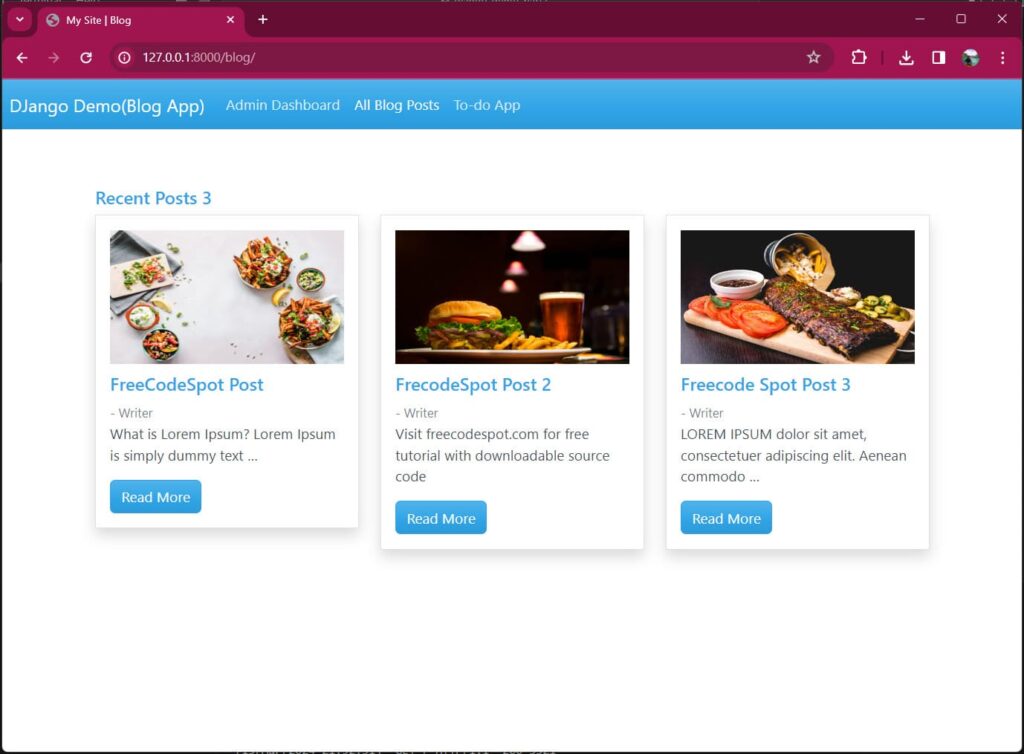
Now when you go to http://localhost:8000/; your blog app should be loaded up immediately, and handling your routes.
Download Source Code
You may download the source code from GitHub. Don’t forget to follow us for more tutorials like this.
After you download the source code switch to Django-Tut-Part-3 branch. To view the latest source code for this tutorial.
Here’s a video for reference:
Summary
In this tutorial, We’ve covered exploring URL Structures, Static files, and Media files in Django, we also dabbled in the Django Admin; We explored the Django Authentication and Authorization systems, and Finally, we learn how we can manage static files and media Files.
In the next tutorial, we’ll see how to run tests in Django and how to deploy our Application to a server over the internet and make it accessible to others.