

In this article, we explore the basics of React, focusing on fundamental concepts like lists, forms, and effective state management in React. Understanding the complexity of these core concepts is essential for any React developer looking to improve their skills.
I. Rendering Lists and Using Keys in React
In React, developers use lists to display a group of things simultaneously. They utilize the map() method to create these lists, and React primarily serves to efficiently render multiple components. It is crucial to use the key attribute correctly to avoid repetition while coding and achieve optimal performance. React uses keys to help identify and track changes, additions, or removals of items within its components. Assign keys to elements within a list to provide them with a stable identity.
const nums = [2, 5, 7, 3, 1];
const listItems = nums.map((num, index) => (
 	<li> key={index}>{num}</li>
 ));
After declaring the array nums, we introduce and use a map function to iterate over each element of the array. For each element, it returns a new list item element (<li>). In this case, we use the key attribute to assign a unique identifier to each list item. In this scenario, that identifier is the index. The content of the list item is the numeric value from the array.
1. Understanding the Importance of Lists in UI Development
Lists are a fundamental way of creating dynamic and interactive user interfaces. This can be done by enabling dynamic rendering of elements based on the data. As explained above, React allows one to map over an array of data. This creates a component for each item, making it easy to handle dynamic content.
Creating components for each item facilitates the efficient reuse of components. This approach enables the encapsulation of logic and styling within the component, promoting a modular and reusable code structure.
React’s virtual DOM and its ability to perform efficient updates make working with lists more optimized. It updates only necessary parts after comparing the virtual DOM with the real DOM thereby minimizing performance bottlenecks. React lists offer a powerful and flexible method for managing and presenting dynamic data in UIs. This capability proves particularly useful in conjunction with forms, enabling users to input data for multiple items and facilitating conditional rendering based on the data. You can apply various styles, show or hide elements, and trigger specific actions based on the properties of each list item.
2. Rendering Dynamic Lists of Data in React
As earlier discussed, we have seen that the map() function is a powerful tool for rendering lists in React. Now, in React, rendering dynamic lists of data is a common task. The process involves mapping over an array of data and creating React components for each item in the array.
To begin, define a React component representing an individual item in the list to create a component for list items. This component can receive data as props and render it
import React from 'react'

 const ListItem = ({item }) => {
 	return (
         <li>{item}</li>
 	);
 }

 export default ListItem;
After creating the component, integrate it into the list component. It creates another component for the list itself. It uses it to map over the array of data, rendering the ListItem component for each item.
// ListComponent.js
 import React from 'react';
 import ListItem from './ListItem';

 const ListComponent = ({ data }) => {
 	return (
     	<ul>
         	{data.map((item, index) => (
             	<ListItem key={index} item={item} />
     	    ))}
     	</ul>
 	);
 }

 export default ListComponent;
Lastly, use the ListComponent in the main component and pass the dynamic array of data.
// MainComponent.js
 import React from 'react';
 import ListComponent from './ListComponent';

 const MainComponent = () => {
     const dynamicData = ['Item 1', 'Item 2', 'Item 3'];
 	return (
     	<div>
         	<h2>Dynamic List Example</h2>
         	<ListComponent data={dynamicData} />
     	</div>
 	);
 }

 export default MainComponent;
Whenever the dynamicData array changes, React will efficiently update the rendered list.
3. Exploring the Role of Keys for Efficient List Rendering
In React, assign the key prop as a special attribute to elements within arrays. This provides each element with a stable identity. The key attribute uniquely identifies a component instance in the list, helping React optimize re-rendering by recycling existing components. For example, in a list of items with each item component having a unique key. React can keep track of each item even if the order of the items changes.
Unlike other props in React, the key prop isn’t accessible in the component’s props object. React strictly employs it to track changes within lists. The key prop is a critical tool in React’s optimization strategy, especially during reconciliation. React relies on these keys to determine removals, changes, and the order of the items. Or it would be harder for React to determine which elements have changed if the unique key is missing. This can lead to suboptimal updates, reducing the overall performance of the application.
Additionally, React may mismatch elements, potentially leading to tricky-to-debug bugs. And could also lead to incorrect data.
II. Handling Forms in React
In form handling, you actively manage data when it undergoes a change in value or when it is submitted. React uses forms to allow users to interact with the web page. Forms play a crucial role in user interactions within web applications. And React provides a wide range of tools for efficiently managing form elements. We will explore the complexity of handling forms in React. Covering the creation of controlled components, managing form states, and implementing user input validation and submission. Here is an example of how react handles forms using useState Hook to keep track of each input value:
import { useState } from 'react';
import ReactDOM from 'react-dom/client';

function MyForm() {
  const [name, setName] = useState("");

  return (
    <form>
      <label>Enter your name:
        <input
          type="text"
          value={name}
          onChange={(e) => setName(e.target.value)}
        />
      </label>
    </form>
  )
}
1. Creating Controlled Components for Form Elements:
A controlled component is a component where form elements derive value from a React state. It ensures that the React state is the single source of truth for form elements. When a component is controlled, the value of form elements is stored in a state. Any changes made to the value are immediately reflected in the state.
This concept stores the component’s value in the state, which makes it easy to access and manipulate it as needed. This makes implementing features like form validation, input masking, and complex form interactions easier.
To create a controlled component, you need to use the value prop to set the value of form elements. And the onChange event to handle changes made to the value.
The value prop sets the initial value of a form element. While the onChange event is triggered whenever the value of a form element changes. Inside the onChange event, you need to update the state with the new value using a state update function. The example below shows a React form that utilises useState hooks from the React library. This initialises a state variable inputValue and a corresponding function setInputValue which is a function to update the inputValue later.
See the script below:
import { useState } from "react";

 export default function controlledComponent() {
 	const [inputValue, setInputValue] = useState("");

 	const handleChange = (event) => {
         setInputValue(event.target.value);
 	};
 	return (
     	<form>
         	<label>
             	Input Value:
             	<input type="text" value={inputValue} onChange={handleChange} />
      	   </label>
         	<p>Input Value: {inputValue}</p>
     	</form>
 	);
 }
An event handler function named handleChange is defined. It is responsible for updating the inputValue state based on the user’s input. It is attached to the onChange event of the input field. The return statement contains JSX that renders a form with a labeled input field. The input field is a controlled component, as its value attribute is directly tied to the inputValue state. This means that the React state controls the input field’s value. The onChange event of the input field is set to the handleChange function. Ensuring that any user input triggers the state update.
2. Managing Form state and handling user input
Managing form states within a controlled component in a react form involves using state. This controls the values of the form elements. This also ensures that React is the single source of truth for the form’s state.
From the example below, we can observe how the form states are managed in a controlled component.
import React, { useState } from 'react';

 function ControlledForm() {
   // Step 1: Initialize State
   const [formData, setFormData] = useState({
 	username: '',
 	password: '',
   });

   // Step 2 & 3: Bind Input Values to State and Handle Change Events
   const handleChange = (event) => {
 	setFormData({
   	...formData,
   	[event.target.name]: event.target.value,
 	});
   };

   // Step 4: Implement Form Submission
   const handleSubmit = (event) => {
 	event.preventDefault();
 	// Access form data from the state (formData) for further processing/validation. You can either implement a client-side validation or send data to a server
 	console.log('Form submitted with data:', formData);
   };

   return (
   	<form onSubmit={handleSubmit}>
       	{/* Step 2: Bind Input Values to State */}
       	<label>
           	Username:
     	{/* Step 3: Handle Change Events */}
     	<input type="text" name="username" value={formData.username} onChange={handleChange} />
   	</label>
   	<label>
         Password:
     	<input type="password" name="password" value={formData.password} onChange={handleChange} />
   	</label>
   	{/* Step 4: Implement Form Submission */}
   	<button type="submit">Submit</button>
 	</form>
   );
 }

 export default ControlledForm;
Firstly, the useState hook is used to initialize state variables for each form field. The values of the form are then bound to their respective state variables and handle state events. The form data from the state is then accessible for additional processing. Which can include client-side validation or data transmission to a server.
3. Validating and Submitting forms in React Applications
Validating and submitting forms ensures that user input meets certain criteria or constraints before submitting the form data. This process helps maintain data integrity and improves the overall user experience. Here’s a general guide on how you can approach validating and submitting forms in React.See the example below for reference:
3.1 Form State and User Input
Form State Management in React: Utilize React state such as useState hook to manage the form data. For example:
const [formData, setFormData] = useState({
 	username: '',
 	password: '',
   });
Input Change Handling: Implement event handlers to update the form state as their user inputs data.
const handleChange = (event) => {
 	setFormData({
   	...formData,
   	[event.target.name]: event.target.value,
 	});
   };
3.2 Form Validation
In the example above example, form validation was not implemented so, we are going to implement it in this step
Define Validation Rules: Specify rules for each form field (e.g., required, minimum length, pattern).
const validateForm = () => {
 	const errors = {};
 	if (!formData.fieldName.trim()) {
     	errors.fieldName = 'Field is required';
 	}
 	return errors;
 }
Display Validation Errors: Show error messages based on the validation results
const errors = validateForm();
 // Inside the render or return JSX
 {errors.fieldName && <p className="error">{errors.fieldName}</p>}
3.3 Form Submission
Handle Form Submission: Implements a function to handle the form submission
const handleSubmit = (event) => {
 	event.preventDefault();
 	const errors = validateForm();

 	if (Object.keys(errors).length === 0) {
     	// Proceed with form submission
     	console.log('Form submitted with data:', formData);
     	// You may want to send data to the server or perform further validation
 	} else {
     	// Display validation errors or take appropriate action
     	console.error('Form validation failed')
 	}
 };
Submit Button: Connect the ‘handleSubmit’ function to the form’s submit button.
<form onSubmit={handleSubmit}>
 	{/* Form fields and input elements */}
 	Button type="submit">Submit</button>
 </form>
3.4 Visual Feedback
Provide Feedback: Optionally, give users feedback on successful submissions or validation errors.
III. Lifting State Up for Better Management
Lifting state up is a process that involves moving state management in React from child components to a common ancestor, which is the parent component. It is a common pattern that React developers use to share state between multiple components.
If you have multiple components that need to share the same state or when the state of a child component needs to be controlled by a parent component. We can lift the state up to the closest common ancestor of those components.
A basic example to illustrate the concept is:
Suppose you have a parent component ‘Parent’ and two child components ‘ChildA’ and ChildB’. Both ‘ChildA’ and ‘ChildB’ need access to the same piece of state:
//Parent.js
 import React, {useState } from 'react';
 import ChildA from './ChildA';
 import ChildB from './ChildB';

 function parent() {
 	const [sharedState, setSharedState] = useState('');

 	return (
     	<div>
         	<ChildA sharedState={sharedState} setSharedState={setSharedState}
         	<ChildB sharedState={sharedState} setSharedState={setSharedState}
     	</div>
     );
 }

 export default Parent;


//ChildA.js
 import React from 'react';

 function ChildA({ sharedState, setSharedState }) {
 	const handleChange = (e) => {
     	setSharedState(e.target.value);
 	};

 	return (
     	<div>
         	<label>ChildA: </label>
         	<input type="text" value={sharedState} onChange={handleChange} />
     	</div>
 	);
 }

 export default ChildA;

//ChildB.js
 import React from 'react'

 function ChildB({ sharedState }) {
 	return (
     	<div>
         	<p>ChildB: {sharedState}</p>
     	</div>
 	);
 }
1. Exploring Challenges with State Management in React with Larger Applications
As discussed in the earlier modules, we can see that State is a powerful feature that allows components to be dynamic and interactive. By managing the state, changes in a React application can be tracked. And components can be rendered based on the current state. However, there are some challenges in managing the state of components. Ensuring that the state is consistent and predictable in larger applications. Here are some common challenges associated with state management in larger applications:
- Complex State Structures: A complex state can lead to bugs that are hard to track down and fix. It can make your application harder to understand and maintain
- Global State vs. Local State: Deciding whether to use global state management solutions like Redux, MobX, context API, or local state within components can be challenging. Choosing the right approach depends on the application’s size, structure and requirements.
- State Synchronization: Keeping different parts of the application in sync when they rely on the same or related state can be challenging as inconsistencies in the state can lead to bugs and unexpected behaviour.
- Performance Concerns: Inefficient state management can result in performance issues, especially in larger applications. Frequent updates to the state, unnecessary re-renders, and excessive data retrieval can impact performance.
Predicting State Changes: Predicting how changes to one part of the state may affect other parts can be challenging. Unintended side effects or cascading updates might occur, leading to bugs that are hard to trace.
These are some of the challenges with state management in larger applications. Some other challenges faced are testing, concurrency and asynchronous operations, refactoring challenges, debugging and documentation which are also direct consequences of larger applications in React.
2. Lifting State to Parent Components for Improved Control
Lifting state up to parent components is a pattern in React where you manage the state in a higher-level component and pass it down to child components as props. This pattern provides improved control over the application state especially when dealing with shared or independent state across multiple components.
In lifting the state up, the first thing to do is identify the piece of state that is shared among multiple components. Or that affects the behaviour of those components. After the state is identified, it is to be lifted to the nearest common ancestor of the components that need access to it. This component becomes the new owner of the state. Next is to pass the state and any necessary callback functions as props to the child components that need access to the state and then, handle the state updates and notifications in the common ancestor. The changes will propagate down to the child components through props.
For example:
// ParentComponent.js
 import React, { useState } from 'react';
 import ChildComponent1 from './ChildComponent1';
 import ChildComponent2 from './ChildComponent2';

 function ParentComponent() {
   const [sharedState, setSharedState] = useState('');

   const handleStateChange = (newValue) => {
 	setSharedState(newValue);
   };

   return (
 	<div>
   	<ChildComponent1 sharedState={sharedState} onChange={handleStateChange} />
   	<ChildComponent2 sharedState={sharedState} />
 	</div>
   );
 }


// ChildComponent1.js
 import React from 'react';

 function ChildComponent1({ sharedState, onChange }) {
   const handleChange = (e) => {
 	onChange(e.target.value);
   };

   return (
 	<div>
   	<input type="text" value={sharedState} onChange={handleChange} />
 	</div>
   );
 }


 // ChildComponent2.js
 import React from 'react';

 function ChildComponent2({ sharedState }) {
   return (
 	<div>
   	<p>Shared State: {sharedState}</p>
 	</div>
  );
}
In the example above, ParentComponent manages the shared state and ChildComponent1 and ChildComponent2 receive the state as props. When the input in ChildComponent1 changes, it notifies the parent, which then updates the shared state, leading to automatic updates in ChildComponent2.
3. Implementing Effective State Management Strategies in React
There are several strategies to handle state in React and the choice depends on the complexity of your application and your specific requirements. Some state management techniques are
3.1 Evolving the React State Management using functional components. Historically, React components relied on class-based state management. The introduction of hooks marked a paradigm shift, enabling functional components to manage state and side effects, fostering cleaner and modular code. Before hooks, functional components were stateless and couldn’t access these features. Hooks allow functional components to have local state, lifecycle methods, and more, making them more powerful and eliminating the need for class components in many cases.
3.2 Context API for Global State. React context provides a way to share values like state across components without passing them through props and it is suitable for low to medium-complexity applications.
const ContextExample = React.createContext();

 function App() {
 	return (
     	<ContextExample.Provider value ={{ /* your state */ }}>
         	<MyComponent />
     	</ContextExample.Provider>
 	);
 }

function MyComponent() {
 	const contextValue = useContext(ContextExample);
 }
3.3 Redux for Predictable State. Redux is a powerful state management library for JavaScript applications and it’s widely used in React projects. It helps in maintaining a predictable state container, especially in larger applications where managing state across components can become complex. It enforces a unidirectional data flow and provides a central store to manage the application state
To install it on your workspace, run
npm install redux react-redux
// Define actions, reducers, and store
 const increment = () => ({ type: 'INCREMENT' });

 const counterReducer = (state = 0, action) => {
   switch (action. type) {
 	case 'INCREMENT':
   	return state + 1;
 	default:
   	return state;
   }
 };

 const store = createStore(counterReducer);

 // Connect your component to the Redux store
 const MyComponent = () => {
   const count = useSelector(state => state);
   const dispatch = useDispatch();

   return (
 	<div>
   	<p>Count: {count}</p>
   	<button onClick={() => dispatch(increment())}>Increment</button>
 	</div>
   );
};
IV. Working sample project and Best Practices
Applying the concepts of list rendering, form handling, and state lifting in real-world scenarios. Here’s a step-by-step guide to create a user login system using React, integrating components, state, props, and event handling:
1. Set Up Your React Project:
Create a new React project using Create React App:
npx create-react-app list-formThen navigate to the project directory and start the server:
cd list-formnpm startThis is the default React page. To close the server, run Ctrl+c.
2. Clear the content of App.js and replace the content with this:
import React, { useState } from 'react';
import './App.css';

// Sample data for rendering a list
const initialItems = [
  { id: 1, name: 'Item 1' },
  { id: 2, name: 'Item 2' },
  { id: 3, name: 'Item 3' },
];

function App() {
  const [items, setItems] = useState(initialItems);
  const [formData, setFormData] = useState({ name: '' });

  const handleChange = (e) => {
	setFormData({ ...formData, [e.target.name]: e.target.value });
  };

  const handleSubmit = (e) => {
	e.preventDefault();
	const newItem = { id: Date.now(), name: formData.name };
	setItems([...items, newItem]);
	setFormData({ name: '' });
  };

  return (
	<div className="App">
  	<h1>React List, Form, and State Management Demo</h1>

  	{/* Rendering Lists and Using Keys */}
  	<ul>
    	{items.map(item => (
      	<li key={item.id}>{item.name}</li>
    	))}
  	</ul>

  	{/* Handling Forms in React */}
  	<form onSubmit={handleSubmit}>
    	<input
      	type="text"
      	name="name"
      	value={formData.name}
      	onChange={handleChange}
      	placeholder="Enter item name"
    	/>
 	   <button type="submit">Add Item</button>
  	</form>

  	{/* Lifting State Up for Better Management */}
  	<ParentComponent />
	</div>
  );
}

// Parent component to demonstrate lifting state up
function ParentComponent() {
  const [counter, setCounter] = useState(0);

  const incrementCounter = () => {
	setCounter(counter + 1);
  };

  return (
	<div>
  	<h2>Counter: {counter}</h2>
  	<ChildComponent incrementCounter={incrementCounter} />
	</div>
  );
}

// Child component receiving function as props
function ChildComponent({ incrementCounter }) {
  return (
	<button onClick={incrementCounter}>Increment Counter</button>
  );
}

export default App;
Let’s break down the code and explain it step by step:
- We import necessary modules from React, including useState for managing component state. We also import a CSS file (App.css) for styling. We initialize a sample list of items (initialItems) using an array of objects with id and name properties.
- Functional Component App(): We define our main functional component App().Inside, we use the useState hook to define two state variables: items to manage the list of items, and formData to manage form data. We use handleChange to handle changes in form input and update the form data state, and handleSubmit to add a new item to the list when the form is submitted.
- Rendering Lists and Using Keys: We use the map() function to render each item in the items array as an <li> element. We ensure each <li> element has a unique key attribute, which is important for React’s efficient rendering of lists.
- Handling Forms in React: We render a simple form with an input field for adding new items.The input field is a controlled component, meaning its value is controlled by React state (formData.name), and changes are handled by the handleChange function.
- Lifting State Up for Better Management: We define a parent component (ParentComponent) and a child component (ChildComponent). The parent component manages a counter state (counter) using useState. The parent component passes down a function (incrementCounter) as a prop to the child component. When the button in the child component is clicked, it calls the incrementCounter function provided by the parent to update the counter state.
3. Replace the content of App.css file with the code below
.App {
  text-align: left;
  margin-top: 35px;
  margin-left: 15px;
  font-family: system-ui, -apple-system, BlinkMacSystemFont, 'Segoe UI', Roboto, Oxygen, Ubuntu, Cantarell, 'Open Sans', 'Helvetica Neue', sans-serif;
  width: 45%;
}

form {
  margin-bottom: 20px;
}

input {
  padding: 8px;
  margin-right: 10px;
}

button {
  padding: 8px 16px;
  background-color: #c88901;
  color: #fff;
  border: none;
  cursor: pointer;
}

button:hover {
  background-color: #056713;
}

h2 {
  margin-top: 30px;
}

ul {
  list-style: none;
  padding: 0;
}

li {
  margin-bottom: 5px;
}
4. Run “npm start” in your terminal.
You should be able to render both the Parent Component and the Child Component. See the image below.
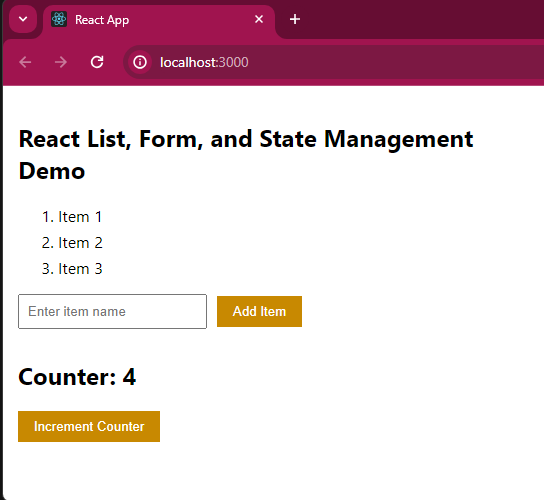
Download Source Code
You can download the source code from GitHub. Don’t forget to follow us for more tutorials like this.

Understanding React components, comprehending state and props, and grasping event handling.
Conclusion
In conclusion, exploring Lists, Forms, and State Management in React is essential for developing dynamic and agile online apps. These fundamental concepts enable developers to quickly handle dynamic information, optimize user interactions through well-designed forms, and manage state to provide a better user experience.
Keep Coding!