
In this article we will be implementing authentication and authorization with IdentityServer4 in a .NET Core application. IdentityServer4 is a powerful, open-source framework for building secure identity solutions in .NET applications. It enables developers to implement authentication and authorization using industry-standard protocols such as OAuth 2.0 and OpenID Connect.
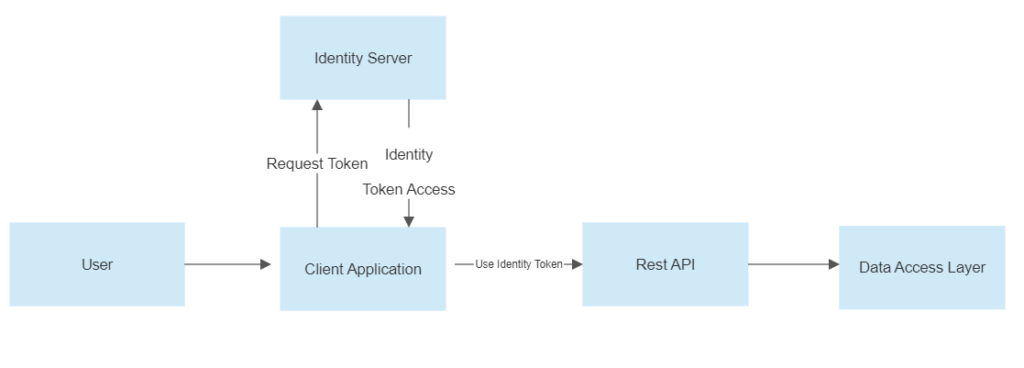
To be able to understand how IdentityServer works, we will create a WEB API Application, an Identity Server Application, and a Client App to consume the methods from the API and use the Identity Server to Authenticate the user.
What is an Identity Server?
IdentityServer is an authentication server that implements OpenID Connect (OIDC) and OAuth 2.0 standards for ASP.NET Core. It serves as a centralized authentication provider that can be used to secure multiple APIs. Consider that you have Three APIs or microservices. The authentication logic does not need to be created in every application. Instead, you can use IdentityServer4 to centralize Access Control and have the Central IdentityServer secure all APIs.
Before we begin, make sure you have the following installed on your development machine:
- .NET Core 6.0 SDK
- Visual Studio or Visual Studio Code (optional but recommended)
- SQL Server
- SQL Server Management Studio
If you already have this on your machine, you can skip this part and move to the second step.
Tutorial Overview:
This is the overall flow of how we will implement authentication and authorization with IdentityServer4
If you want to use the Source Code from this tutorial, Check out this video to run the migration and run a full simulation of Identity Server 4 in .Net 6.0
I. Create IdentityServer4 Project
We will start with a new ASP.NET Core and use this new project to setup authentication and authorization with IdentityServer4 in .NET Core.
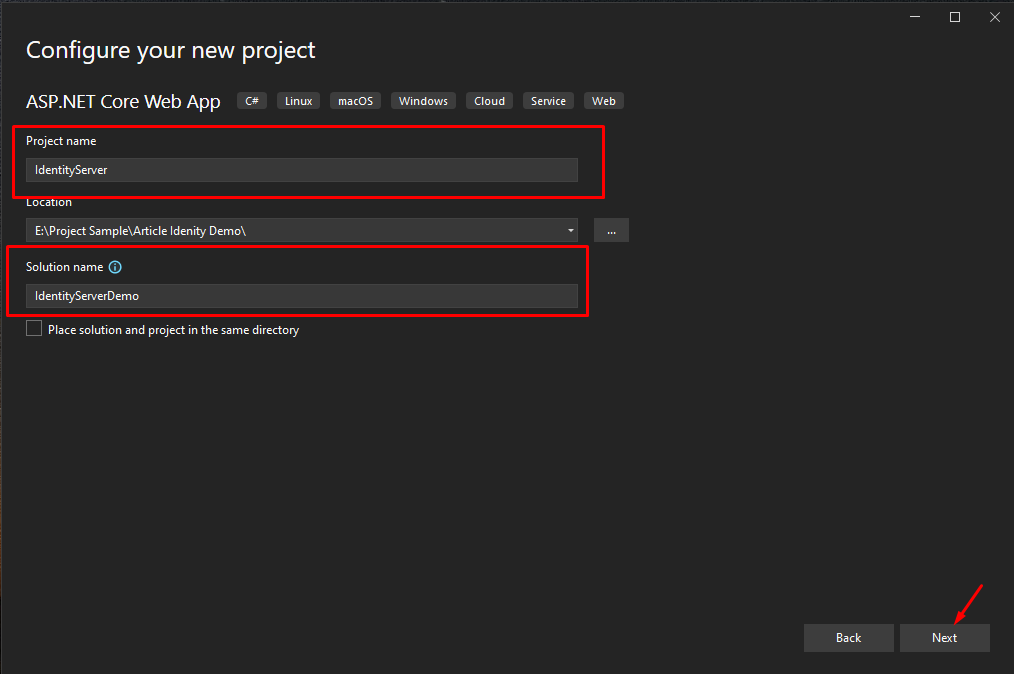
1. Create a new ASP.NET Core Web Application
- Select File > New > Project.
- Select ASP.NET Core Web App. Name the project IdentityServer to have the same namespace as my project and name the solution IdentityServerDemo. Click Next.
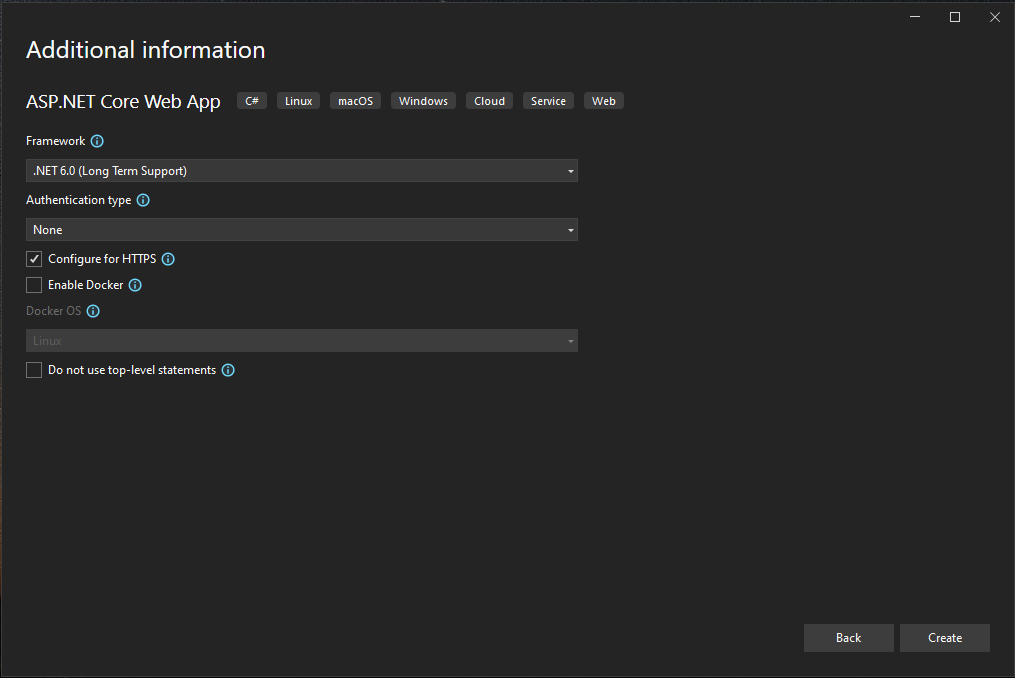
- On the next window, select the .NET 6.0 Framework and check Configure for HTTPS option.
- Lastly, Click on Create.
2. Install IdentityServer4 NuGet packages
Let’s install the required NuGet packages for IdentityServer 4. To do that, Open Manage Nuget Packages in Visual Studio and install the following packages.
    <PackageReference Include="IdentityServer4" Version="4.1.2" />
    <PackageReference Include="IdentityServer4.AspNetIdentity" Version="4.1.2" />
    <PackageReference Include="IdentityServer4.EntityFramework" Version="4.1.2" />
    <PackageReference Include="Microsoft.AspNetCore.Authentication.OpenIdConnect" Version="6.0.11" />
    <PackageReference Include="Microsoft.AspNetCore.Components.Authorization" Version="6.0.11" />
    <PackageReference Include="Microsoft.AspNetCore.Identity.EntityFrameworkCore" Version="6.0.11" />
    <PackageReference Include="Microsoft.AspNetCore.Identity.UI" Version="6.0.11" />
    <PackageReference Include="Microsoft.EntityFrameworkCore.SqlServer" Version="7.0.0" />
    <PackageReference Include="Microsoft.EntityFrameworkCore.Tools" Version="7.0.0">
3. Configure SQL Server Connection
3.1 Add your SQL Server connection string in Appsettings.json
"ConnectionStrings": {
"DefaultConnection": "Data Source=SQL Server Name;Initial Catalog=Database Name;Integrated Security=True;Connect Timeout=30;Encrypt=False;TrustServerCertificate=False;ApplicationIntent=ReadWrite;MultiSubnetFailover=False"
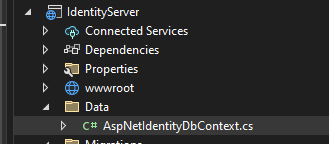
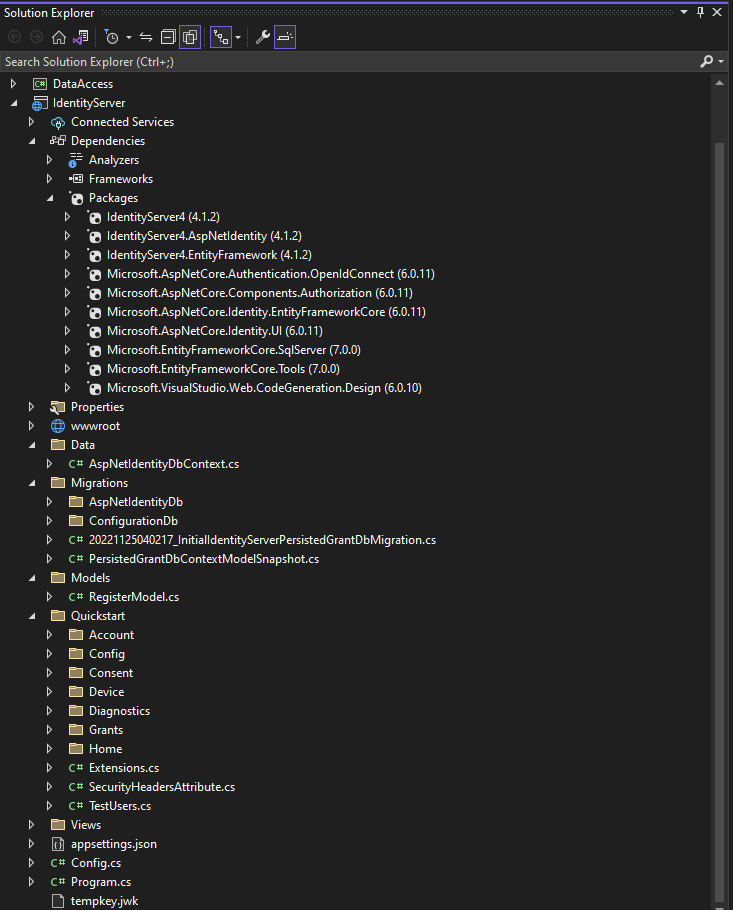
}3.2 Now, create DBContext for our Identity server application. Create a folder and create an ASPNETIdentityDbContext class.
  public class AspNetIdentityDbContext : IdentityDbContext
    {
        public AspNetIdentityDbContext(DbContextOptions<AspNetIdentityDbContext> options) : base(options) { }

    }
In my case, I created a folder named Data. See the image below.
3.3 Register the AspNetIdentityDbContext and Add the Identity on your startup.cs. If you use .NET Core 6.0, configure it in program.cs. Add the following code after the CreateBuilder method.
var assembly = typeof(Program).Assembly.GetName().Name;
var defaultConnString = builder.Configuration.GetConnectionString("DefaultConnection");

builder.Services.AddDbContext<AspNetIdentityDbContext>(options =>
    options.UseSqlServer(defaultConnString,
         b => b.MigrationsAssembly(assembly)));

builder.Services.AddIdentity<IdentityUser, IdentityRole>()
    .AddEntityFrameworkStores<AspNetIdentityDbContext>();
DefaultConnection » This is the connection string we added in appsettings.json file
4. Create Indenity Framework Migration Script
Now, create a migration file for the identity. This step will create a script for the default tables needed for the Identity.
4.1 Open Package Manager Console and execute the following command.
Package Manager Console location:
Menu » Tools » Nuget Package Manager » Package Manager Console
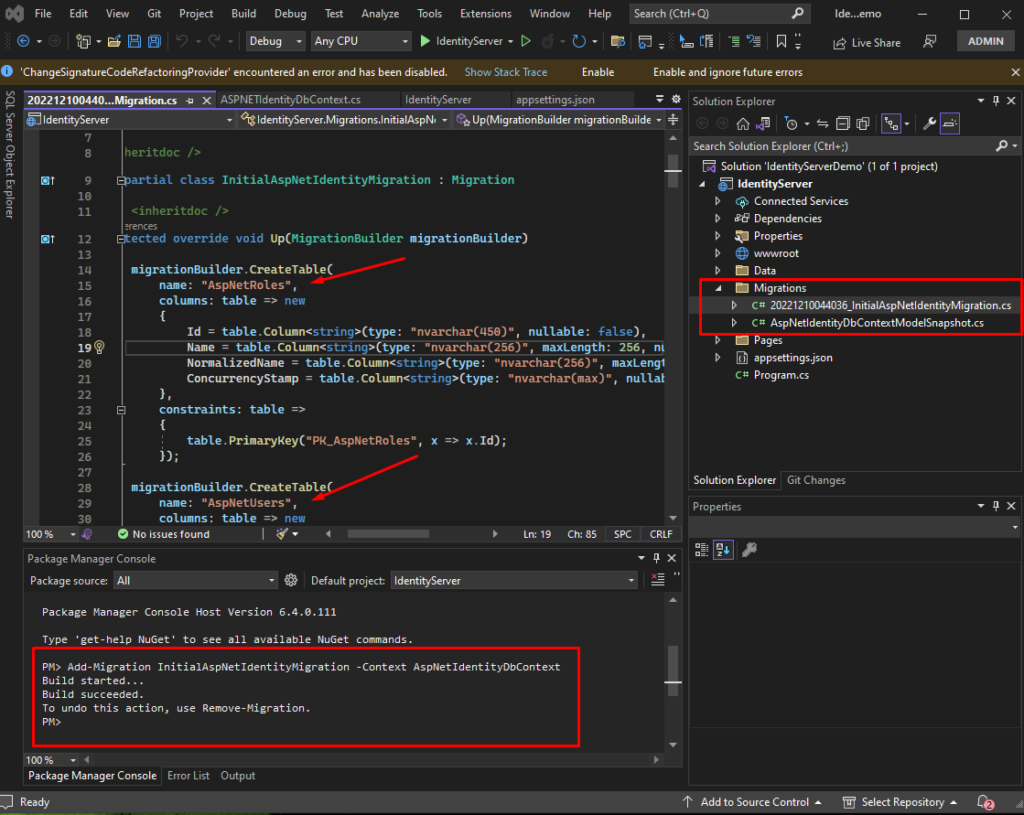
Add-Migration InitialAspNetIdentityMigration -Context AspNetIdentityDbContextAfter you execute the command above, you will see a Migrations folder on your solution. When you open the file, you will notice a SQL script of the tables created once we run the update-database command. See the image below.
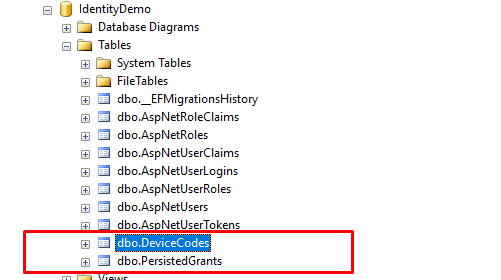
4.2 Now, execute the command below to run the migration file we created in the previous step.
Update-Database -Context AspNetIdentityDbContext4.3 Once done, open your SQL Server and verify if the tables were created. See the image below.
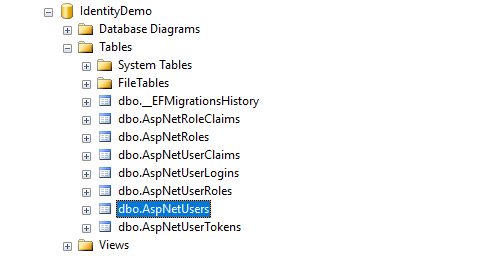
For this tutorial, we only use the AspNetUser table for login authentication.
5. Configure IdentityServer in Program.cs and Create IdentityServer Tables
After the Identity Framework configuration, it’s time to add IdentityServer4 to our application. To do that, we need to add the following line to our program.cs, to configure the stores we need for IdentityServer to work.
For more information on Configuring the stores you may refer to the official website from here.
builder.Services.AddIdentityServer()
    .AddAspNetIdentity<IdentityUser>()
    .AddConfigurationStore(options =>
    {
        options.ConfigureDbContext = b => b.UseSqlServer(defaultConnString, opt => opt.MigrationsAssembly(assembly));
    })
    .AddOperationalStore(options =>
    {
        options.ConfigureDbContext = b => b.UseSqlServer(defaultConnString, opt => opt.MigrationsAssembly(assembly));
    })
    .AddDeveloperSigningCredential();
5.1 Add the above line after the CreateBuilder method.
5.2 Then add the code snippet below after builder.Build() was called.
app.UseIdentityServer();
Now, we are ready to add the Identity Server Migration file. This step will create the default tables needed for the configuration of IdentityServer.
5.3 To do that, navigate back to the Package Manager Console and then execute the commands below one by one.
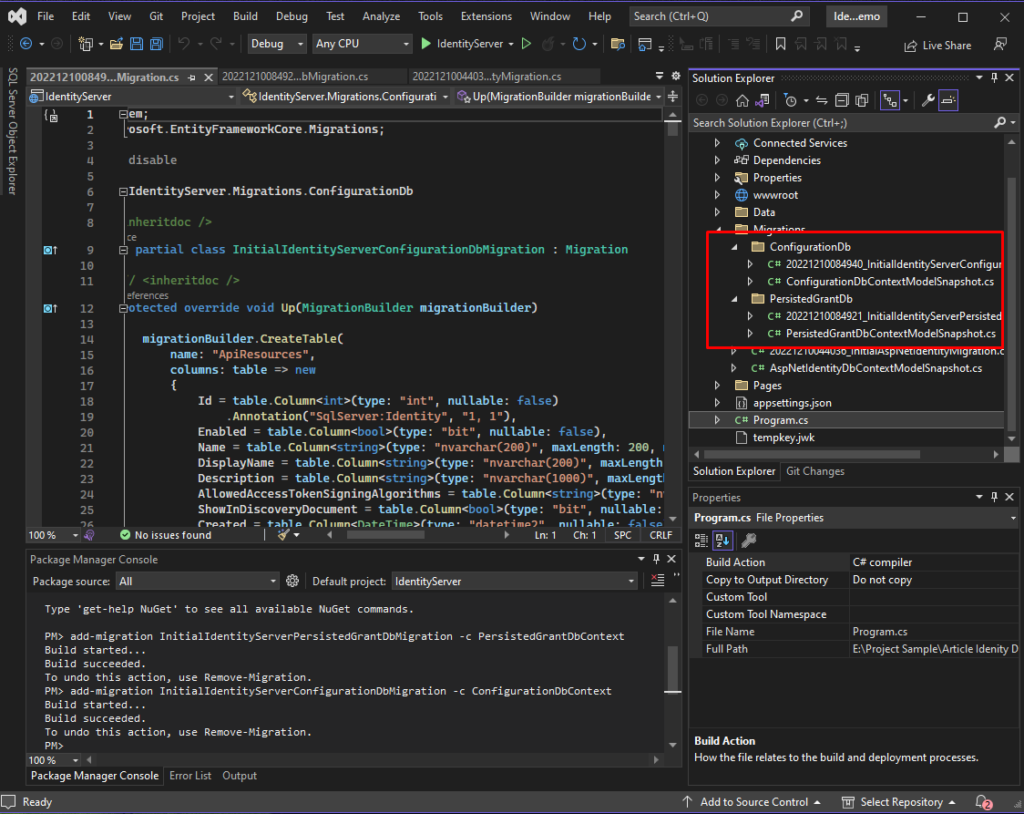
add-migration InitialIdentityServerPersistedGrantDbMigration -c PersistedGrantDbContext
add-migration InitialIdentityServerConfigurationDbMigration -c ConfigurationDbContext
If you have successfully executed the command above, you will notice a new file was created inside the Migrations folder. See the image below.
5.4 We can then create the tables by executing the command below. Run the commands one by one.
update-database -Context PersistedGrantDbContext
update-database -Context ConfigurationDbContext
After each command, you can check the database to observe what table is created. See the images below.
update-database -Context PersistedGrantDbContext
update-database -Context ConfigurationDbContext
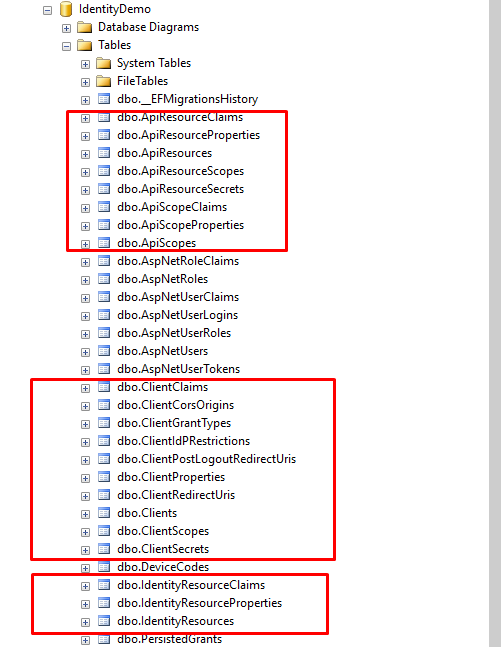
This time, we have all the necessary tables for the IdentityServer configuration. If you observe a bunch of tables created, we will focus only on the tables that have something to do with IdentityServer configuration.
6. Configure Clients, Identity Resources, and Users
Now, let’s add IdentityServer4 Configuration.
6.1 Create a Config.cs class and add the following code snippet. In my case, I added the file directly from my solution root directory.
I get this config source code from the docs.Identityserver.io website. You can add a custom configuration here, but for this tutorial, we will use the default config given by the official website of Identity Server.
The script below adds the Identity Resources
public static IEnumerable<IdentityResource> GetIdentityResources()
        {
            return new List<IdentityResource>
            {
                new IdentityResources.OpenId(),
                new IdentityResources.Profile(),
            };
        }
Use the scripts below to Add Scopes
        public static IEnumerable<ApiScope> ApiScopes =>
           new[] { new ApiScope("api1"), };
Adding API Resources
        public static IEnumerable<ApiResource> GetApis()
        {
            return new List<ApiResource>
              {
                  new ApiResource("api1", "My API")
              };
        }
Adding Clients
Now, let’s add the client app, make sure to point the redirect URI to your client web app URL. You can replace the port number with the local port that you currently use in your project.
                RedirectUris = { "https://localhost:7088/signin-oidc" },
                PostLogoutRedirectUris = { "https://localhost:7088/signout-callback-oidc" },
The script below shows how to configure an actual client on Indentity Server. I added two clients: the API and a client web app.
public static IEnumerable<Client> GetClients()
        {
            return new List<Client>
        {
            new Client
            {
                ClientId = "client",

                // no interactive user, use the clientid/secret for authentication
                AllowedGrantTypes = GrantTypes.ClientCredentials,

                // secret for authentication
                ClientSecrets =
                {
                    new Secret("secret".Sha256())
                },

                // scopes that client has access to
                AllowedScopes = { "api1" }
            },

            new Client
            {
                ClientId = "ro.client",
                AllowedGrantTypes = GrantTypes.ResourceOwnerPassword,

                ClientSecrets =
                {
                    new Secret("secret".Sha256())
                },
                AllowedScopes = { "api1" }
            },

            new Client
            {
                ClientId = "mvc",
                ClientName = "MVC Client",
                AllowedGrantTypes = GrantTypes.Code,

                ClientSecrets =
                {
                    new Secret("secret".Sha256())
                },

                RedirectUris           = { "https://localhost:7088/signin-oidc" },
                PostLogoutRedirectUris = { "https://localhost:7088/signout-callback-oidc" },

                AllowedScopes =
                {
                    IdentityServerConstants.StandardScopes.OpenId,
                    IdentityServerConstants.StandardScopes.Profile,
                    "api1"
                },

                AllowOfflineAccess = true,
                RequirePkce = true,
            }
         };
        }
The Script below is the complete code snippet on my Config.cs file. You can also look at the source code at the end of this tutorial.
 public static class Config
    {
        public static IEnumerable<IdentityResource> GetIdentityResources()
        {
            return new List<IdentityResource>
            {
                new IdentityResources.OpenId(),
                new IdentityResources.Profile(),
            };
        }

        public static IEnumerable<ApiScope> ApiScopes =>
           new[] { new ApiScope("api1"), };


        public static IEnumerable<ApiResource> GetApis()
        {
            return new List<ApiResource>
        {
            new ApiResource("api1", "My API")
        };
        }

        public static IEnumerable<Client> GetClients()
        {
            return new List<Client>
        {
            new Client
            {
                ClientId = "client",

                // no interactive user, use the clientid/secret for authentication
                AllowedGrantTypes = GrantTypes.ClientCredentials,

                // secret for authentication
                ClientSecrets =
                {
                    new Secret("secret".Sha256())
                },

                // scopes that client has access to
                AllowedScopes = { "api1" }
            },
            // resource owner password grant client
            new Client
            {
                ClientId = "ro.client",
                AllowedGrantTypes = GrantTypes.ResourceOwnerPassword,

                ClientSecrets =
                {
                    new Secret("secret".Sha256())
                },
                AllowedScopes = { "api1" }
            },
            // OpenID Connect hybrid flow client (MVC)
            new Client
            {
                ClientId = "mvc",
                ClientName = "MVC Client",
                AllowedGrantTypes = GrantTypes.Code,

                ClientSecrets =
                {
                    new Secret("secret".Sha256())
                },

                RedirectUris           = { "https://localhost:7088/signin-oidc" },
                PostLogoutRedirectUris = { "https://localhost:7088/signout-callback-oidc" },

                AllowedScopes =
                {
                    IdentityServerConstants.StandardScopes.OpenId,
                    IdentityServerConstants.StandardScopes.Profile,
                    "api1"
                },

                AllowOfflineAccess = true,
                RequirePkce = true,
            }
         };
        }
    }
7. Execute IdentityServer Config and Add IdentityServer Template UI
At this moment, we are almost done setting up our Identity Server application. One last thing to do is to run this configuration file we created in the previous step. This process will generate an entry to the IdentityServer tables, which are the scopes and clients we added to the Config.cs.
One way to make this happen is to create a seeder that will execute this config on the first run of our application. You can refer to this link docs.identityserver.io.
In this tutorial, I will directly inject my seeder inside our program.cs file. This way the config will be executed once we run our project.
7.1 Add the script below after the builder.Build() method was called.
#region Initialized Database
using (var serviceScope = app.Services.GetService<IServiceScopeFactory>().CreateScope())
{
serviceScope.ServiceProvider.GetRequiredService<PersistedGrantDbContext>().Database.Migrate();
var context = serviceScope.ServiceProvider.GetRequiredService<ConfigurationDbContext>();
context.Database.Migrate();
if (!context.Clients.Any())
{
foreach (var client in Config.GetClients())
{
context.Clients.Add(client.ToEntity());
}
context.SaveChanges();
}
if (!context.IdentityResources.Any())
{
foreach (var resource in Config.GetIdentityResources())
{
context.IdentityResources.Add(resource.ToEntity());
}
context.SaveChanges();
}
if (!context.ApiScopes.Any())
{
foreach (var resource in Config.ApiScopes.ToList())
{
context.ApiScopes.Add(resource.ToEntity());
}
context.SaveChanges();
}
if (!context.ApiResources.Any())
{
foreach (var resource in Config.GetApis())
{
context.ApiResources.Add(resource.ToEntity());
}
context.SaveChanges();
}
}
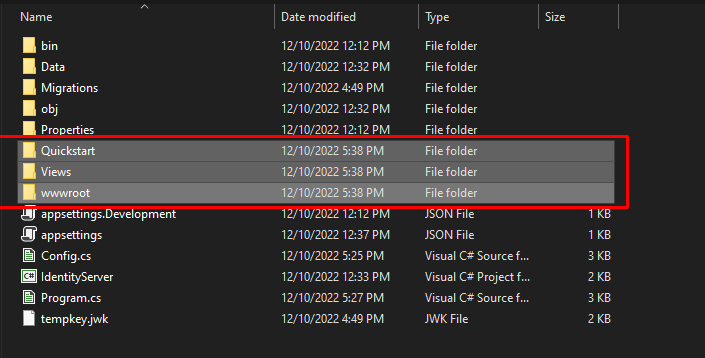
#endregion7.2 Now, before we run our application. Let’s add the Identity Server UI from the GitHub Repository.
You can download IdentityServer4.Quickstart.UI from this repository and copy and override the file from your project. See the image below.
7.3 Then, add this to your program.cs file. This step will register the default Controller route. See the code below.

8. Run the Project(IndentityServer)
Now, run the application. This is how the Identity Server UI looks in the browser. See the image below.
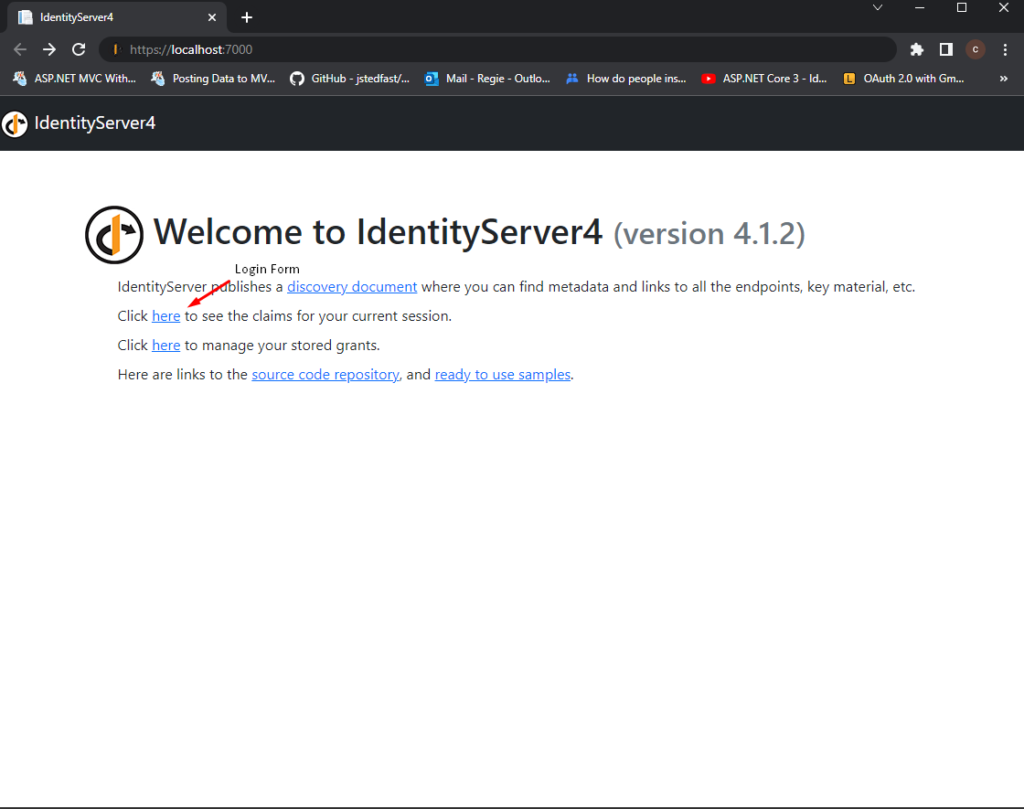
To view all Identity server configuration, navigate to this URL.
https://localhost:7000/.well-known/openid-configurationIf you remember, we added the IdentityServer seeder to our program.cs, this will be initialized on the first load of our application. To check if this is adequately executed, you can navigate to your SQL Server and use the following query to check all the entries you added on Config.cs.
Select * from [dbo].[IdentityResources]
Select * from [dbo].[ApiScopes]
Select * from [dbo].[ApiResources]
SELECT * FROM [dbo].[Clients]
Select * from [dbo].[ClientScopes]
Select * from [dbo].[ClientRedirectUris]
Select * from [dbo].[ClientPostLogoutRedirectUris]
Later, if you change the configuration, you can update these tables. Especially for ClientRedirectURis, this is where you set the client URL, which we will create later in this tutorial.
II. Create Data Access Class Library Project
This step will create a class library project containing all the SQL queries we need for this tutorial. To do that, follow the steps below.
1. Create a new Class Library project and name it DataAccess. This project will contain the entities and DB Context we need for this sample rest API.
2. Install the following nugget packages.
 <PackageReference Include="Microsoft.EntityFrameworkCore.SqlServer" Version="7.0.0" />
 <PackageReference Include="Microsoft.EntityFrameworkCore.Tools" Version="7.0.0">
3. Delete the sample class and create a new folder, Data and Entities.
- Data » contains the DB Context that we will create later
- Entities » Contains model properties.
4. Navigate to the Data folder and create a new class AppDBContext. Then, copy the code snippet below.
    public class AppDBContext : DbContext
    {
        public AppDBContext(DbContextOptions<AppDBContext> options) : base(options) {  }
        public DbSet<User> users { get; set; }
    }
5. Next, create a model property inside the Entities folder. In my case, I named it User. Below are the properties I used.
    public class User
    {
        public int Id { get; set; }
        public string UserName { get; set; }
        public string Address { get; set; }
        public string Contact { get; set; }
    }
6. Add the DataAccess Library to the API project as a reference dll. To do that, right-click on Dependencies and choose Add Project Reference.
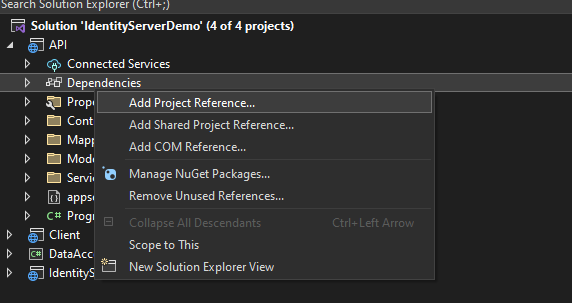
7. Then choose the project dll you want to associate with our API project. Which, in this case, is the DataAccess project.
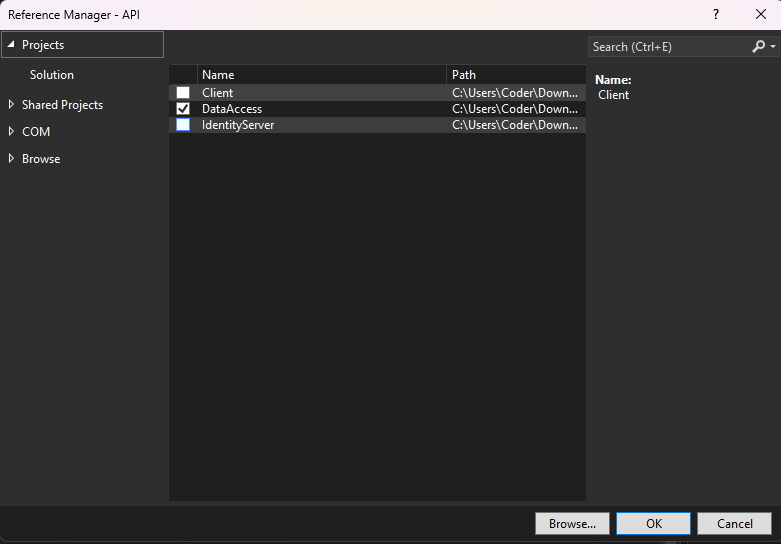
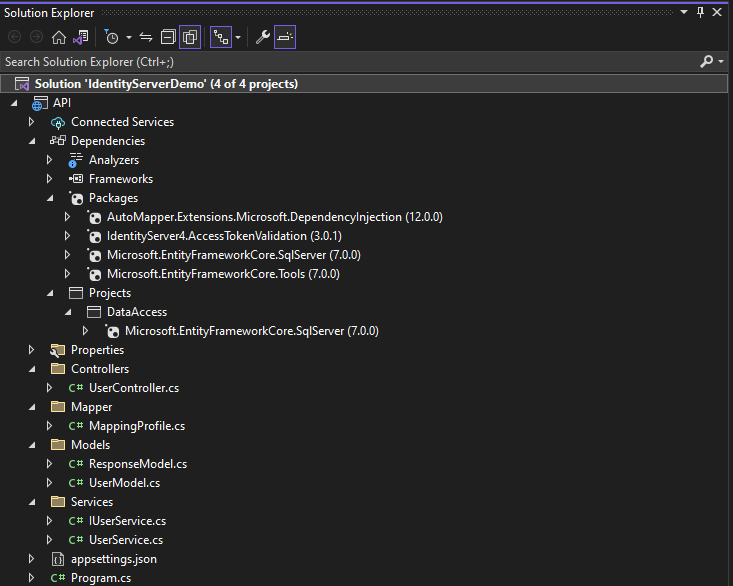
Now, DataAccess project is connected to the API project.
Project Solution:

III. Create ASP.NET Core Web API
Now, create a new ASP.NET Core Web API project. We will secure this API project with the IdentityServer we created above. That means if a client accesses this API, it should use the Identity Server login to get an access token, which can be utilized to access the method from this API.
Follow the steps below to create the project.
- Right-click on your solution explorer > Add > New Project.
- Select ASP.NET Core Web API. Name the project API to have the same namespace as my project. Click Next.
- On the next window select the .NET 6.0 Framework and check Configure for HTTPS option.
- Lastly, Click on Create.
Configure Web API project
1. Add the following NuGet packages
  <PackageReference Include="AutoMapper.Extensions.Microsoft.DependencyInjection" Version="12.0.0" />
   <PackageReference Include="IdentityServer4.AccessTokenValidation" Version="3.0.1" />
   <PackageReference Include="Microsoft.EntityFrameworkCore.SqlServer" Version="7.0.2" />
   <PackageReference Include="Microsoft.EntityFrameworkCore.Tools" Version="7.0.2">
2. Open project appsettings.json and add an entry for the SQL connection string. See the code snippet below.
  "ConnectionStrings": {
    "DefaultConnection": "Server=myServerAddress;Database=myDataBase;User Id=myUsername;Password=myPassword;"
  }
3. To use this connection string, open program.cs and add the following line.
builder.Services.AddDbContext<AppDBContext>(options =>
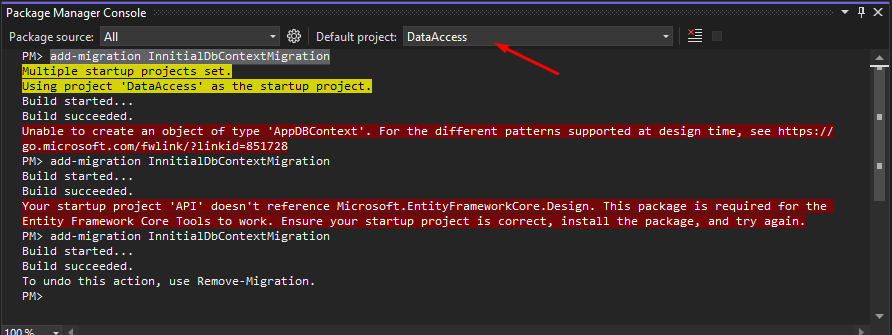
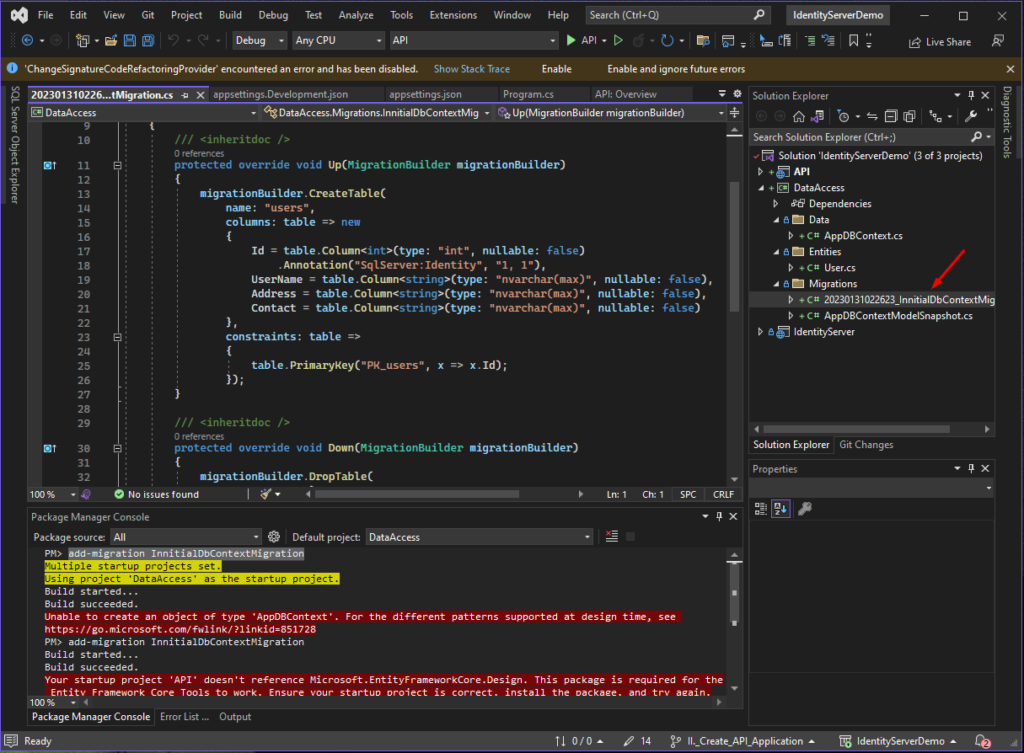
options.UseSqlServer(builder.Configuration.GetConnectionString("DefaultConnection")));4. We can now run a migration command to generate SQL script and create Database actual tables. Open the Package Manager Console and run the command below.
- add-migration InnitialDbContextMigration
And make sure to select DataAccess as the Default project.
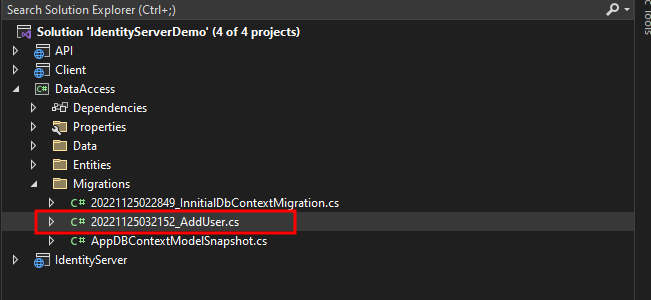
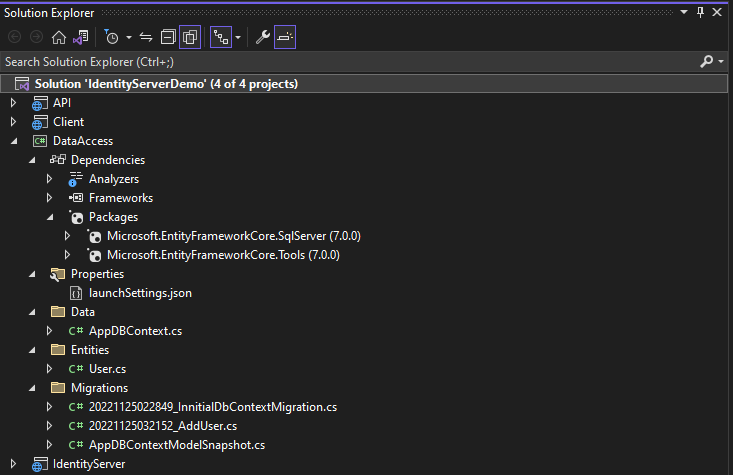
5. A new folder will be made under DataAccess after the migration is successfully created.
6. Now, we can add dummy data to the users table. We can add a new migration and add the record we want to display.
add-migration AddUser7. Open the migration file and replace it with the code snippet below.
 protected override void Up(MigrationBuilder migrationBuilder)
 {
     migrationBuilder.Sql($"INSERT INTO users(UserName, Address, Contact) VALUES" +
                                                                          $"('Freecode', 'spot.com', 'free@gmail.com')," +
                                                                          $"('Freecode1', 'spot.com', 'free1@gmail.com')");
 }
7. Run migration by running the following command. Before executing it, make sure to select API as the default project.
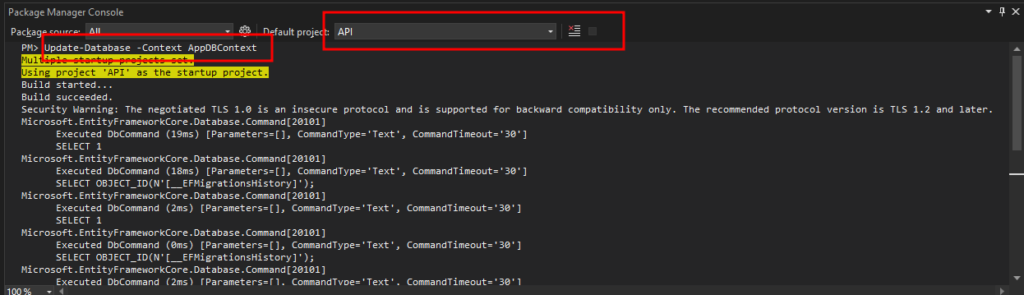
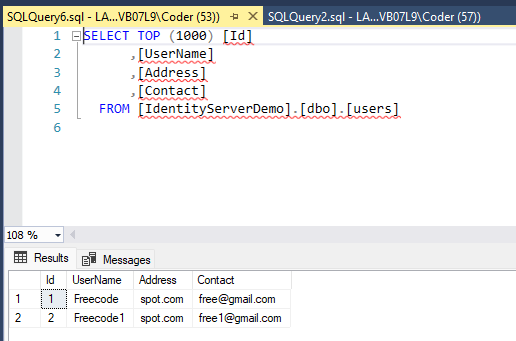
Update-Database -Context AppDBContextThis will create a table name for users and add sample data. To verify, open the SQL server and select all records inside the users table.
8. Navigate to the program.cs and add this line to configure Bearer authorization.
builder.Services.AddAuthentication("Bearer")
    .AddJwtBearer("Bearer", options =>
    {
        options.Authority = "https://localhost:7000";
        options.TokenValidationParameters = new TokenValidationParameters
        {
            ValidateAudience = false
        };
});- options.Authority » Identity server URL
9. Create a Models folder and create model properties.
ResponseModel<T> » Handles the response of API calls
public class ResponseModel<T>
    {
        public T Data { get; set; }
        public int Code { get; set; }
        public string Message { get; set; }
    }
UserModel » model properties for User data
public class UserModel
    {
        public int Id { get; set; }
        public string UserName { get; set; }
        public string Address { get; set; }
        public string Contact { get; set; }
    }
10. Create a Services folder, then add the following classes.
IUserService » Interface class
public interface IUserService
    {
        Task<ResponseModel<List<UserModel>>> GetUsers();
    }
UserService » Implementation class
public class UserService : IUserService
    {
        private readonly AppDBContext _dBContext;
        private readonly IMapper _mapper;

        public UserService(AppDBContext dBContext, IMapper mapper)
        {
            _dBContext = dBContext;
            _mapper = mapper;
        }

        public async Task<ResponseModel<List<UserModel>>> GetUsers()
        {
            ResponseModel<List<UserModel>> response = new ResponseModel<List<UserModel>>();
            response.Data = _mapper.Map<List<UserModel>>(await _dBContext.users.ToListAsync());
            response.Code = 200;
            return response;
        }
    }
11. Register the service class on your application by adding this line to your program.cs file.
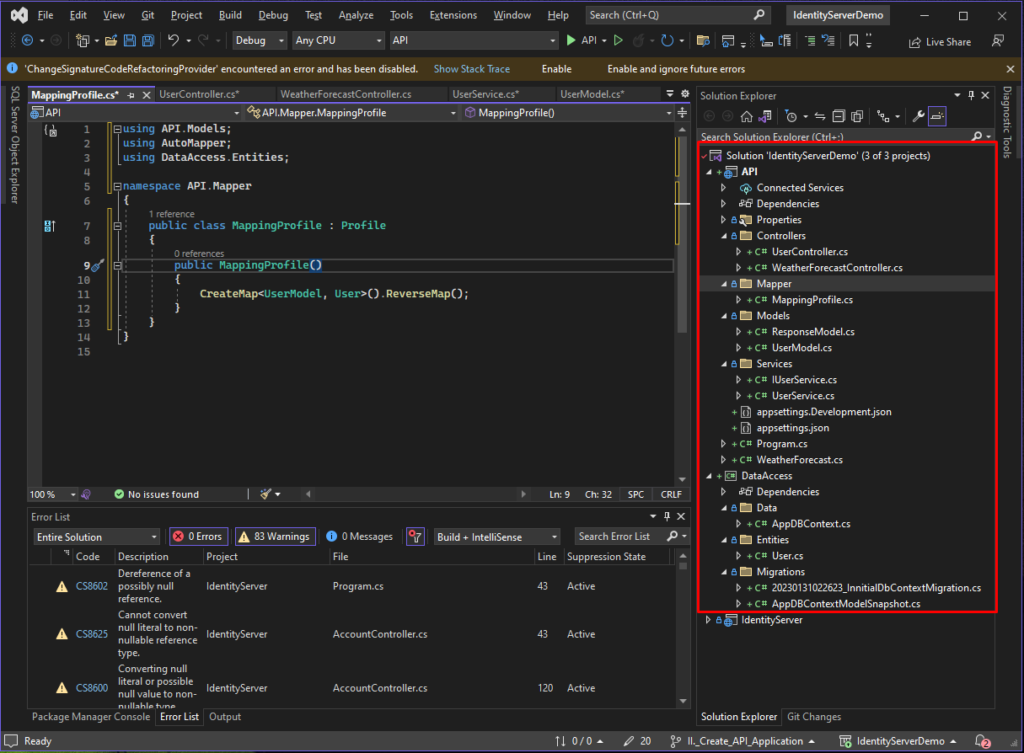
builder.Services.AddScoped<IUserService, UserService>();12. Add mapping profile. We will use an Automapper to map our DataAccess and API User properties. To do that, create a Mapper folder and add the MappingProfile class. See the code snippet below.
 public class MappingProfile : Profile
    {
        public MappingProfile()
        {
            CreateMap<UserModel, User>().ReverseMap();
        }
    }
13. Then add an entry to your program.cs for Automaper.
builder.Services.AddAutoMapper(AppDomain.CurrentDomain.GetAssemblies());14. Now, create a User controller class, add an API method that will return a list of User records, and add an Authorize attribute to restrict an authenticated user from accessing the GetUser method.
[Route("api/[controller]")]
    [ApiController]
    [Authorize]
    public class UserController : ControllerBase
    {
        private readonly IUserService _service;

        public UserController(IUserService service)
        {
            _service = service;
        }

        [HttpGet]
        public async Task<IActionResult> GetUsers()
        {
            var user = await _service.GetUsers();
            return Ok(user);
        }
    }
Project Solution Screenshot
using API.Services;
using DataAccess.Data;
using Microsoft.EntityFrameworkCore;
using Microsoft.IdentityModel.Tokens;

var builder = WebApplication.CreateBuilder(args);

// Add services to the container.

builder.Services.AddControllers();

builder.Services.AddAuthentication("Bearer")
    .AddJwtBearer("Bearer", options =>
    {
        options.Authority = "https://localhost:7000";

        options.TokenValidationParameters = new TokenValidationParameters
        {
            ValidateAudience = false
        };
    });

builder.Services.AddDbContext<AppDBContext>(options =>
    options.UseSqlServer(builder.Configuration.GetConnectionString("DefaultConnection")));

builder.Services.AddScoped<IUserService, UserService>();

var app = builder.Build();

// Configure the HTTP request pipeline.
if (app.Environment.IsDevelopment())
{
    app.UseSwagger();
    app.UseSwaggerUI();
}

app.UseAuthentication();
app.UseAuthorization();
app.MapControllers();

app.Run();
We have successfully created our Web API and secured it to be accessible only for an authenticated user, which will be handled by the Identity server that we created a while ago.
IV. Create Client Application
To fully understand how the identity server works, we will create a client application, and we will secure this using the identity server project application we created in the previous step.
1. Add a new project with ASP.NET Core Web Application
- Right-click on your Project solution, then add New Project.
- Select ASP.NET Core Web App. Name the project Client to have the same name as my project.
- Click Next.
- On the next window, select the .NET 6.0 Framework and check the Configure for HTTPS option.
- Lastly, Click on Create.
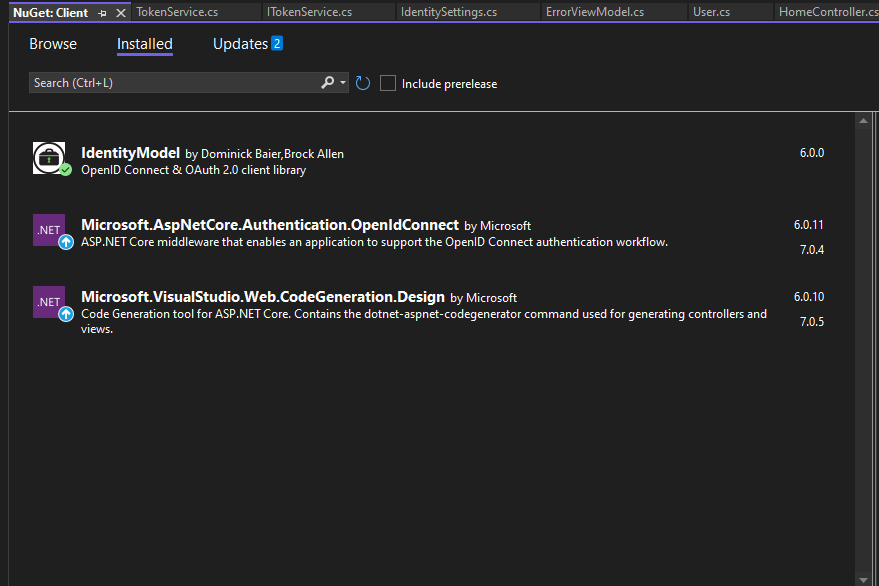
Add these Nuget Packages to the Client Project.
2. Create the model properties.
ResponseModel
This will handle the response data from our WEB API application
public class ResponseModel<T>
    {
        public T Data { get; set; }
        public int Code { get; set; }
        public string Message { get; set; }
    }
User
User data properties
 public class User
    {
        public int Id { get; set; }
        public string UserName { get; set; }
        public string Address { get; set; }
        public string Contact { get; set; }
    }
3. Create the Services to handle identity token
IdentitySettings
Identity settings properties
    public class IdentitySettings
    {
        public string DiscoveryUrl { get; set; }
        public string ClientName { get; set; }
        public string ClientPassword { get; set; }
        public string UseHttps { get; set; }

    }
ITokenService
Token handler interface
  public interface ITokenService
    {
        Task<TokenResponse> GetToken(string scope);
    }
TokenService
ITokenService Implementation – Retrieved token from Identity server for login users
using IdentityModel.Client;
using Microsoft.Extensions.Options;

namespace Client.Services
{
    public class TokenService : ITokenService
    {
        private readonly IOptions<IdentitySettings> _identitySettings;
        private readonly DiscoveryDocumentResponse _documentResponse;
        private readonly HttpClient _httpClient;

        public TokenService(IOptions<IdentitySettings>  identitySettings)
        {
            _identitySettings = identitySettings;
            _httpClient = new HttpClient();
            _documentResponse = _httpClient.GetDiscoveryDocumentAsync
                 (_identitySettings.Value.DiscoveryUrl).Result;

            if (_documentResponse.IsError)
            {
                throw new Exception("Unable to get discovery document", _documentResponse.Exception);
            }

        }

        public async Task<TokenResponse> GetToken(string scope)
        {
            var tokenResponse = await _httpClient.RequestClientCredentialsTokenAsync(new ClientCredentialsTokenRequest {
                Address = _documentResponse.TokenEndpoint,
                ClientId = _identitySettings.Value.ClientName,
                ClientSecret = _identitySettings.Value.ClientPassword,
                Scope = scope
            });

            if (tokenResponse.IsError)
            {
                throw new Exception("Unable to get token", tokenResponse.Exception);
            }

            return tokenResponse;
        }
    }
}
4. Create a Home Controller and set the attribute to Authorize. By setting authorize, a user that is not authenticated will be redirected to our Identity server application for login.
api1 » This is the identity server scope we create on the IdentityServer client. We can use this scope to get the token from the identity server.
using Client.Models;
using Client.Services;
using IdentityModel.Client;
using Microsoft.AspNetCore.Authorization;
using Microsoft.AspNetCore.Mvc;
using System.Diagnostics;
using System.Net.Http;

namespace Client.Controllers
{
    [Authorize]
    public class HomeController : Controller
    {
        private readonly ITokenService _service;
        private readonly IConfiguration _config;
        private readonly HttpClient httpClient;
        public HomeController(ITokenService service, IConfiguration config)
        {
            httpClient = new HttpClient();
            _service = service;
            _config = config;
        }

        public async Task<IActionResult> Index()
        {
            var tokenResult = await _service.GetToken("api1");
            httpClient.SetBearerToken(tokenResult.AccessToken);

            var result = await httpClient.GetAsync(_config["apiUrl"] + "/api/User");

            if (result.IsSuccessStatusCode)
            {
                var user = await result.Content.ReadFromJsonAsync<ResponseModel<List<User>>>();
                return View(user.Data);
            }

            return View();
        }


    }
}
5. Add the necessary settings on appsettings.json.
 "apiUrl": "https://localhost:7222", //API project
  "applicationUrl": "https://localhost:7088", //Client Project
  "IdentitySettings": {
    "DiscoveryUrl": "https://localhost:7000", //IdentityServer project
    "ClientName": "client",
    "ClientPassword": "secret",
    "UseHttps": true
  },
  "InteractiveServiceSettings": {
    "AuthorityUrl": "https://localhost:7000",
    "ClientId": "mvc",
    "ClientSecret": "secret",
    "Scopes": [ "api1" ]
  }
6. Now, configure the client app to use the identity server. Open program.cs and copy the code snippet below.
using Client.Services;
using Microsoft.AspNetCore.Authentication.Cookies;
using Microsoft.AspNetCore.Authentication.OpenIdConnect;

var builder = WebApplication.CreateBuilder(args);

// Add services to the container.
builder.Services.AddControllersWithViews();
builder.Services.AddHttpClient();
builder.Services.Configure<IdentitySettings>(builder.Configuration.GetSection("IdentitySettings"));
builder.Services.AddScoped<ITokenService, TokenService>();
builder.Services.AddAuthentication(options =>
{
    options.DefaultScheme = CookieAuthenticationDefaults.AuthenticationScheme;
    options.DefaultChallengeScheme = OpenIdConnectDefaults.AuthenticationScheme;
})
    .AddCookie(CookieAuthenticationDefaults.AuthenticationScheme)
    .AddOpenIdConnect(OpenIdConnectDefaults.AuthenticationScheme,
    options =>
    {
        options.SignInScheme = CookieAuthenticationDefaults.AuthenticationScheme;
        options.SignOutScheme = OpenIdConnectDefaults.AuthenticationScheme;
        options.Authority = builder.Configuration["InteractiveServiceSettings:AuthorityUrl"];
        options.ClientId = builder.Configuration["InteractiveServiceSettings:ClientId"];
        options.ClientSecret = builder.Configuration["InteractiveServiceSettings:ClientSecret"];
        options.ResponseType = "code";
        options.SaveTokens = true;
        options.GetClaimsFromUserInfoEndpoint = true;
    });

var app = builder.Build();

// Configure the HTTP request pipeline.
if (!app.Environment.IsDevelopment())
{
    app.UseExceptionHandler("/Home/Error");
    // The default HSTS value is 30 days. You may want to change this for production scenarios, see https://aka.ms/aspnetcore-hsts.
    app.UseHsts();
}

app.UseHttpsRedirection();
app.UseStaticFiles();

app.UseRouting();
app.UseAuthentication();
app.UseAuthorization();

app.MapControllerRoute(
    name: "default",
    pattern: "{controller=Home}/{action=Index}/{id?}");

app.Run();
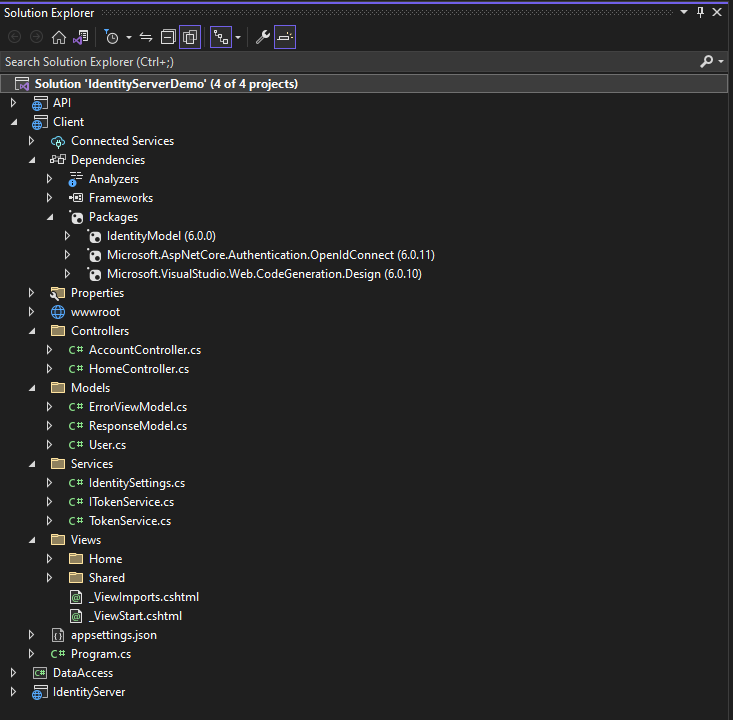
Project Folder Structure
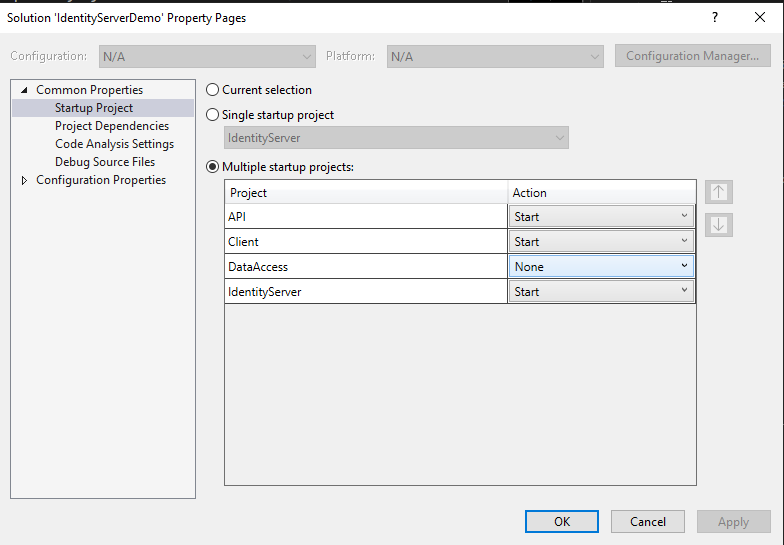
To test your project, set up multiple startups before running the visual studio and browsing your client project.
Right-click project solution, then select properties and set which project to start. See the image below.
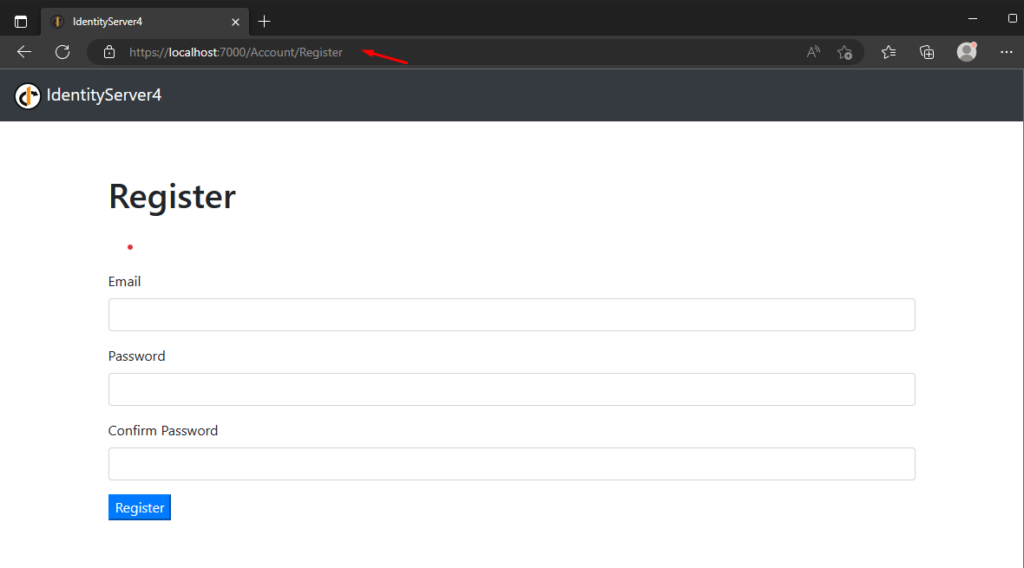
Create A dummy login Account
I have also created a registered account to create a dummy login credential. To access it, you can browse your Identity server URL, which, in my case, is https://localhost:7000/Account/Register.
Register Source Code

Source Code
You may get the full source code for this tutorial from CoderBugzz on GitHub.
Summary
We have created a simple application to show how to Implement authentication and authorization with IdentityServer4 in .NET Core. We can use this identity server on any other web application that we will be creating in the future. Instead of creating login authentication every time we create our web project, we can use our existing identity server. Hopefully, this article gave you an idea and can be helpful on your next big project.
KEEP CODING!
Subscribe to get more tutorials like this with freecode.