In this article, we will explore step-by-step guide on how to create a Laravel API with Swagger documentation. This powerful combination allows for secure authentication with Laravel Passport and smooth API documentation using Swagger.
- Create Laravel Project
- Create a Model and Migration file
- Run Migration
- Create Controllers
- Install Laravel Passport
- Configure App to use Laravel Passport
- Configure Route to Use Passport Middleware
- Configure Laravel to Return JSON Reponse
- API test via Postman
- Install Swagger
- Add Swagger Annotation for AuthController
- Add Swagger Annotation for BlogController
- Generate Swagger Docs
- Run Laravel Project
- Summary
Before diving into the implementation, ensure you have the following prerequisites:
- PHP installed on your system
- Composer installed
- Laravel installed
- MySQL Server
- Basic understanding of the Laravel framework

Check this out! This article covers how to setup a Laravel environment on Windows.
Create Laravel Project
1. Start by creating a new Laravel project using the following command:
composer create-project --prefer-dist laravel/laravel laravel-passport2. Navigate to your project directory
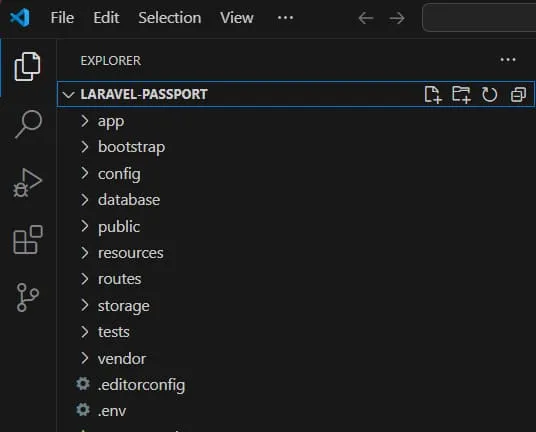
cd laravel-passport3. Open the directory with your preferred text editor, In my case, I’ll use Visual Studio code. See the image below.
3. Configure environment variables:
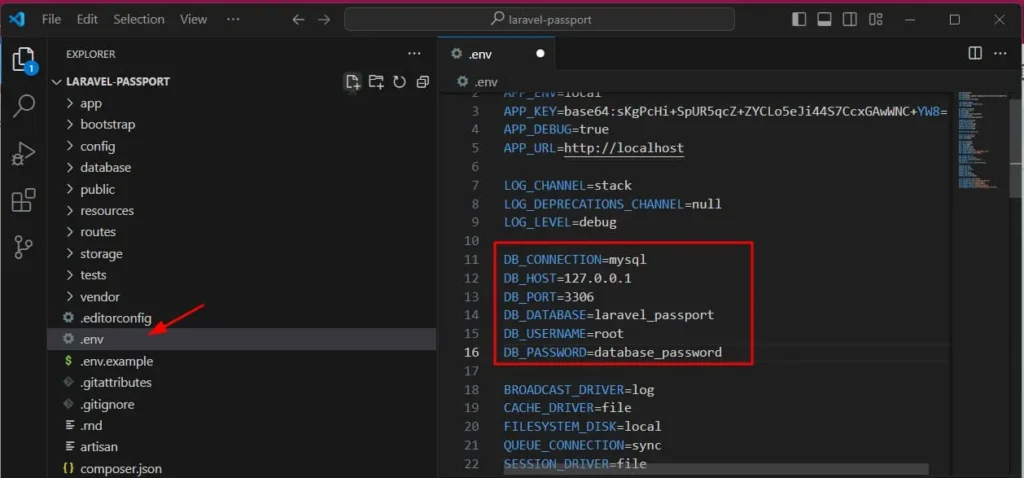
Make sure you have your MySQL server set up on your local machine. Open the .env file and configure the database connection and other settings.
4. Generate application key:
Run the following command to generate the application key:
php artisan key:generateThis key is used for encrypting various elements within your application. After executing this command the key will be applied to your env file.

5. Run the development server
php artisan serveCreate a Model and Migration file
1. Create User Model
This model will handle the user data for our authentication. By default, a User model was created during the installation but in case you wanted to create a different model property to handle your authentication. You can generate a User model with the following command:
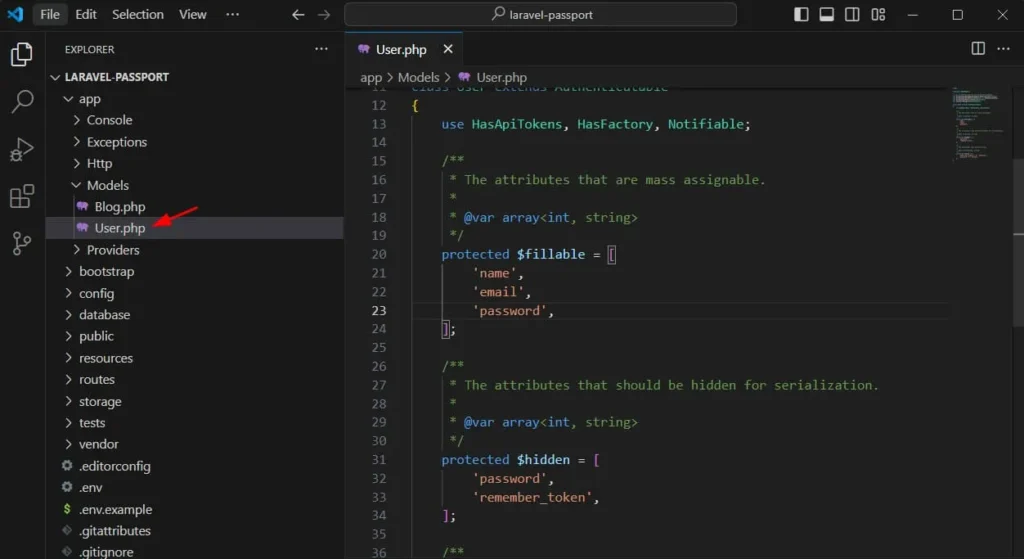
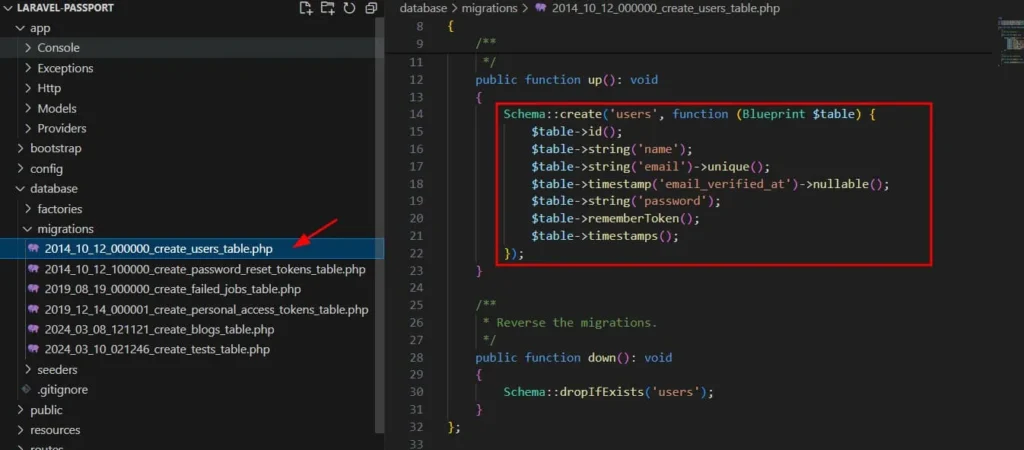
php artisan make:model User -mThis is where the created model is located:
The command above will also generate a corresponding migration file. Open the migration file and add a column if necessary. A migration file is a database schema of the table corresponding to your model property.
2. Create a Blog Model
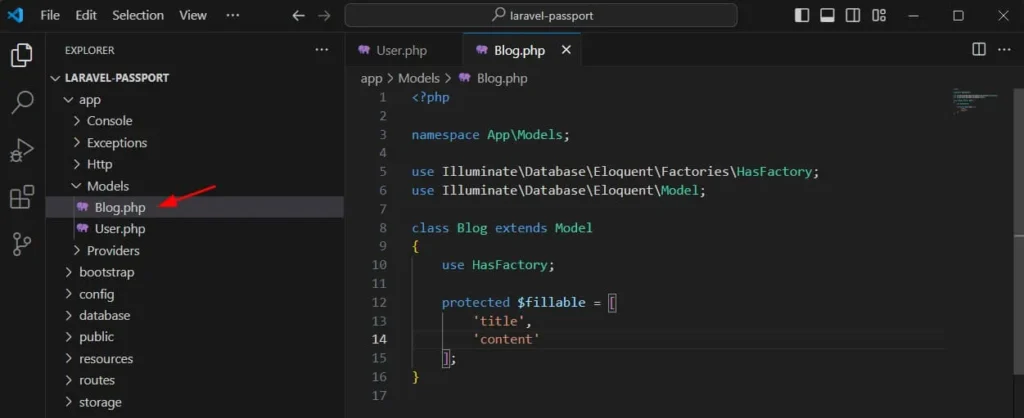
This model property will be used for our BlogController. To create the model, execute the command below.
php artisan make:model Blog -mYou can check the newly created model inside app » Models folder. See the image below.
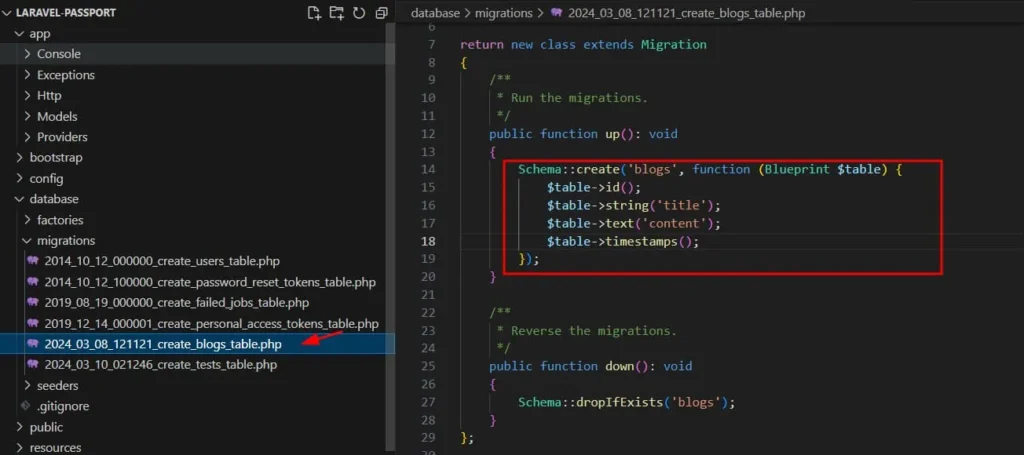
Then, the migration file is inside the app » database » migrations and select the filename which in my case is the create_blog_table. Open the file and add the column you need.
Run Migration
Now, that we have set up the model and migration, run the migration to create all the tables in our migration.
php artisan migrateAfter running this command, check your database to confirm if the table user and blog were created. I am using MySQL workbench to access my database.
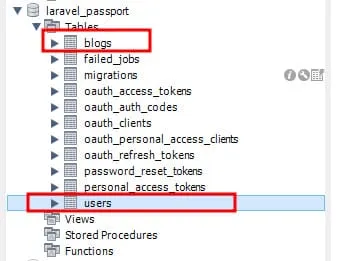
If you observe, I have a lot of tables created, Most of them will be created later once we start to configure our API project.
Create Controllers
Now, we can create a controller that will contain all our authentication methods and a controller that will be our main controller that will be protected with an authorization token.
1. Create Auth/AuthController
In AuthController we will implement the following methods.
| Method | Description |
| register | Add new user to our App |
| login | Authenticate user and return access token |
| logout | Logout user and revoke access token |
To create a new controller run the following command.
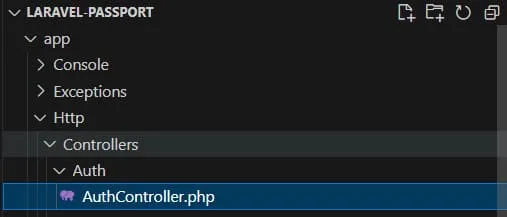
php artisan make:controller Auth/AuthControllerThis will create a new file named AuthController inside app » Http » Controllers » Auth.
Now, before we implement all the methods below. We need to import classes to our AuthController. To do that, import the classes by adding the following script.
use App\Models\User;
use Illuminate\Support\Facades\Hash;
use Validator;
use Illuminate\Http\JsonResponse;
Then you can start adding the following methods.
1.1 register
Implement the registration logic in the register method. First, declare a constant variable inside AuthController class.
 const STATUS_SUCCESS = 'success';
 const STATUS_FAILED = 'failed';
Second, create the register method. Copy the code snippet below.
public function register(Request $request): JsonResponse
{
    $validation = $this->validateRegistration($request);


    if ($validation->fails()) {
        return $this->validationErrorResponse($validation->errors());
    }


    $user = $this->createUser($request);


    $token = $this->generateUserToken($user, $request->email);


    $response = [
        'status' => self::STATUS_SUCCESS,
        'message' => 'User is created successfully.',
        'data' => [
            'token' => $token->accessToken,
            'user' => $user,
        ],
    ];


    return response()->json($response, JsonResponse::HTTP_CREATED);
}
Third, If you observe the code above we use validateRegistration method. So you can create a private method using the following code snippet. This method will validate the input value.
private function validateRegistration(Request $request): \Illuminate\Contracts\Validation\Validator
{
    return Validator::make($request->all(), [
        'name' => 'required|string|max:250',
        'email' => 'required|string|email:rfc,dns|max:250|unique:users,email',
        'password' => 'required|string|min:8|confirmed',
    ]);
}
Fourth, create a validationErrorResponse.
private function validationErrorResponse($errors): JsonResponse
{
    return response()->json([
        'status' => self::STATUS_FAILED,
        'message' => 'Validation Error!',
        'data' => $errors,
    ], JsonResponse::HTTP_FORBIDDEN);
}
Fifth, create the createUser method.
private function createUser(Request $request)
{
    return User::create([
        'name' => $request->name,
        'email' => $request->email,
        'password' => Hash::make($request->password),
    ]);
}
Lastly, create the generateUserToken method. This method will return a valid token that can be used to access all authorized methods in our Laravel API project.
private function generateUserToken($user, $email)
{
    return $user->createToken($email);
}
1.2 login
Once, we have registered a new user let’s implement the login logic in the login method. First, let’s create a validateLogin method. This will filter an invalid user input.
private function validateLogin(Request $request): \Illuminate\Contracts\Validation\Validator
{
    return Validator::make($request->all(), [
        'email' => 'required|string|email',
        'password' => 'required|string',
    ]);
}
Second, create an invalidCredentialResponse.
private function invalidCredentialsResponse(): JsonResponse
{
    return response()->json([
        'status' => self::STATUS_FAILED,
        'message' => 'Invalid credentials',
    ], JsonResponse::HTTP_UNAUTHORIZED);
}
Third, create a method that will getUserbyEmail
private function getUserByEmail($email)
{
    return User::where('email', $email)->first();
}
Finally, create the login logic and use all the method created above.
public function login(Request $request): JsonResponse
{
    $validation = $this->validateLogin($request);


    if ($validation->fails()) {
        return $this->validationErrorResponse($validation->errors());
    }


    $user = $this->getUserByEmail($request->email);


    if (!$user || !Hash::check($request->password, $user->password)) {
        return $this->invalidCredentialsResponse();
    }


    $token = $this->generateUserToken($user, $request->email);


    $response = [
        'status' => self::STATUS_SUCCESS,
        'message' => 'User is logged in successfully.',
        'data' => [
            'token' => $token->accessToken,
            'user' => $user,
        ],
    ];

    return response()->json($response, JsonResponse::HTTP_OK);
}
1.3 logout
Implement the logout logic in the logout method. This will revoke the token.
public function logout(Request $request)
    {
        auth()->user()->tokens()->delete();


        return response()->json([
            'status' => 'success',
            'message' => 'User is logged out successfully'
        ], 200);
    }
2. Create BlogController
Now, let’s create another controller that will be protected by passport authentication. For this demo, I’ll create BlogController. To create the BlogController run the command below.
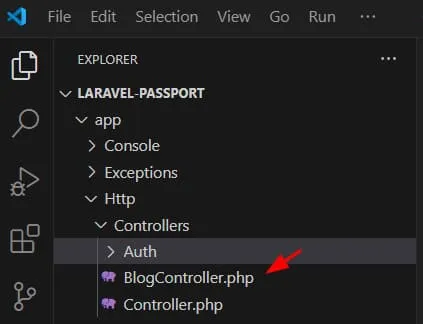
php artisan make:controller BlogControllerThis will create the controller inside the Http » Controllers folder. See the screenshot below.
Now, let’s add the CRUD operation. Open BlogController and import the following.
use App\Models\Blog;
use Illuminate\Http\Request;
use Validator;
Then, you can proceed with creating all the methods mentioned below.
1.1 index
This method will return all Blog content.
public function index()
    {
        $contents = Blog::latest()->get();


        if (is_null($contents->first())) {
            return response()->json([
                'status' => 'failed',
                'message' => 'No product found!',
            ], 200);
        }


        $response = [
            'status' => 'success',
            'message' => 'Blog post are retrieved successfully.',
            'data' => $contents,
        ];


        return response()->json($contents, 200);
    }
1.2 store
This method will insert or create the blog data to the database.
public function store(Request $request)
    {
        $validate = Validator::make($request->all(), [
            'title' => 'required|string|max:250',
            'content' => 'required|string'
        ]);


        if ($validate->fails()) {
            return response()->json([
                'status' => 'failed',
                'message' => 'Validation Error!',
                'data' => $validate->errors(),
            ], 403);
        }


        $contents = Blog::create($request->all());


        $response = [
            'status' => 'success',
            'message' => 'Blog post is added successfully.',
            'data' => $contents,
        ];


        return response()->json($response, 200);
    }
1.3 show
This method will return Blog record by ID
public function show($id)
    {
        $contents = Blog::find($id);


        if (is_null($contents)) {
            return response()->json([
                'status' => 'failed',
                'message' => 'Blog post is not found!',
            ], 200);
        }


        $response = [
            'status' => 'success',
            'message' => 'Blog post is retrieved successfully.',
            'data' => $contents,
        ];


        return response()->json($response, 200);
    }
1.4 update
This method updates Blog content.
public function update(Request $request, $id)
    {
        $validate = Validator::make($request->all(), [
            'title' => 'required|string|max:250',
            'content' => 'required|string'
        ]);


        if ($validate->fails()) {
            return response()->json([
                'status' => 'failed',
                'message' => 'Validation Error!',
                'data' => $validate->errors(),
            ], 403);
        }


        $content = Blog::find($id);


        if (is_null($content)) {
            return response()->json([
                'status' => 'failed',
                'message' => 'Blog post is not found!',
            ], 200);
        }


        $content->update($request->all());


        $response = [
            'status' => 'success',
            'message' => 'Blog post is updated successfully.',
            'data' => $content,
        ];


        return response()->json($response, 200);
    }
1.5 destroy
This method will delete the Blog record by ID
public function destroy($id)
    {
        $content = Blog::find($id);


        if (is_null($content)) {
            return response()->json([
                'status' => 'failed',
                'message' => 'Blog post is not found!',
            ], 200);
        }


        Blog::destroy($id);
        return response()->json([
            'status' => 'success',
            'message' => 'Blog post is deleted successfully.'
        ], 200);
    }
1.6 search
This method will search Blog content using title.
public function search($title)
    {
        $content = Blog::where('title', 'like', '%' . $title . '%')
            ->latest()->get();


        if (is_null($content->first())) {
            return response()->json([
                'status' => 'failed',
                'message' => 'No blog posts found!',
            ], 200);
        }


        $response = [
            'status' => 'success',
            'message' => 'Blog posts are retrieved successfully.',
            'data' => $content,
        ];


        return response()->json($response, 200);
    }
Install Laravel Passport
Laravel passport will require Oauth2-server, You can add it in your composer by running the following command.
composer require league/oauth2-serverIf you encounter an error installing it via composer you can manually add it in your composer.json file.
"league/oauth2-server": "8.4”See the image below for your reference.
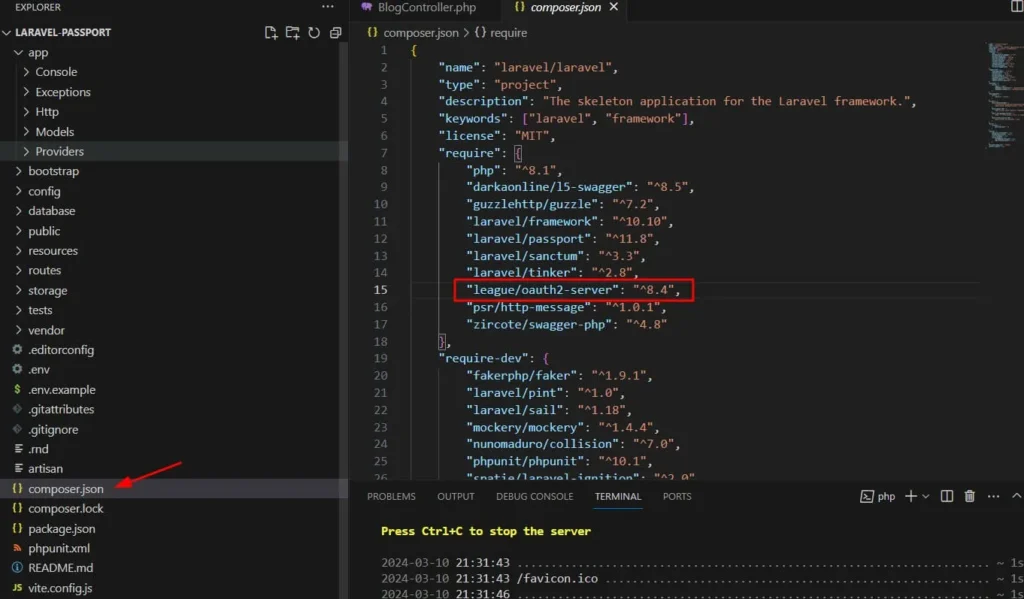
Then you can run the command below to install Oauth2-server package.
Composer UpdateNow, we are ready to install the Laravel passport. To do that, add a Laravel passport to your composer by running the command below.
composer require laravel/passportAfter installing Passport, you need to run the migrations to create the necessary database tables. Use the following Artisan command:
php artisan migrate
Next, you need to install Passport. Run the following command:
php artisan passport:installThis command will create the encryption keys needed to generate secure access tokens.
Configure App to use Laravel Passport
Now, we have to make sure a few things to use Laravel on our project.
First, open config » auth.php then add the API entry to use passport.
    'guards' => [
        'api' => [
            'driver' => 'passport',
            'provider' => 'users',
        ],
    ],
This is what my current config looks like.
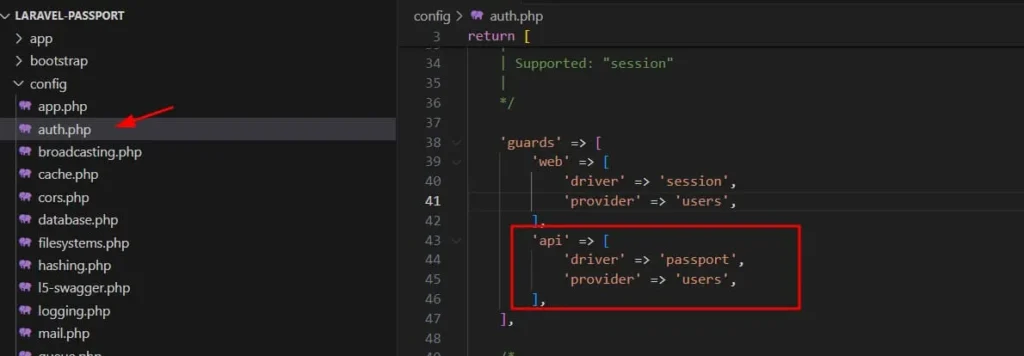
Second, to make sure the User model is using the right class for HasApiTokens. To do that, open the User model and verify the following import.
use Laravel\Passport\HasApiTokens;By default, HasApiTokens is using Sanctum, so make sure to change it to Passport.
Next, is to declare the following script inside the user class.
use HasApiTokensAs a final result, the current declaration would look like this.
use HasApiTokens, HasFactory, Notifiable;Most of this config is handled by Laravel during the installation. But just in case, it’s not working as expected you can verify this setting.
Configure Route to Use Passport Middleware
Now, let’s start adding the route. Locate the API route by going to routes » api.php, open the file, and inspect the content. In a fresh install of Laravel, the default route is protected with Sanctum auth like the script below.
Route::middleware('auth:sanctum')->get('/user', function (Request $request) {
    return $request->user();
});
Now, we need to add our own route to the controller that we set up in the previous step.
First, let’s start with the public route, this route can be accessed by a guest user which is the login and register route.
Route::controller(AuthController::class)->group(function() {
    Route::post('/register', 'register');
    Route::post('/login', 'login');
});
We make this public so that we can register a new user and generate a token to access all other protected routes that we are about to declare.
Second, we will use a group of routes that will be protected with our passport API auth. To do so, we can use the following code snippet.
Route::middleware('auth:api')->group( function () {

});
Third, we can add the logout route inside this group.
Route::middleware('auth:api')->group( function () {
    Route::post('/logout', [AuthController::class, 'logout']);
});
Lastly, we can create another group of protected routes for all our methods inside BlogController. By doing so, our final routes will look like this.
Route::middleware('auth:api')->group( function () {
    Route::post('/logout', [AuthController::class, 'logout']);


    Route::controller(BlogController::class)->group(function() {
        Route::get('/blog', 'index');
        Route::get('/blog/{id}', 'show');
        Route::get('/blog/search/{title}', 'search');
        Route::post('/blog', 'store');
        Route::post('/blog/{id}', 'update');
        Route::delete('/blog/{id}', 'destroy');
    });
});
Now, we are all set and we can run a test by running the php artisan serve command.
Configure Laravel to Return JSON Reponse
By default, if a user access a protected route, Laravel will redirect the user to the default login route, which is define in the Authecticate.php class, and if the login is not found it will throw an error like this.
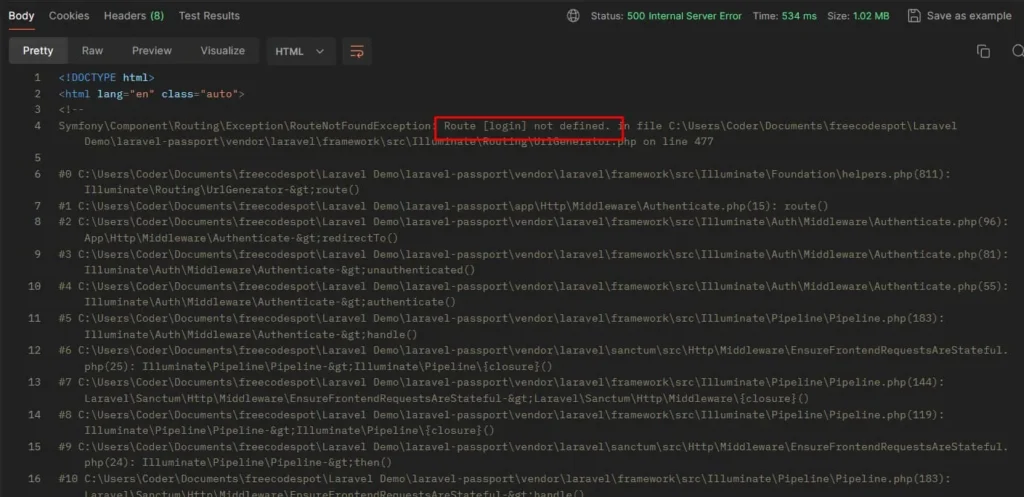
Same scenario if we remove the Authorization header with the bearer token in our request Laravel will redirect us to the login page which we don’t have in our current route.
To fix this, we can force our app to return JSON by adding application/json to the request header.
First, we will create a middleware and name it with your preferred name. In my case I’ll name it CustomAuthApi. Run the following command to create the middleware.
php artisan make:middleware CustomAuthApiSecond, open the newly created CustomAuthApi Class inside Http » Middleware » CustomAuthApi.php then rewrite the handle method using the following code snippet.
public function handle(Request $request, Closure $next): Response
    {
        $request->headers->set('Accept', 'application/json');
        return $next($request);
    }
And make sure this class is declared
use Symfony\Component\HttpFoundation\Response;Third, use this middleware by adding it to the Kernel.php inside the Http folder then look for this line.
protected $middlewareGroups = [In my case, the only way it works is to comment out all other middleware inside the api group and add the custom middleware.
'api' => [
            // \Laravel\Sanctum\Http\Middleware\EnsureFrontendRequestsAreStateful::class,
            // \Illuminate\Routing\Middleware\ThrottleRequests::class.':api',
            // \Illuminate\Routing\Middleware\SubstituteBindings::class,
            \App\Http\Middleware\CustomAuthApi::class,
        ],
This is what the final middleGroups config looks like.
protected $middlewareGroups = [
        'web' => [
            \App\Http\Middleware\EncryptCookies::class,
            \Illuminate\Cookie\Middleware\AddQueuedCookiesToResponse::class,
            \Illuminate\Session\Middleware\StartSession::class,
            \Illuminate\View\Middleware\ShareErrorsFromSession::class,
            \App\Http\Middleware\VerifyCsrfToken::class,
            \Illuminate\Routing\Middleware\SubstituteBindings::class,
        ],


        'api' => [
            // \Laravel\Sanctum\Http\Middleware\EnsureFrontendRequestsAreStateful::class,
            // \Illuminate\Routing\Middleware\ThrottleRequests::class.':api',
            // \Illuminate\Routing\Middleware\SubstituteBindings::class,
            \App\Http\Middleware\CustomAuthApi::class,
        ],
    ];
Fourth, we can over the exception handler to customize the response for API requests. To do that, navigate to the folder Exceptions and then open Handler.php then add the following method.
    protected function unauthenticated($request, AuthenticationException $ex){

        if( $request->is('api/*') ) {
            return response()->json(['success' => false, 'message' => $ex->getMessage()], 401);
        }

        return redirect('/login'); // for normal routes
    }
This means, that if it is not an API request in case you are not just using this project as an API the user will redirect to the login route, or else a JSON response will be sent as a response.
Lastly, you can run php artisan serve again and test via Postman. You should be able to see this response if you are missing an authorization header on your request.

API test via Postman
This time, we can fully test our API using Postman or any other rest client tools. See the video below for your reference.
Run php artisan serve command and start your test with the following endpoint.
| Endpoint | Request Type | Description |
http://127.0.0.1:8000/api/register | POST | Register new User |
http://127.0.0.1:8000/api/login | POST | Authenticate and generate token |
http://127.0.0.1:8000/api/logout | POST | Revoked access token |
http://127.0.0.1:8000/api/blog | POST | Add new Blog content |
http://127.0.0.1:8000/api/blog | GET | Get all Blog content |
http://127.0.0.1:8000/api/blog/{ID} | GET | Get Blog by ID |
http://127.0.0.1:8000/api/blog/{ID} | POST | Update Blog by ID |
http://127.0.0.1:8000/api/blog/search/{title} | GET | Search Blog by title |
To make it easier for you to test, here is message json body that you can use:
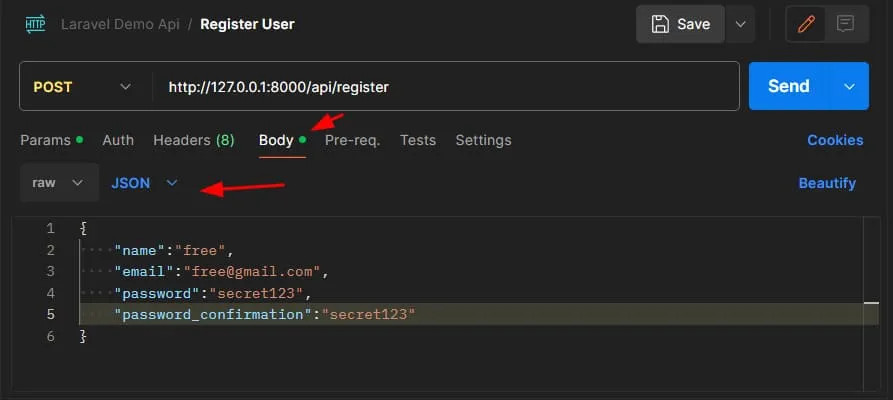
Register JSON Payload:
{
    "name":"free",
    "email":"free@gmail.com",
    "password":"secret123",
    "password_confirmation":"secret123"
}
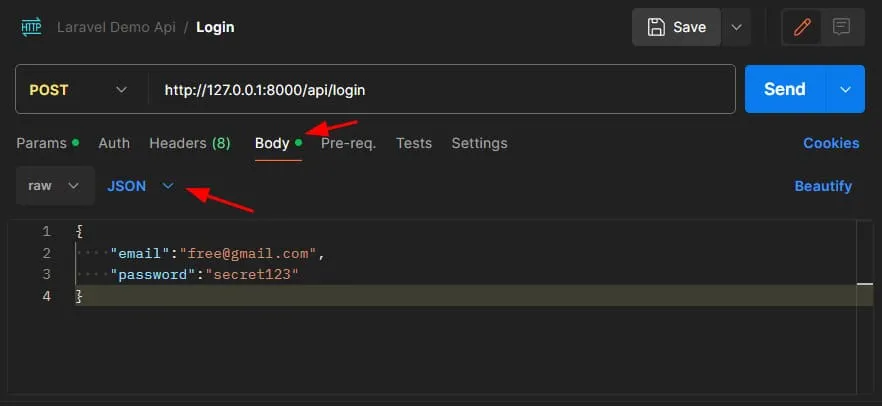
Login JSON Payload:
{
    "email":"free@gmail.com",
    "password":"secret123"
}
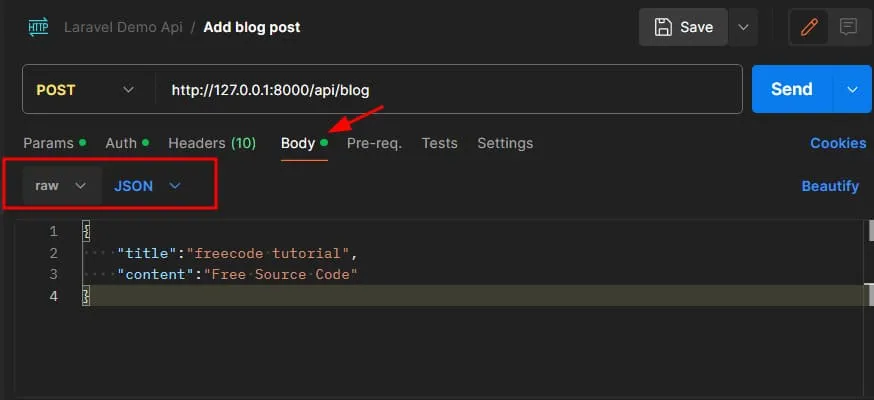
Add and Update Blog JSON payload:
{
    "title":"freecode tutorial",
    "content":"Free Source Code"
}
Here’s a full video montage to see, how to test our project using Postman.
Install Swagger
Laravel doesn’t natively support Swagger out of the box, so you’ll need to generate the Swagger documentation yourself. One popular tool for this is darkaonline/l5-swagger. Install it using Composer:
composer require darkaonline/l5-swaggerConfigure Swagger:
Open the generated configuration file (config/l5-swagger.php) and configure it according to your needs. Make sure to set the correct paths for your API routes. To check open the file and look for this line.
'routes' => [
                /*
                 * Route for accessing api documentation interface
                */
                'api' => 'api/documentation',
            ],
Add Swagger Annotation for AuthController
In your controllers, add Swagger annotations to document your API. Refer to Swagger PHP annotations documentation for details. As I mentioned before, Swagger is not directly supported in Laravel so we need to add some controller annotation to document our API.
AuthController Annotation
Let’s start by adding annotation for AuthController:
/**
 * @OA\Info(
 *     title="Laravel Passport API Demo",
 *     version="1.0.0",
 *     description="Freecode Spot Laravel Demo",
 *     @OA\Contact(
 *         email="freecode@email.com",
 *         name="Freecode Spot"
 *     )
 * ),
 *  * @OA\SecurityScheme(
 *     securityScheme="bearerAuth",
 *     type="http",
 *     scheme="bearer",
 *     bearerFormat="JWT",
 * )
 */
class AuthController extends Controller
{
    //add existing code here
}
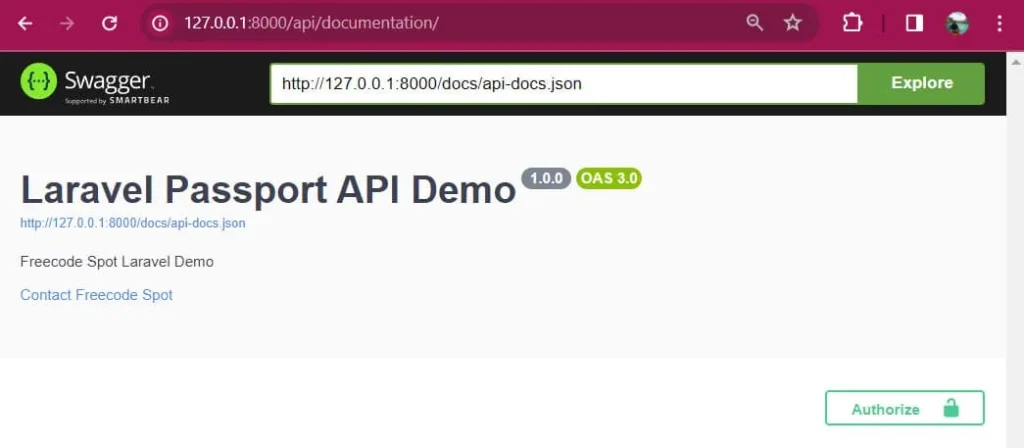
In the annotation we added a SecurityScheme this will add Authorization button on the swagger page where we can input the token four our testing. This is what it looks like after we generate a swagger document.
Register method annotation:
/**
 * @OA\Post(
 *      path="/api/register",
 *      operationId="register",
 *      tags={"Authentication"},
 *      summary="Register a new user",
 *      description="Registers a new user with the provided name, email, and password.",
 *      @OA\RequestBody(
 *          required=true,
 *          @OA\MediaType(
 *              mediaType="application/json",
 *              @OA\Schema(
 *                  @OA\Property(property="name", type="string", example="FreeCode Spot"),
 *                  @OA\Property(property="email", type="string", format="email", example="freecodespot@gmail.com"),
 *                  @OA\Property(property="password", type="string", format="password", example="freecodespot"),
 *                  @OA\Property(property="password_confirmation", type="string", format="password", example="freecodespot"),
 *              )
 *          )
 *      ),
 *      @OA\Response(
 *          response=201,
 *          description="User registered successfully",
 *          @OA\JsonContent(
 *              @OA\Property(property="status", type="string", example="success"),
 *              @OA\Property(property="message", type="string", example="User is created successfully."),
 *              @OA\Property(property="data", type="object",
 *                  @OA\Property(property="token", type="string", example="access_token_here"),
 *                  @OA\Property(property="user", type="object",
 *                      @OA\Property(property="name", type="string", example="Freecode Spot"),
 *                      @OA\Property(property="email", type="string", example="free.code@gmail.com"),
 *                  ),
 *              ),
 *          ),
 *      )
 * )
 */


public function register(Request $request): JsonResponse
{
    //add existing code here
}
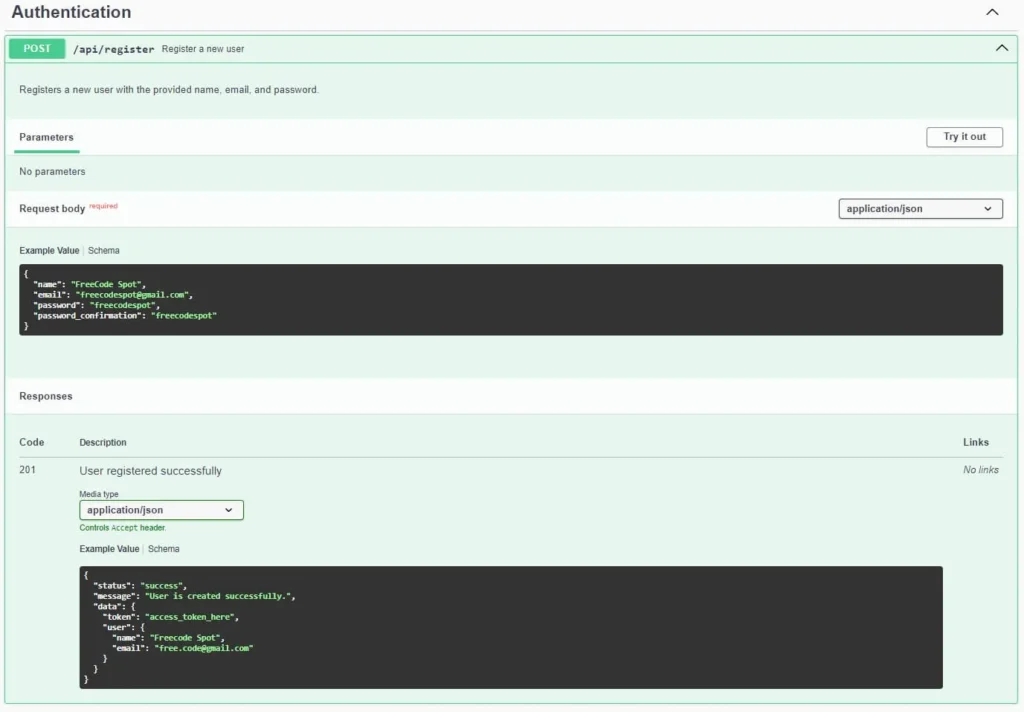
This is what it looks like after we generate a swagger document.
Login Annotation:
/**
 * @OA\Post(
 *      path="/api/login",
 *      operationId="login",
 *      tags={"Authentication"},
 *      summary="Login a user",
 *      description="Logs in a user with the provided email and password.",
 *      @OA\RequestBody(
 *          required=true,
 *          @OA\MediaType(
 *              mediaType="application/json",
 *              @OA\Schema(
 *                  @OA\Property(property="email", type="string", format="email", example="freecodespot@gmail.com"),
 *                  @OA\Property(property="password", type="string", format="password", example="freecodespot"),
 *              )
 *          )
 *      ),
 *      @OA\Response(
 *          response=200,
 *          description="User logged in successfully",
 *          @OA\JsonContent(
 *              @OA\Property(property="status", type="string", example="success"),
 *              @OA\Property(property="message", type="string", example="User is logged in successfully."),
 *              @OA\Property(property="data", type="object",
 *                  @OA\Property(property="token", type="string", example="access_token_here"),
 *                  @OA\Property(property="user", type="object",
 *                      @OA\Property(property="name", type="string", example="FreeCode Spot"),
 *                      @OA\Property(property="email", type="string", example="freecodespot@gmail.com"),
 *                  ),
 *              ),
 *          ),
 *      ),
 *      @OA\Response(
 *          response=401,
 *          description="Invalid credentials",
 *          @OA\JsonContent(
 *              @OA\Property(property="status", type="string", example="failed"),
 *              @OA\Property(property="message", type="string", example="Invalid credentials"),
 *          ),
 *      ),
 *      @OA\Response(
 *          response=403,
 *          description="Validation Error",
 *          @OA\JsonContent(
 *              @OA\Property(property="status", type="string", example="failed"),
 *              @OA\Property(property="message", type="string", example="Validation Error!"),
 *              @OA\Property(property="data", type="object", example={"email": {"The email field is required."}}),
 *          ),
 *      ),
 * )
 */
public function login(Request $request): JsonResponse
{
  //Add existing code here
}
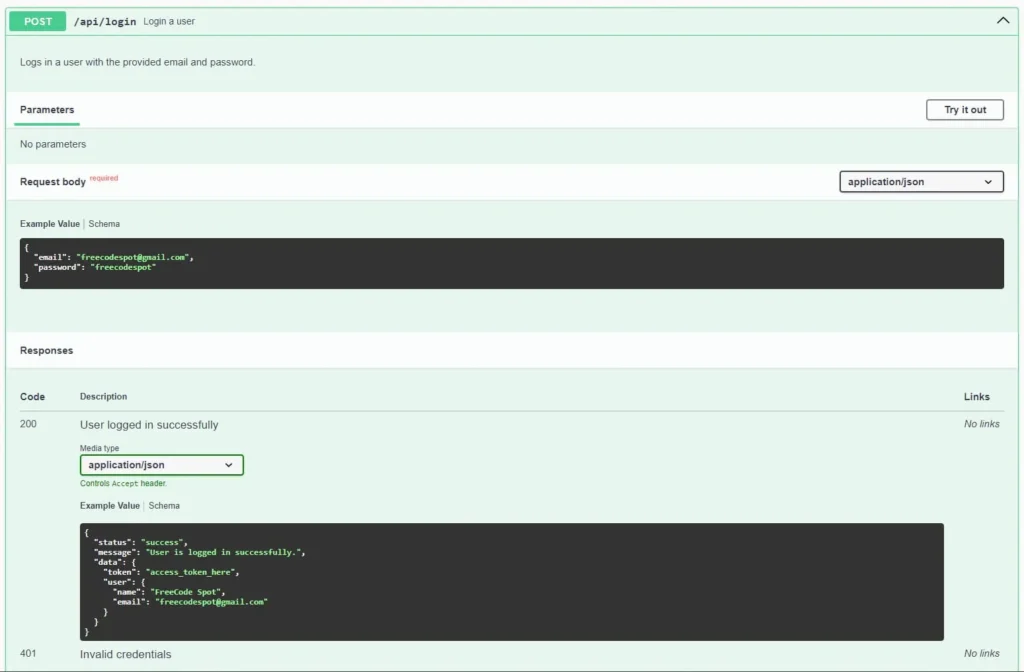
This is what it looks like after we generate a swagger document.

LogOut Annotation:
/**
     * @OA\Post(
     *     path="/api/logout",
     *     summary="Logout and revoke the access token",
     *     tags={"Authentication"},
     *     security={{"passport": {}}},
     *     @OA\Response(
     *         response=200,
     *         description="User logged out successfully",
     *         @OA\JsonContent(
     *             @OA\Property(property="status", type="string", example="success"),
     *             @OA\Property(property="message", type="string", example="User is logged out successfully."),
     *         )
     *     ),
     * security={
 *         {"bearerAuth": {}}
 *     }
     * )
     */
    public function logout(Request $request)
    {
       //add existing code here
    }
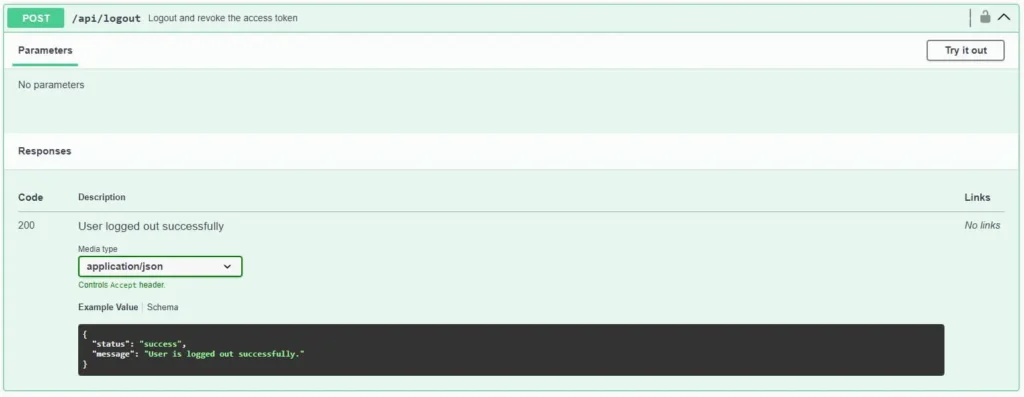
If you observe from the annotation we added security for this method, that means we expect bearer token parameter for this method.
Add Swagger Annotation for BlogController
Now, let’s add swagger annotation for BlogController and all it’s method.
BlogController Annotation:
/**
 * @OA\Tag(
 *     name="Blogs",
 *     description="Endpoints for managing blog posts"
 * ),
 */
class BlogController extends Controller
{
   //add existing code here
}
Index Method Annotation:
/**
 * @OA\Get(
 *      path="/api/blog",
 *      operationId="index",
 *      tags={"Blogs"},
 *      summary="Get all blog posts",
 *      description="Retrieves all blog posts.",
 *      @OA\Response(
 *          response=200,
 *          description="Blog posts retrieved successfully",
 *          @OA\JsonContent(
 *              @OA\Property(property="status", type="string", example="success"),
 *              @OA\Property(property="message", type="string", example="Blog posts are retrieved successfully or No blog posts found!"),
 *              @OA\Property(property="data", type="array",
 *                  @OA\Items(
 *                      @OA\Property(property="id", type="integer", example=1),
 *                      @OA\Property(property="title", type="string", example="Blog Post Title"),
 *                      @OA\Property(property="content", type="string", example="Blog Post Content"),
 *                      @OA\Property(property="created_at", type="string", format="date-time", example="2024-03-09T12:34:56Z"),
 *                      @OA\Property(property="updated_at", type="string", format="date-time", example="2024-03-09T12:34:56Z"),
 *                  ),
 *              ),
 *          ),
 *      ),
 *
 *     security={
 *         {"bearerAuth": {}}
 *     }
 * )
 */
    public function index()
    {
       //add existing code here
    }
Store Method Annotation:
/**
 * @OA\Post(
 *      path="/api/blog",
 *      operationId="store",
 *      tags={"Blogs"},
 *      summary="Create a new blog post",
 *      description="Creates a new blog post with the provided title and content.",
 *      @OA\RequestBody(
 *          required=true,
 *          @OA\MediaType(
 *              mediaType="application/json",
 *              @OA\Schema(
 *                  @OA\Property(property="title", type="string", example="New Blog Post"),
 *                  @OA\Property(property="content", type="string", example="This is the content of the blog post."),
 *              )
 *          )
 *      ),
 *      @OA\Response(
 *          response=200,
 *          description="Blog post added successfully",
 *          @OA\JsonContent(
 *              @OA\Property(property="status", type="string", example="success"),
 *              @OA\Property(property="message", type="string", example="Blog post is added successfully."),
 *              @OA\Property(property="data", type="object",
 *                  @OA\Property(property="id", type="integer", example=1),
 *                  @OA\Property(property="title", type="string", example="New Blog Post"),
 *                  @OA\Property(property="content", type="string", example="This is the content of the blog post."),
 *                  @OA\Property(property="created_at", type="string", format="date-time", example="2024-03-09T12:34:56Z"),
 *                  @OA\Property(property="updated_at", type="string", format="date-time", example="2024-03-09T12:34:56Z"),
 *              ),
 *          ),
 *      ),
 *      @OA\Response(
 *          response=403,
 *          description="Validation Error",
 *          @OA\JsonContent(
 *              @OA\Property(property="status", type="string", example="failed"),
 *              @OA\Property(property="message", type="string", example="Validation Error!"),
 *              @OA\Property(property="data", type="object", example={"title": {"The title field is required."}}),
 *          ),
 *      ),
 *
 *     security={
 *         {"bearerAuth": {}}
 *     }
 * )
 */
    public function store(Request $request)
    {
      //add existing code here
    }
Show Method Annotation:
/**
 * @OA\Get(
 *      path="/api/blog/{id}",
 *      operationId="show",
 *      tags={"Blogs"},
 *      summary="Get a specific blog post",
 *      description="Retrieves a specific blog post by its ID.",
 *      @OA\Parameter(
 *          name="id",
 *          in="path",
 *          required=true,
 *          description="ID of the blog post",
 *          @OA\Schema(type="integer", format="int64")
 *      ),
 *      @OA\Response(
 *          response=200,
 *          description="Blog post retrieval response",
 *          @OA\JsonContent(
 *              @OA\Property(property="status", type="string", example="success"),
 *              @OA\Property(property="message", type="string"),
 *              @OA\Property(property="data", type="object",
 *                  oneOf={
 *                      @OA\Schema(
 *                          @OA\Property(property="id", type="integer", example=1),
 *                          @OA\Property(property="title", type="string", example="Blog Post Title"),
 *                          @OA\Property(property="content", type="string", example="Blog Post Content"),
 *                          @OA\Property(property="created_at", type="string", format="date-time", example="2024-03-09T12:34:56Z"),
 *                          @OA\Property(property="updated_at", type="string", format="date-time", example="2024-03-09T12:34:56Z"),
 *                      ),
 *                      @OA\Schema(
 *                          @OA\Property(property="status", type="string", example="failed"),
 *                          @OA\Property(property="message", type="string", example="Blog post is not found!"),
 *                      ),
 *                  },
 *              ),
 *          ),
 *      ),
 *
 *     security={
 *         {"bearerAuth": {}}
 *     }
 * )
 */
    public function show($id)
    {
         //Add existing code here
    }
Update Method Annotation
/**
 * @OA\Put(
 *      path="/api/blog/{id}",
 *      operationId="update",
 *      tags={"Blogs"},
 *      summary="Update a specific blog post",
 *      description="Updates a specific blog post by its ID.",
 *      @OA\Parameter(
 *          name="id",
 *          in="path",
 *          required=true,
 *          description="ID of the blog post",
 *          @OA\Schema(type="integer", format="int64")
 *      ),
 *      @OA\RequestBody(
 *          required=true,
 *          @OA\MediaType(
 *              mediaType="application/json",
 *              @OA\Schema(
 *                  @OA\Property(property="title", type="string", example="Updated Blog Post"),
 *                  @OA\Property(property="content", type="string", example="This is the updated content of the blog post."),
 *              )
 *          )
 *      ),
 *      @OA\Response(
 *          response=200,
 *          description="Blog post update response",
 *          @OA\JsonContent(
 *              @OA\Property(property="status", type="string", example="success"),
 *              @OA\Property(property="message", type="string"),
 *              @OA\Property(property="data", type="object",
 *                  oneOf={
 *                      @OA\Schema(
 *                          @OA\Property(property="id", type="integer", example=1),
 *                          @OA\Property(property="title", type="string", example="Updated Blog Post"),
 *                          @OA\Property(property="content", type="string", example="This is the updated content of the blog post."),
 *                          @OA\Property(property="created_at", type="string", format="date-time", example="2024-03-09T12:34:56Z"),
 *                          @OA\Property(property="updated_at", type="string", format="date-time", example="2024-03-09T12:34:56Z"),
 *                      ),
 *                      @OA\Schema(
 *                          @OA\Property(property="status", type="string", example="failed"),
 *                          @OA\Property(property="message", type="string", example="Blog post is not found!"),
 *                      ),
 *                  },
 *              ),
 *          ),
 *      ),
 *      @OA\Response(
 *          response=403,
 *          description="Validation Error",
 *          @OA\JsonContent(
 *              @OA\Property(property="status", type="string", example="failed"),
 *              @OA\Property(property="message", type="string", example="Validation Error!"),
 *              @OA\Property(property="data", type="object", example={"title": {"The title field is required."}}),
 *          ),
 *      ),
 *
 *     security={
 *         {"bearerAuth": {}}
 *     }
 * )
 */
    public function update(Request $request, $id)
    {
      //add existing code here
    }
destroy Method Annotation:
/**
 * @OA\Delete(
 *      path="/api/blog/{id}",
 *      operationId="destroy",
 *      tags={"Blogs"},
 *      summary="Delete a specific blog post",
 *      description="Deletes a specific blog post by its ID.",
 *      @OA\Parameter(
 *          name="id",
 *          in="path",
 *          required=true,
 *          description="ID of the blog post",
 *          @OA\Schema(type="integer", format="int64")
 *      ),
 *      @OA\Response(
 *          response=200,
 *          description="Blog post deletion response",
 *          @OA\JsonContent(
 *              @OA\Property(property="status", type="string", example="success"),
 *              @OA\Property(property="message", type="string"),
 *              @OA\Property(property="data", type="object",
 *                  oneOf={
 *                      @OA\Schema(
 *                          @OA\Property(property="id", type="integer", example=1),
 *                          @OA\Property(property="title", type="string", example="Deleted Blog Post"),
 *                          @OA\Property(property="content", type="string", example="This is the content of the deleted blog post.")
 *                      ),
 *                      @OA\Schema(
 *                          @OA\Property(property="status", type="string", example="failed"),
 *                          @OA\Property(property="message", type="string", example="Blog post is not found!"),
 *                      ),
 *                  },
 *              ),
 *          ),
 *      ),
 *
 *     security={
 *         {"bearerAuth": {}}
 *     }
 * )
 */
    public function destroy($id)
    {
       //add existing code here
    }
Search Method Annotation:
/**
 * @OA\Get(
 *      path="/api/blog/search/{title}",
 *      operationId="search",
 *      tags={"Blogs"},
 *      summary="Search for blog posts by title",
 *      description="Retrieves blog posts based on the provided title search.",
 *      @OA\Parameter(
 *          name="title",
 *          in="path",
 *          required=true,
 *          description="Title to search for",
 *          @OA\Schema(type="string")
 *      ),
 *      @OA\Response(
 *          response=200,
 *          description="Blog posts retrieval response",
 *          @OA\JsonContent(
 *              @OA\Property(property="status", type="string", example="success"),
 *              @OA\Property(property="message", type="string"),
 *              @OA\Property(property="data", type="array", description="Array of blog posts",
 *                  @OA\Items(
 *                      @OA\Property(property="id", type="integer", example=1),
 *                      @OA\Property(property="title", type="string", example="Blog Post Title"),
 *                      @OA\Property(property="content", type="string", example="Blog Post Content")
 *                  ),
 *              ),
 *              @OA\Property(property="no_posts_found", type="boolean", example=false),
 *          ),
 *      ),
 *
 *     security={
 *         {"bearerAuth": {}}
 *     }
 * )
 */
    public function search($title)
    {
      //add existing code here
    }
Generate Swagger Docs
Now, that we already added all the annotation, it’s time to generate the Swagger docs.To do that, execute the following command.
php artisan l5-swagger:generate
Everytime you have changes on the annotation you need to execute the command above to generate a new document and apply your latest changes.
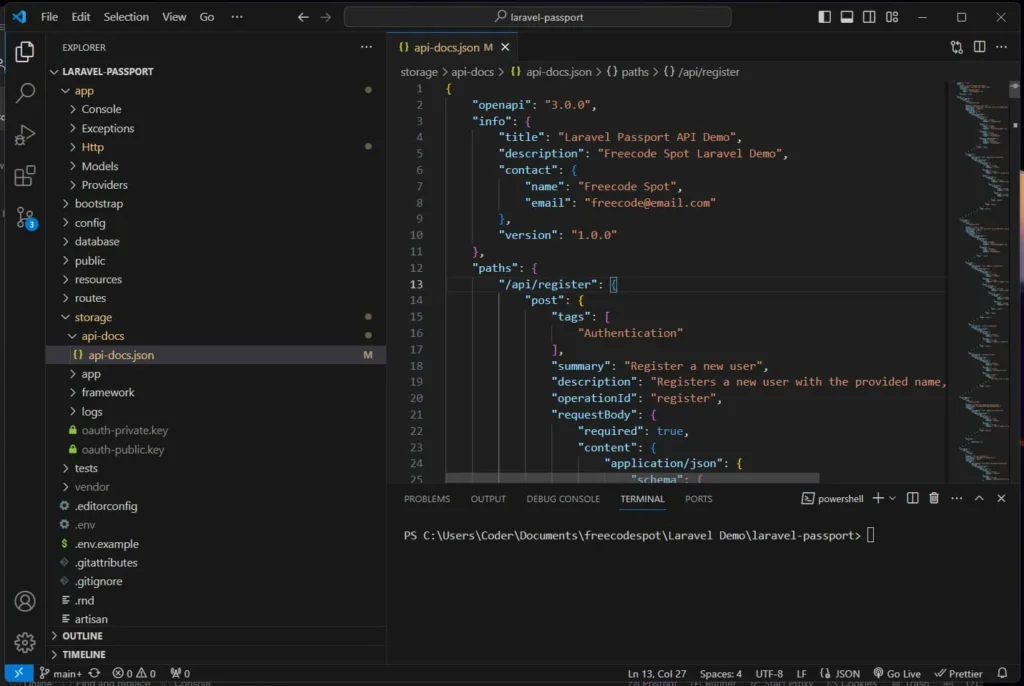
To view the JSON docs generated using the command, you can go to storage » api-docs folder then open api-docs.json file.
Run Laravel Project
Run your Laravel project:
php artisan serveVisit http://localhost:8000/api/documentation to access Swagger documentation for your Laravel Passport API.
Here’s a full video on how to test API with Swagger.
Summary
Congratulations! You have successfully created a Laravel API with Swagger documentation. This combination provides secure authentication and clear API documentation for your Laravel projects. Explore and expand upon this foundation to build powerful and efficient APIs.
To download our free source code from this tutorial, you can use the button below.
Note: Extract the file using 7Zip and use password: freecodespot
Check this out! This article covers how to implement login and Registration
