In this article, we will learn how we can execute Flutter login and registration using Firebase. Firebase has a lot of authentication methods available but for now, we are going to use the sign-in method anonymous and Email/Password.
- Setup Flutter on VSCode
- Create a New Flutter App
- Setup Firebase Project
- Configure Firebase
- Enable Firebase Authentication
- Install Firebase dependencies on Flutter App.
- Set Flutter Minimum SDK Version
- Flutter File Structure
- Create Model Properties
- Add Firebase Authentication Class(Auth.dart)
- Initialize Firebase in a Flutter Project
- Create Authentication Middleware
- Create an Authentication Handler
- Create a Login screen
- Create a Register Screen
- Create Home Screen with a sign-out button
- Summary
You might want to check: Using SQLFlite in Flutter
If you have already set up your flutter development on your local machine you may proceed to the next step to create a flutter project but if not follow the steps below.
Setup Flutter on VSCode
These are just brief steps for you to start your configuration. But if you want full technical documentation you may visit Flutter’s official website using this link. I am using Windows OS for this tutorial.
- Install git for windows. link.
- Download Flutter SDK. link.
- Extract Flutter SDK. In my case, I extracted it on this location “D:\flutter\flutter”
- Add “flutter\bin” to the Environment Variable. See the image below.
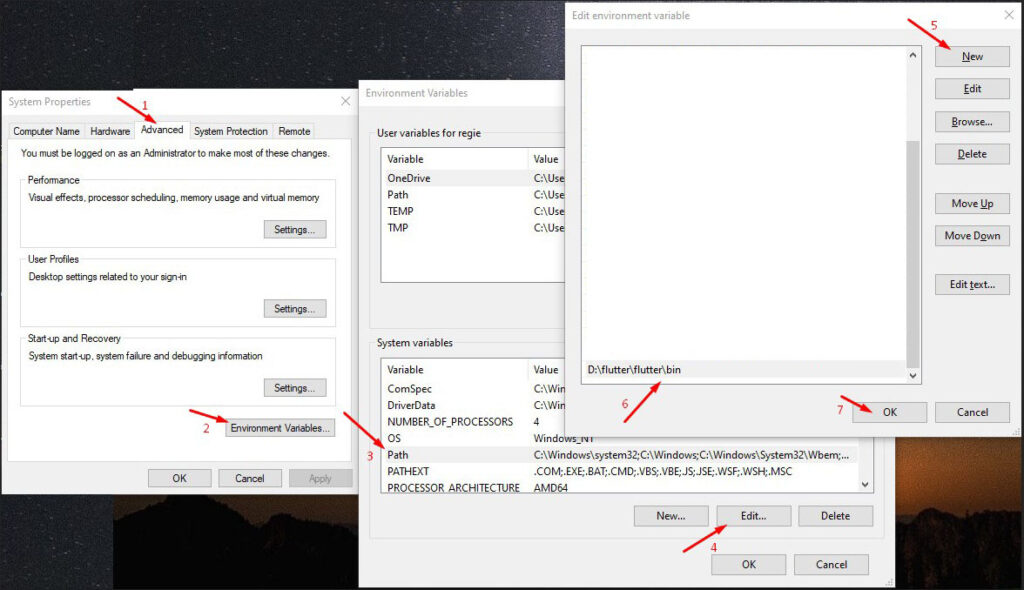
5. Now, open git Bash or command prompt then run the “flutter doctor” command to check the installation. If an error occurs follow the steps provided on the result.
6. Download android studio here
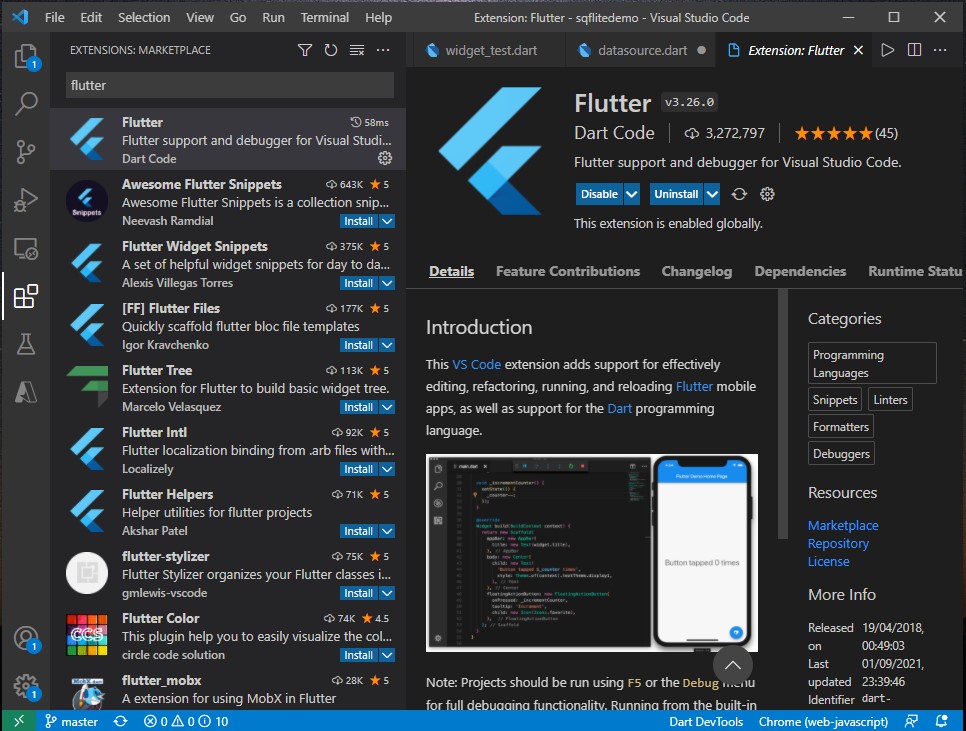
7. Download and install Visual Studio Code here. Open vscode and install the Flutter extension.
Create a New Flutter App
Now, it’s time to create the Flutter App.
- Create a folder and choose a location where you want to put your Apps.
- Open vscode then open the folder you just created using File » Open Folder.
- Open vscode terminal by going to View » Terminal.
- Then use this command to create the App. “flutter create fl_logindemo“
- Change your directory to the newly created App which in my case “cd fl_logindemo“
- Now, run flutter by using “flutter run” command.
Setup Firebase Project
In order for us to create a flutter login and registration using Firebase, we have to register and create a project on the Firebase website. Follow the steps below.
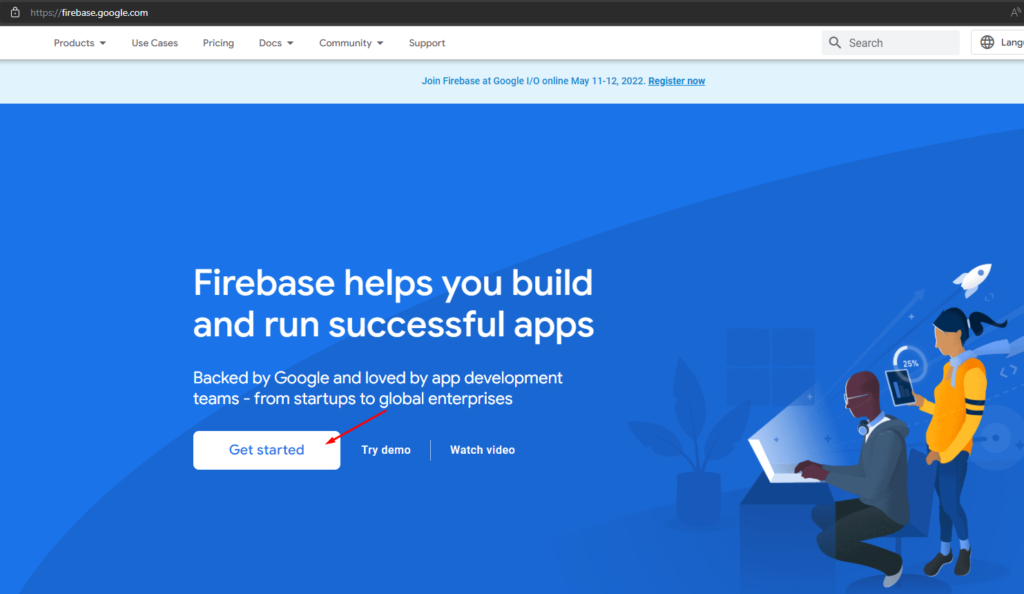
- Open https://firebase.google.com on your browser then click on Get Started. Login using your Gmail account.
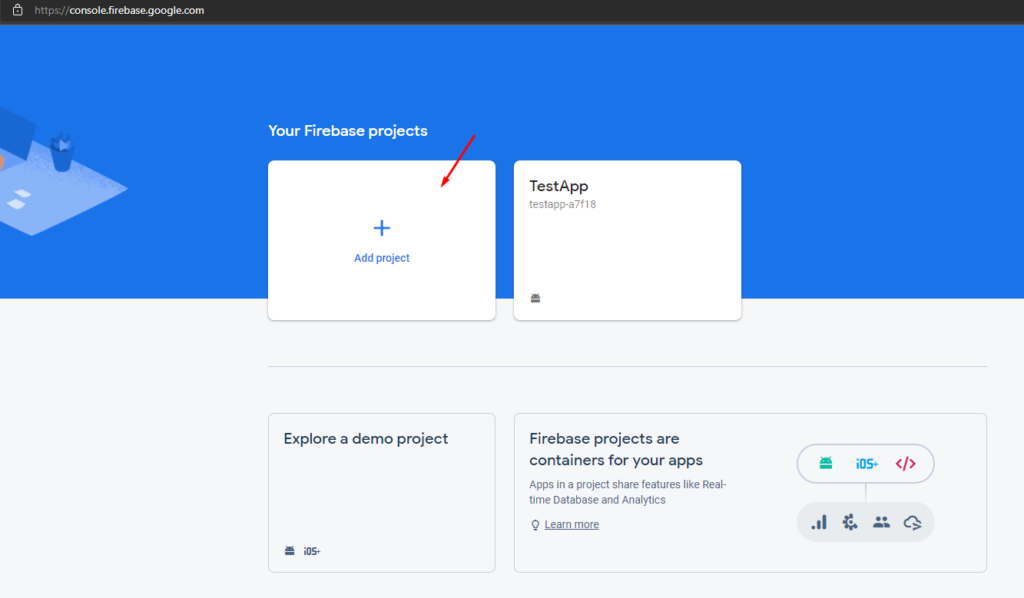
2. Once you have successfully login. You will be prompted with a screen that will ask you to add a project. Click on Add project and fill in the necessary field.
3. Fill in your project information and click continue.
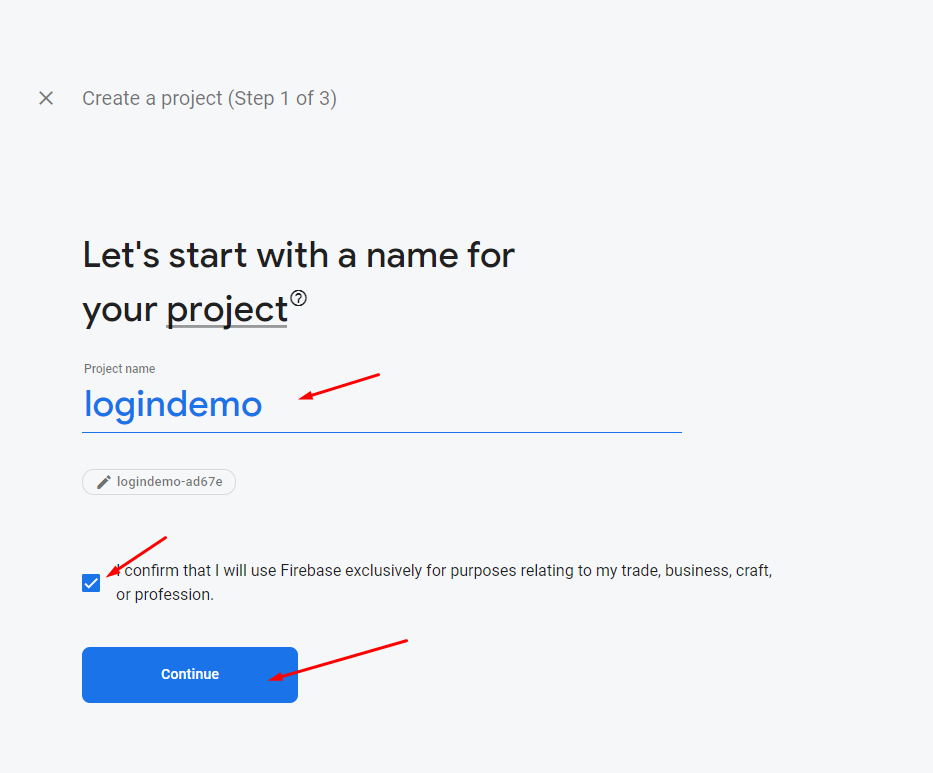
4. Click Create Project button to proceed.
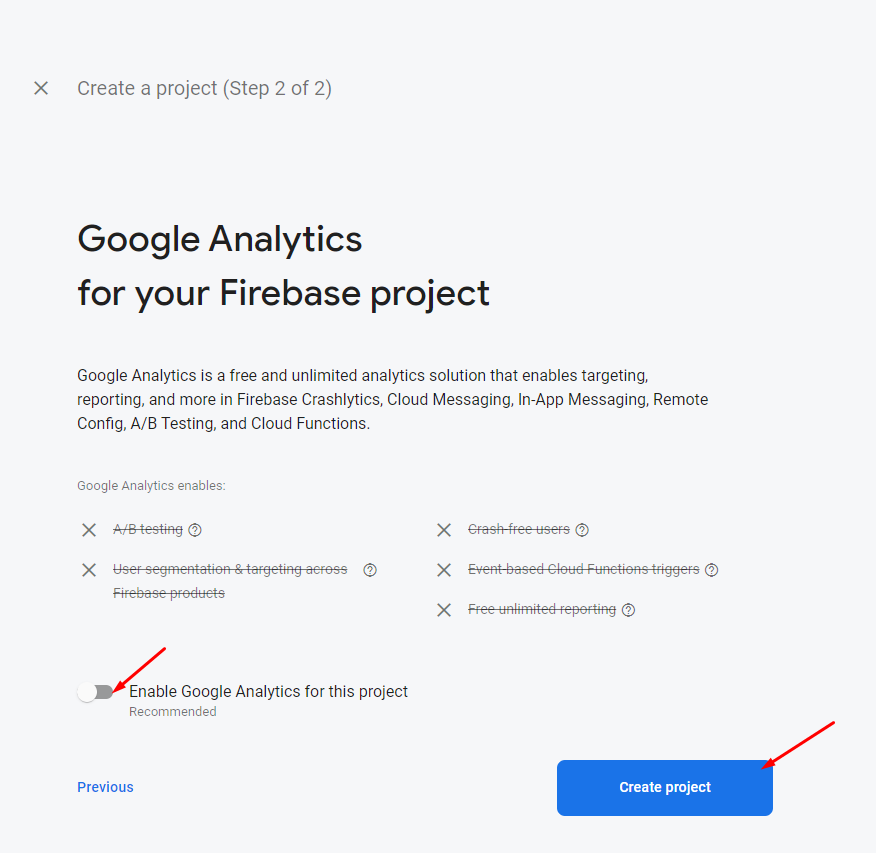
5. Once the process is done you will see this screen. Click Continue and you will be navigated to the firebase dashboard.
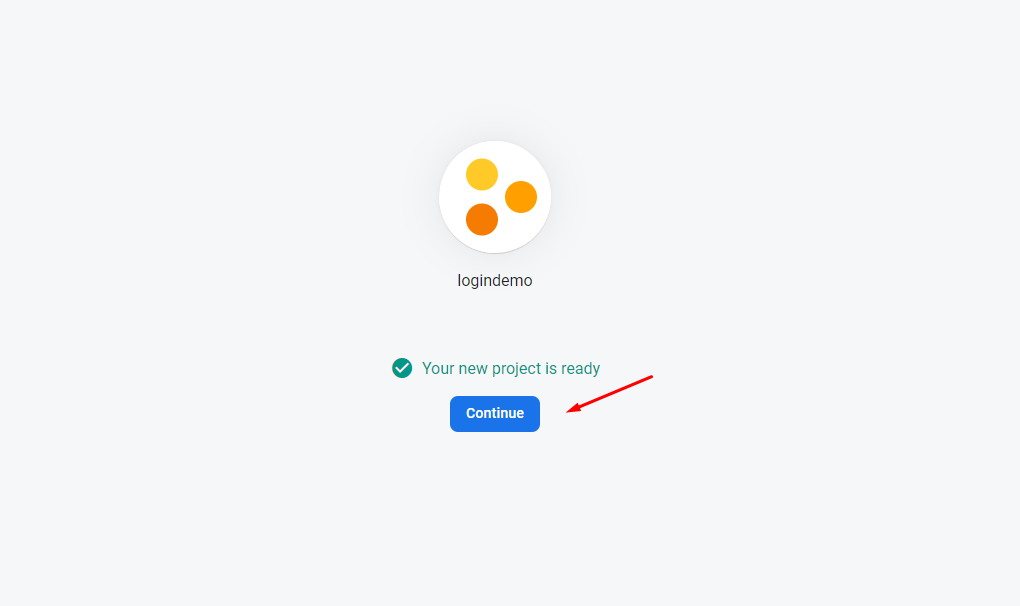
By this time, Our firebase project is successfully created. Now, we are ready to create our first Android App.
Configure Firebase
Let’s create our first Firebase Android application. Follow the steps below.
1. Find an android icon on the Firebase Dashboard homepage and click to add an App. This is what the firebase dashboard looks like if this is your first time using it. See the image below.
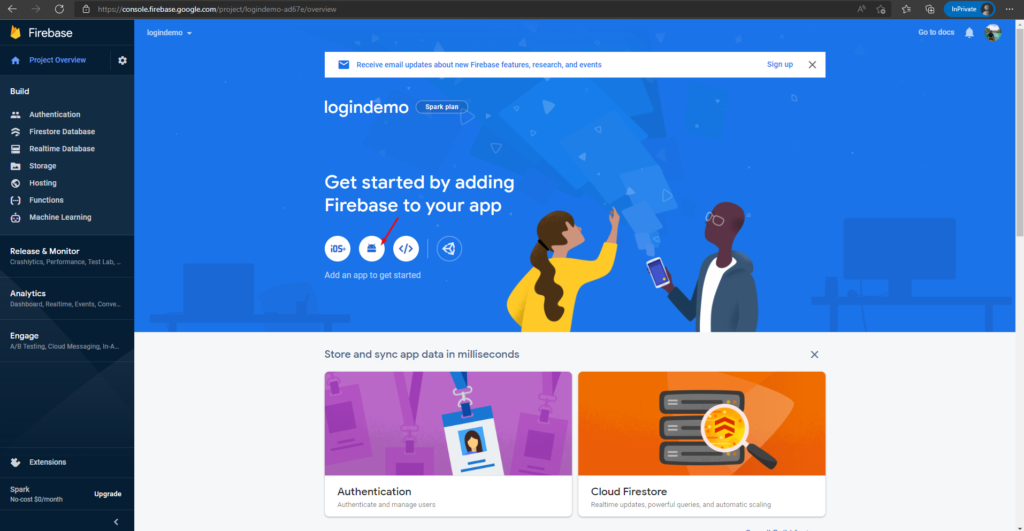
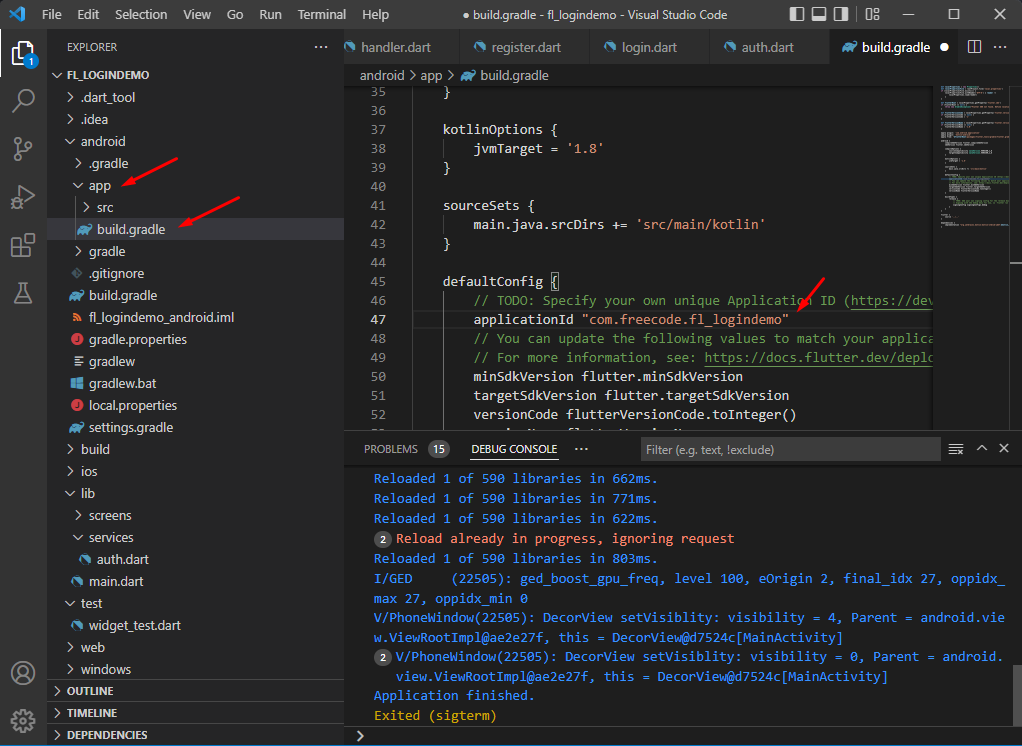
2. Fill in on the information needed to add Firebase to your App. One of the requirements is to add your Application package name. You can find it on the new flutter project you created a while ago. In my case fl_logindemo App. You need to find your application id on your flutter App which can be found at this location Project Name » Android » App » build.gradle.
Note:
You may change your default applicationId, in my case I name it com.freecode.fl_login
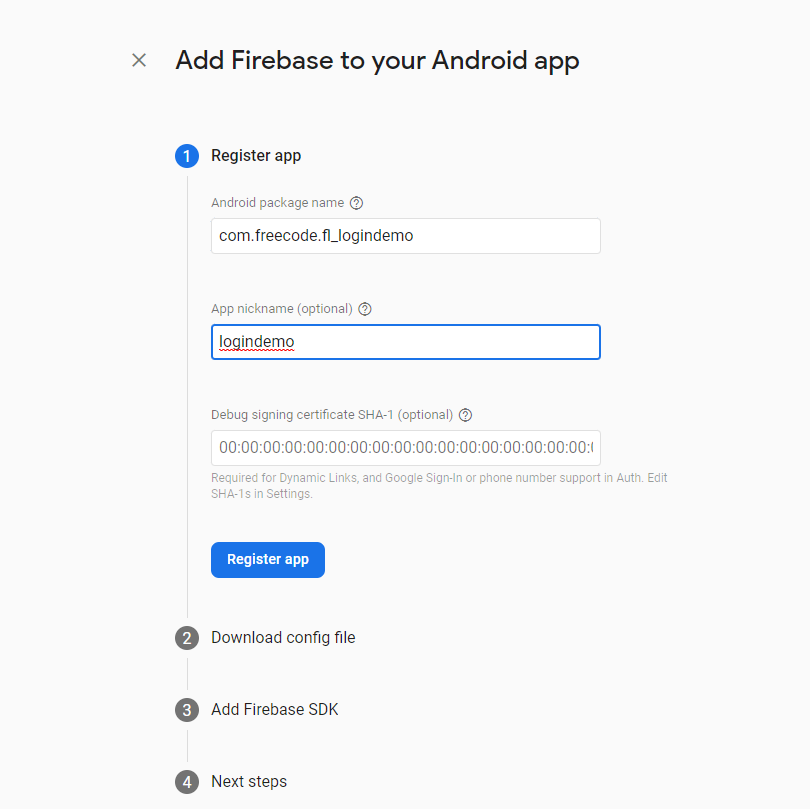
3. Copy the application ID from your flutter project and fill it in on the form below and then click the Register app button to proceed.
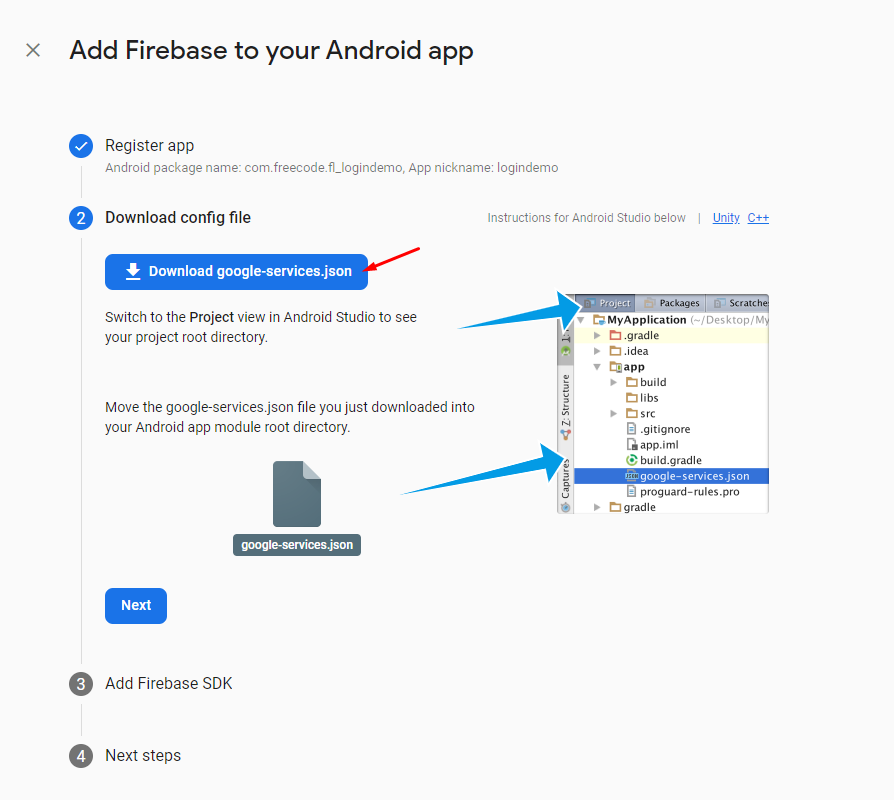
4. Now, you will be instructed to download a configuration file. Just follow the step and download google-services.json file.
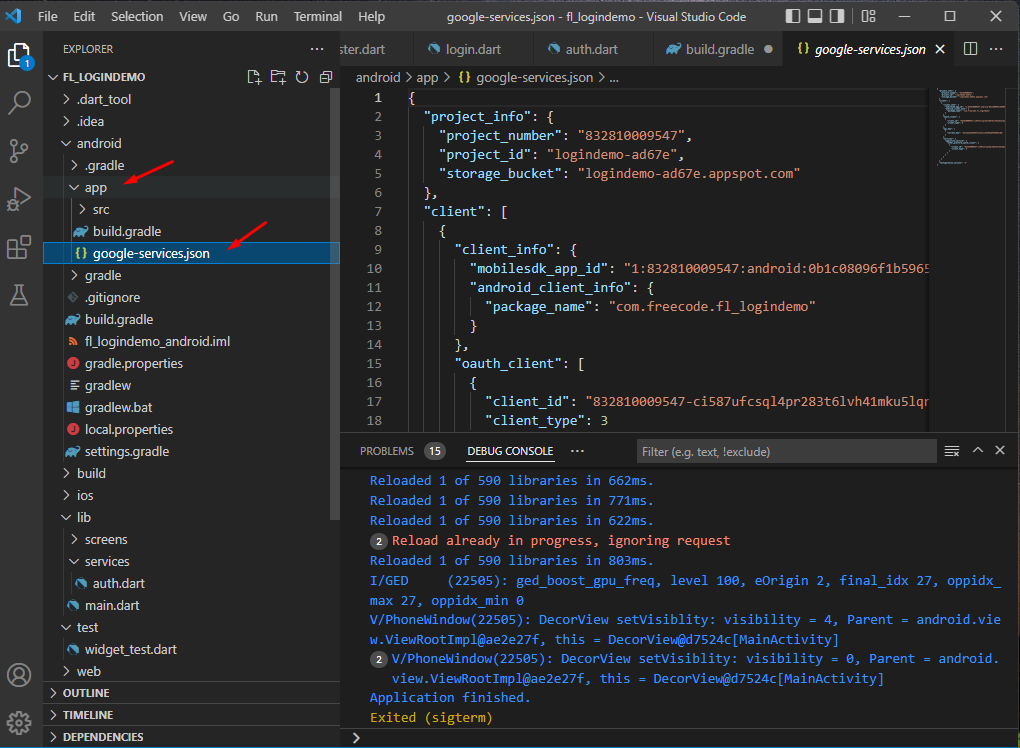
5. After downloading the file place the google-services.json file in your App folder.
6. Add Firebase SDK dependencies. Follow the instructions prompted in this step.
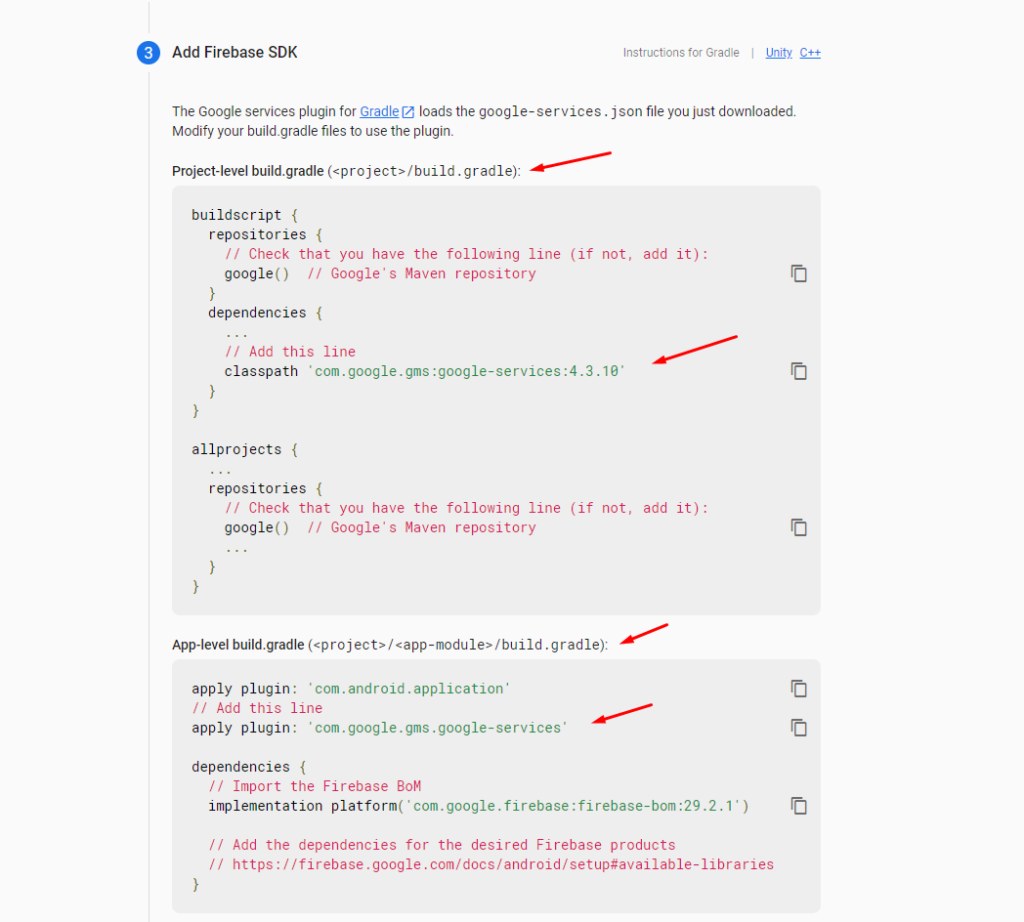
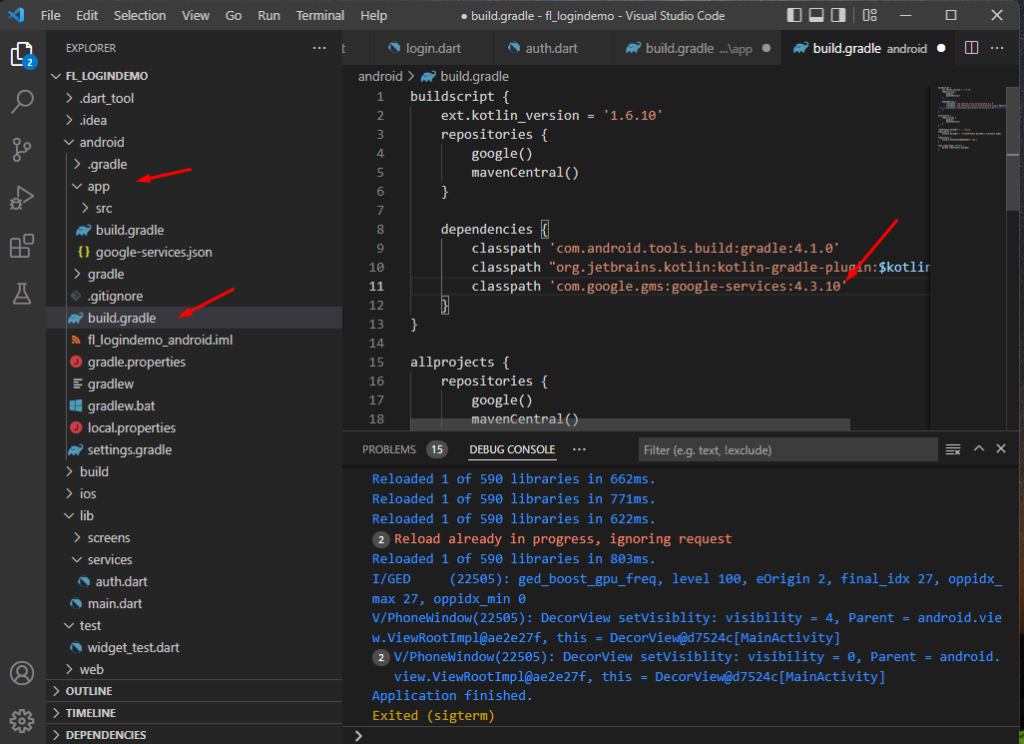
7. Add com.google.gms:google-services:4.3.10 on build.gradle located inside Android » build.gradle inside your flutter project. See the image below.
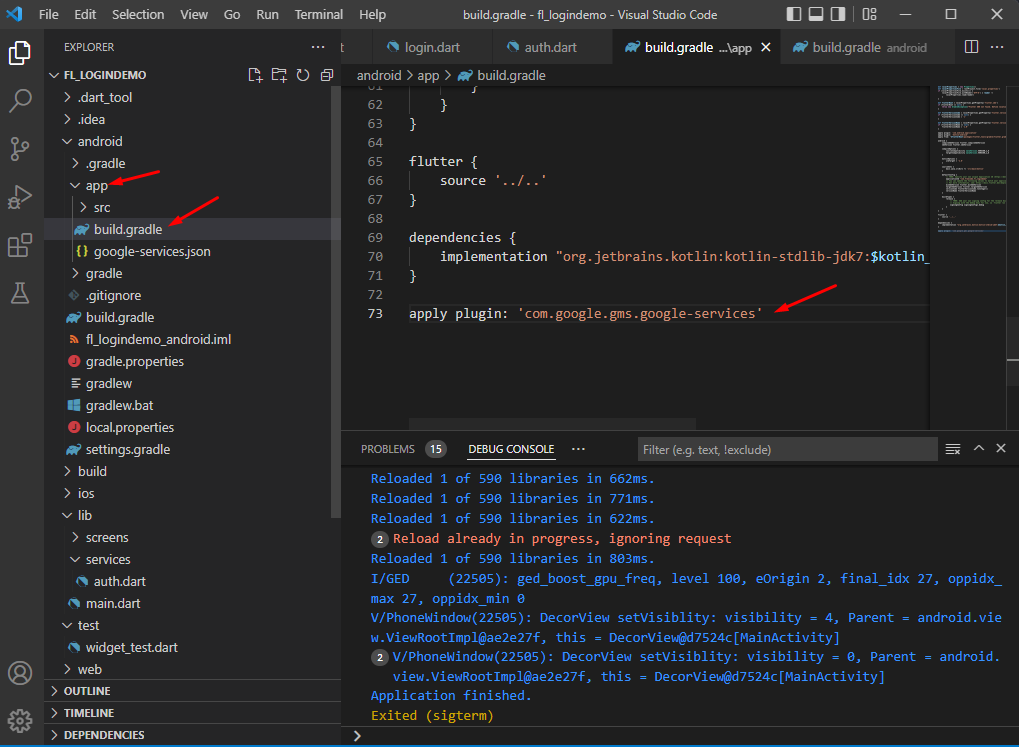
8. Add com.google.gms.google-services plugin on build.gradle under Android » App » buid.gradle inside your flutter project(fl_logindemo).
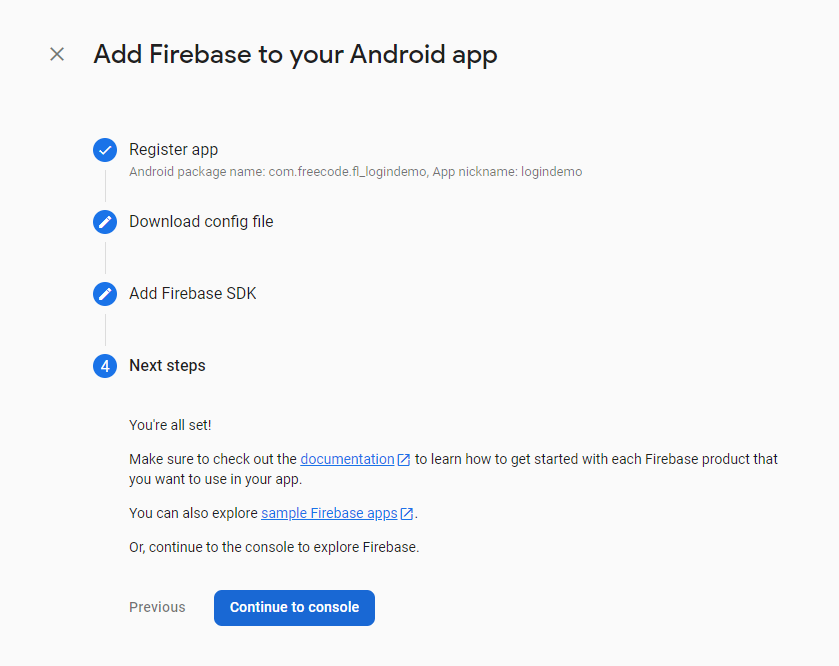
9. Now, that we have executed all the steps on Registering our android app. Click on Continue to Console to move back to the Firebase dashboard.
Enable Firebase Authentication
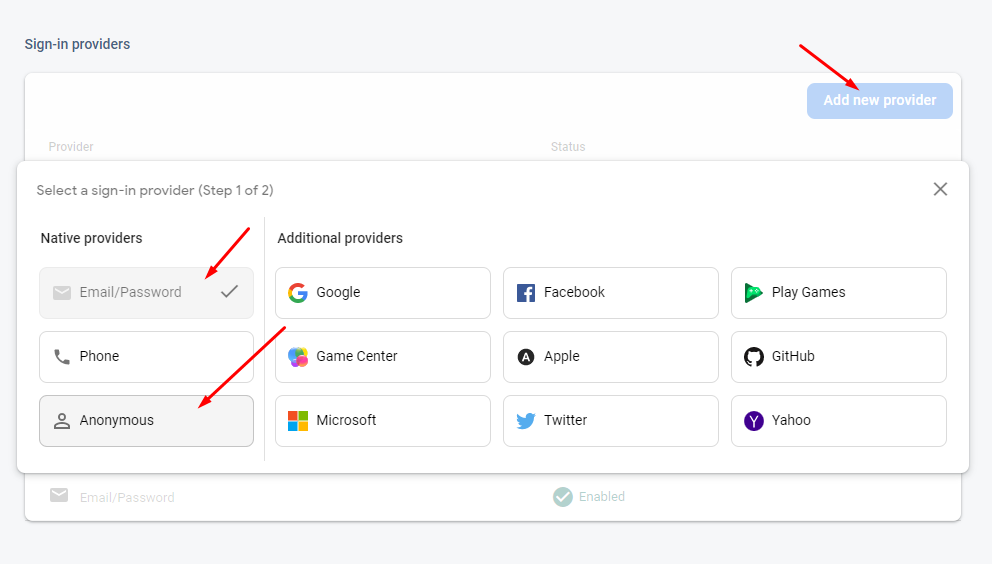
To integrate the sign-in anonymous and sign-in using the Email\Password method on our App we need to enable it on the firebase dashboard.
- Navigate to the Authentication page. See the image below.
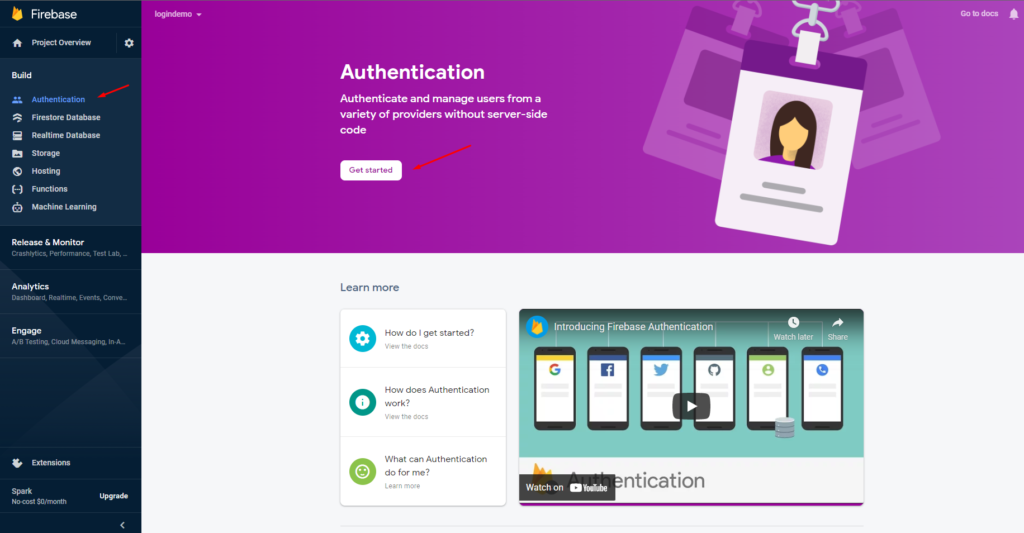
2. Click on Get started and add the sign-in method you want to use on your flutter project. You can still add a new provider later if you decided to use other providers.
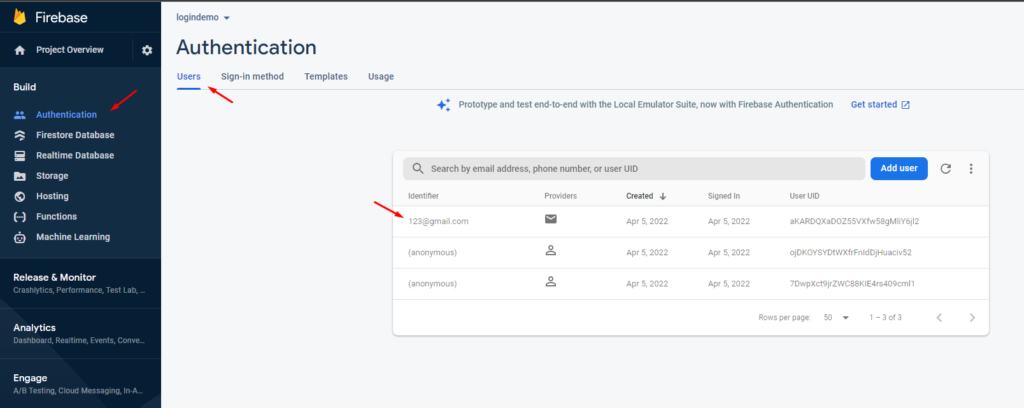
3. Whenever a user will register to your app using this sign-in provider you choose, you can view the user from the Authentication User tab. This is where you can find settings to remove or disable specific users. See the image below.
Install Firebase dependencies on Flutter App.
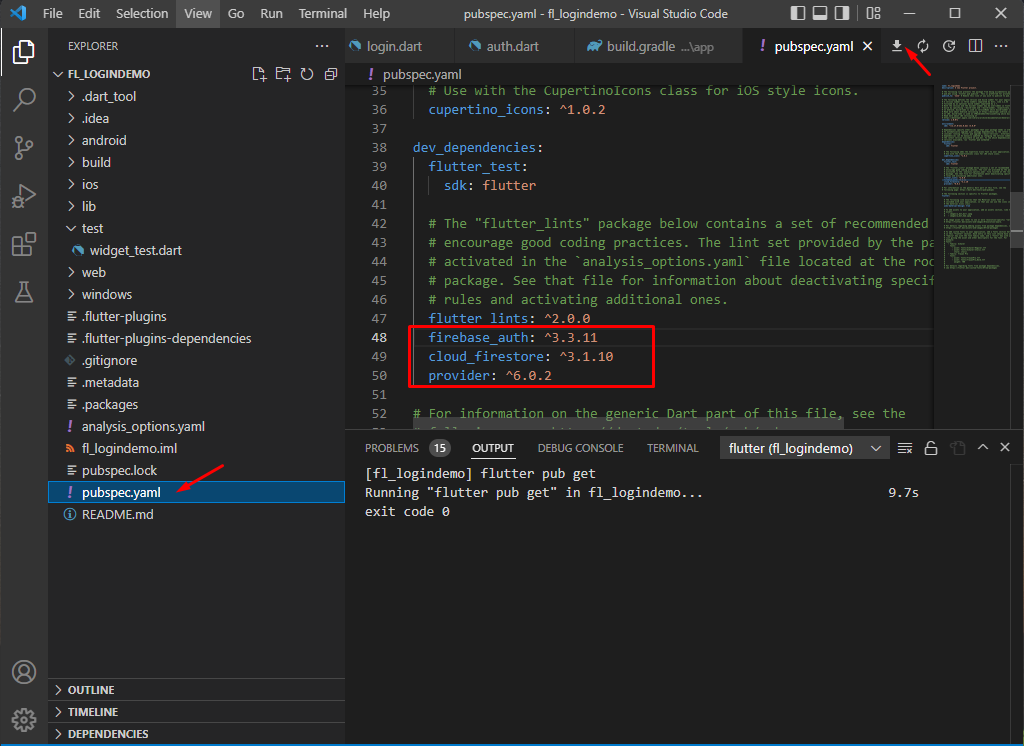
Before we proceed with the coding part on our flutter login and registration using Firebase sign-in provider project, we need to add these dependencies in order for us to utilize Firebase sign-in methods. Below is the list of the plugins that we need for this project.
- firebase_auth: ^3.3.11
- cloud_firestore: ^3.1.10
- provider: ^6.0.2
To install these dependencies, Navigate to your flutter project(fl_logindemo) and open pubspec.yaml . This is where we can register plugins to be utilized inside your app. Once you have added the plugin above, press save, vscode will automatically download and install the plugins.
After adding the plugins you may have an error requiring you to upgrade your minimum SDK version. This will depend on the required minimum SDK of the version of the plugins you use. In my case, cloud_firestore requires me to use a higher SDK version. See the image below.
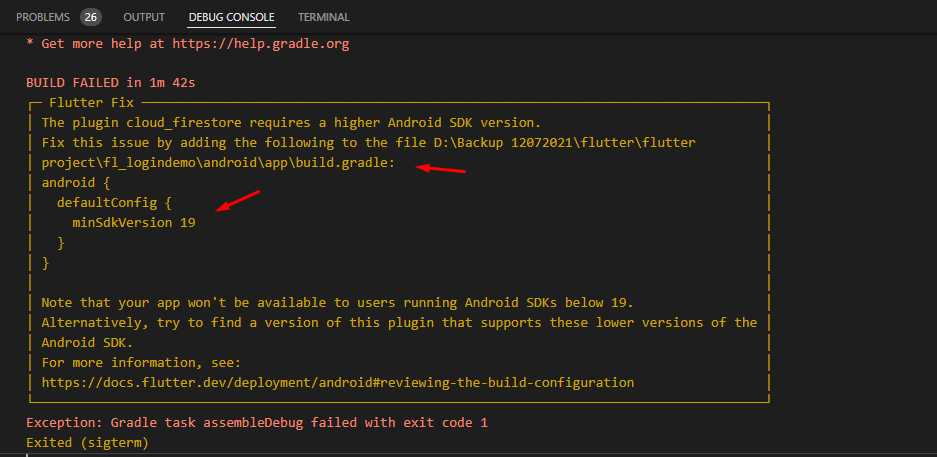
If you have encountered the error above you need to update your minimum SDK version. To do that, follow the steps below.
Set Flutter Minimum SDK Version
SDK version settings are located under build Flutter projects(fl_logindemo) » Android » App » build.gradle . You can change it directly from this file but in my case, I prefer to not touch this and instead change it from your Flutter SDK directory.
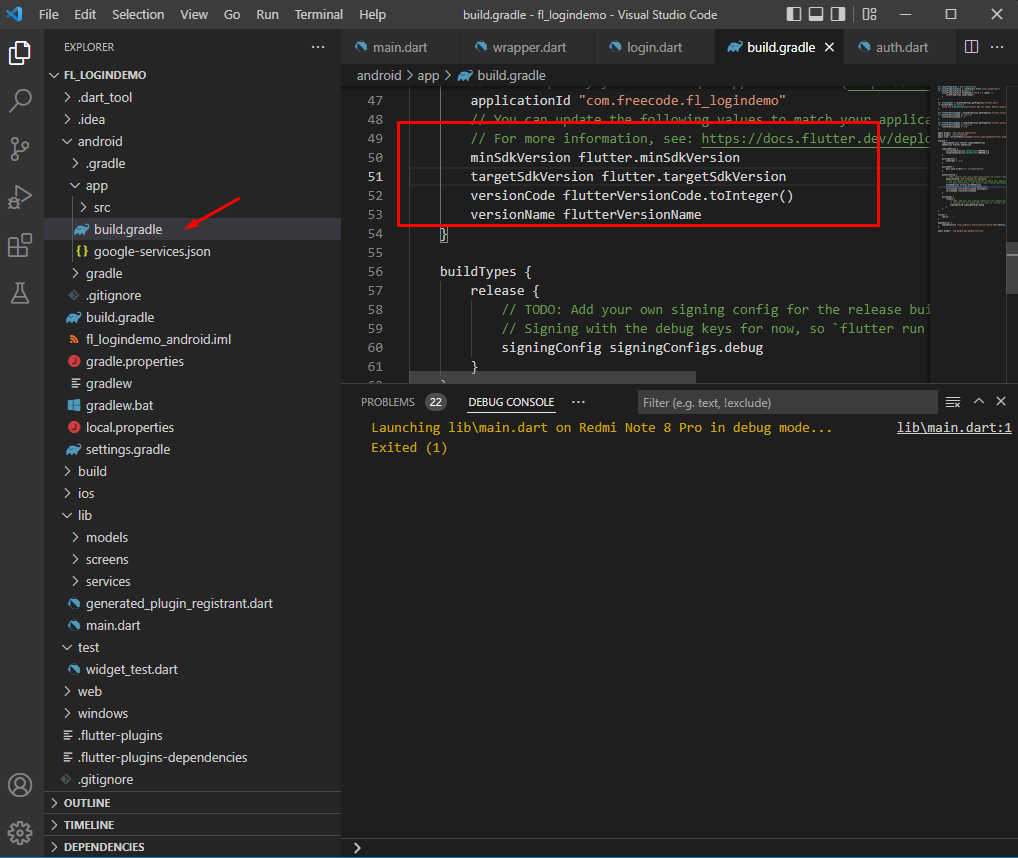
To locate your flutter SDK directory open local.properties file then navigate to the physical path. See the image below.
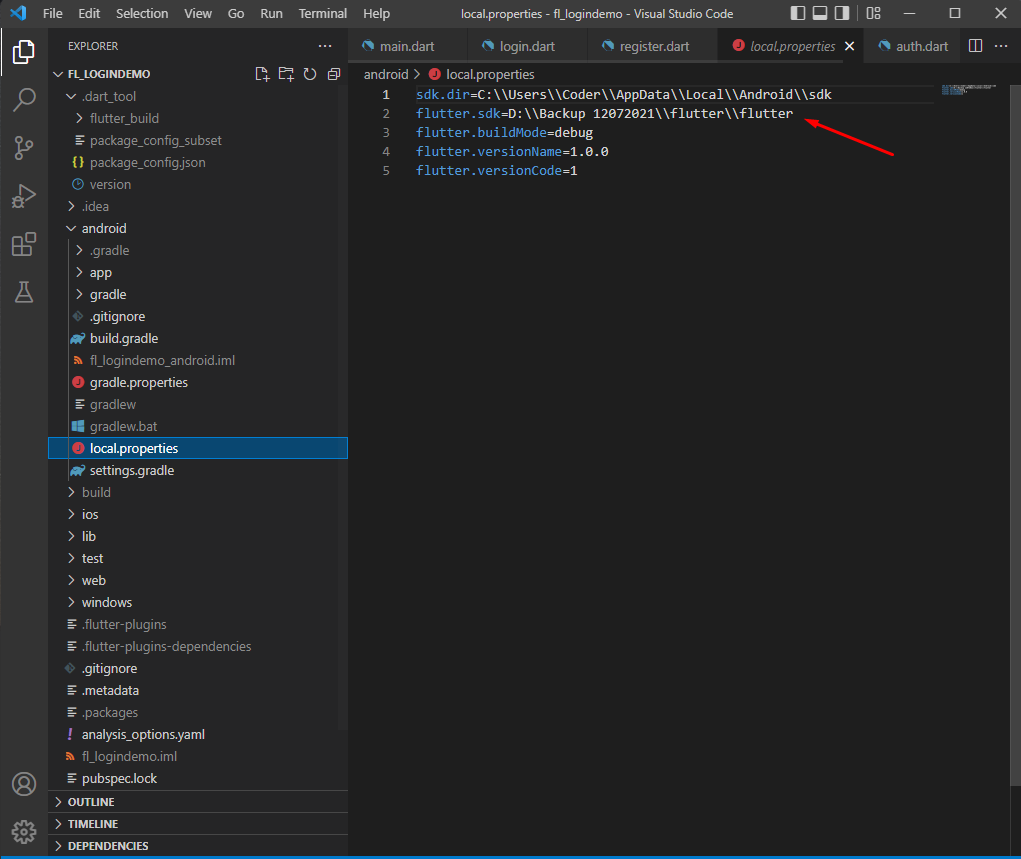
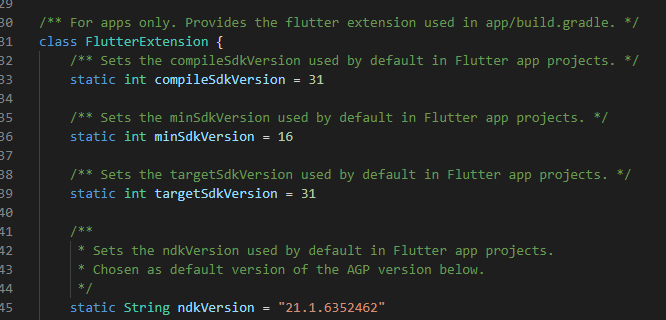
Once, you have located your Flutter SDK directory open flutter.gradle file found inside flutter » flutter » packages » flutter_tools » gradle. You will see the minimum SDK version. You can change the SDK version from here.
Flutter File Structure
Before, we move on to creating our flutter login and registration using Firebase. I’ll explain here the main folder structure for the expected result for this tutorial. This will help you understand the flow as we go through the coding part.
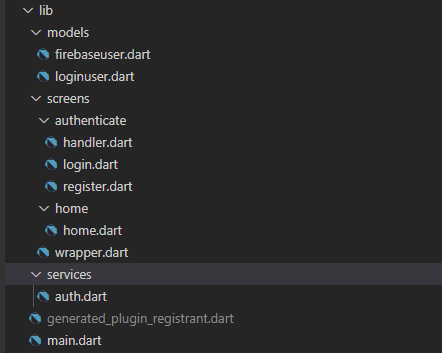
- main.dart » This is the first function executed when you run your flutter app
- wrapper.dart » This will handle to show the home page if a user is already authenticated or call handler.dart for an unauthenticated user.
- handler.dart » This file contains a function that will handle if the user wants to show login or registration screen or UI.
- firebaseuser.dart » This is a property that will be used on mapping Firebase User during authentication.
- loginuser.dart » This model property is used to map record from the user credential in the login and registration form
- login.dart » login UI or screens that will be shown on the user side
- register.dart » register UI or screen that will be shown on the user side
- home.dart » dummy page to show after successful authentication
- auth.dart » contains Firebase Method for sign-in, sign-out, and registration. This is where all the firebase integration will be placed.
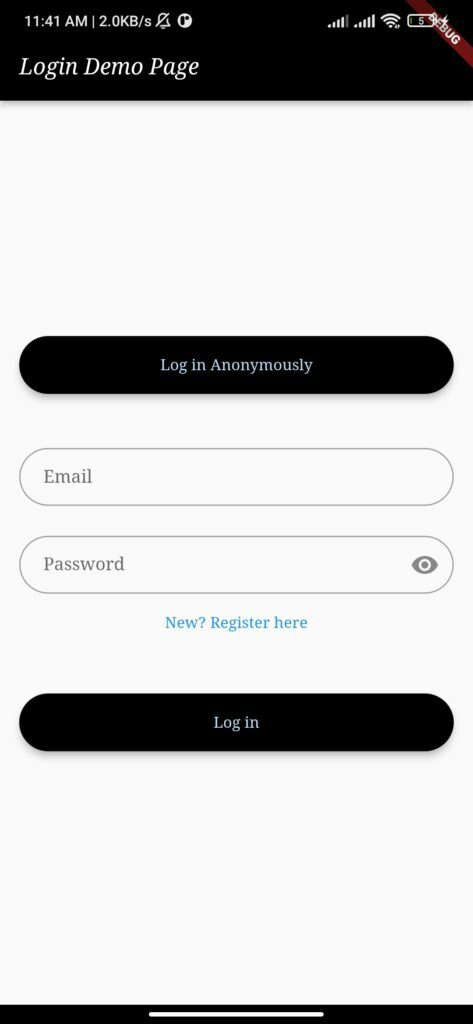
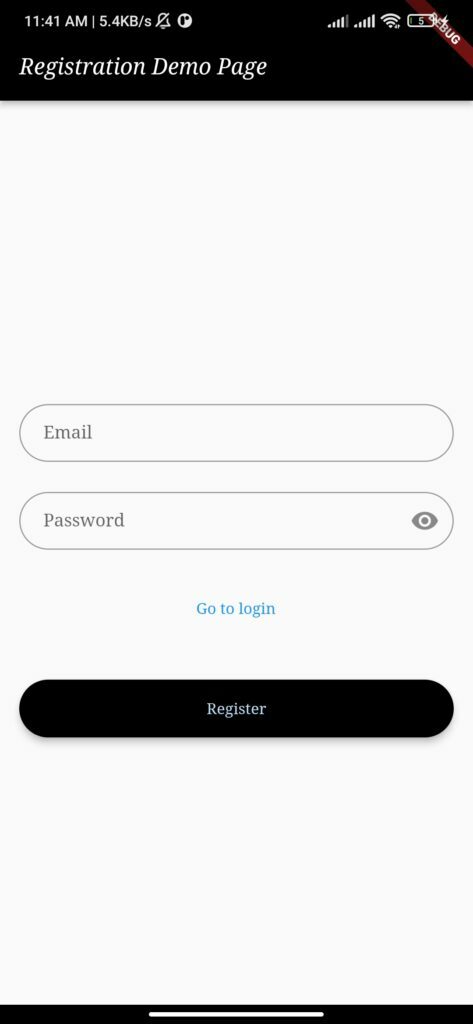
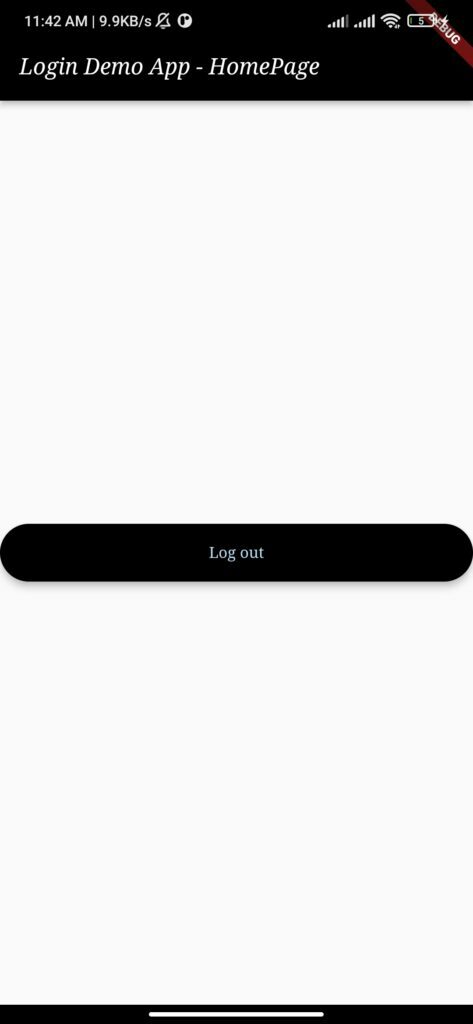
This is the final UI look of the output for this projects. See the image below.
Create Model Properties
Now, open your flutter project then create a models folder. This folder will contain the properties that we need later for mapping information we need from Firebase User.
1. firebaseuser.dart
class FirebaseUser {
  final String? uid ;
  final String? code; //code firebaseauth excemption
  FirebaseUser({this.uid,this.code});
}
For this tutorial I only use two model properties, uid would be my identifier if a user is authenticated and code is the firebase catch code to identify the error response. Below is the response from the Firebase sign-in method.

You may need this record for your future project. You can include the record you need on your properties but for this tutorial, I will only include uid.
2. loginuser.dart
properties for login credential used.
class LoginUser {
  final String? email;
  final String? password;

  LoginUser({this.email, this.password});
}
Add Firebase Authentication Class(Auth.dart)
Create a services folder then create auth.dart file. This file will contain the method that will call the sign-in method of Firebase.
1. Open the file and create AuthService Class. Make sure to include the imports as shown on the code snippet below and initialize FirebaseAuth.
import 'package:firebase_auth/firebase_auth.dart';
import '../models/loginuser.dart';
import '../models/FirebaseUser.dart';

class AuthService {
  final FirebaseAuth _auth = FirebaseAuth.instance;
}
2. Create a sign In Anonymous method. See the code snippet below.
  Future signInAnonymous() async {
    try {
      UserCredential userCredential = await _auth.signInAnonymously();
      User? user = userCredential.user;
      return _firebaseUser(user);
    } catch (e) {
     return FirebaseUser(code: e.toString(), uid: null);
    }
  }
3. Create Sign In with Email and Password method. See the code snippet below.
  Future signInEmailPassword(LoginUser _login) async {
    try {
      UserCredential userCredential = await FirebaseAuth.instance
          .signInWithEmailAndPassword(
              email: _login.email.toString(),
              password: _login.password.toString());
      User? user = userCredential.user;
      return _firebaseUser(user);
    } on FirebaseAuthException catch (e) {
      return FirebaseUser(code: e.code, uid: null);
    }
  }
4. Create Register Email and Password method. See the code snippet below.
  Future registerEmailPassword(LoginUser _login) async {
    try {
      UserCredential userCredential = await FirebaseAuth.instance
          .createUserWithEmailAndPassword(
              email: _login.email.toString(),
              password: _login.password.toString());
      User? user = userCredential.user;
      return _firebaseUser(user);
    } on FirebaseAuthException catch (e) {
      return FirebaseUser(code: e.code, uid: null);
    } catch (e) {
      return FirebaseUser(code: e.toString(), uid: null);
    }
  }
5. Create a sign-out method.
Future signOut() async {
    try {
      return await _auth.signOut();
    } catch (e) {
      return null;
    }
  }
6. Create a method to map Firebase User into our model properties in FirebaseUser.
FirebaseUser? _firebaseUser(User? user) {
    return user != null ? FirebaseUser(uid: user.uid) : null;
  }
7. Create stream method user. This will be used later on by our stream provider listener to check whenever FirbaseAuth Changes.
Stream<FirebaseUser?> get user {
    return _auth.authStateChanges().map(_firebaseUser);
  }
AuthService Full Source Code
import 'package:firebase_auth/firebase_auth.dart';
import '../models/loginuser.dart';
import '../models/FirebaseUser.dart';

class AuthService {
  final FirebaseAuth _auth = FirebaseAuth.instance;


  FirebaseUser? _firebaseUser(User? user) {
    return user != null ? FirebaseUser(uid: user.uid) : null;
  }


  Stream<FirebaseUser?> get user {
    return _auth.authStateChanges().map(_firebaseUser);
  }


  Future signInAnonymous() async {
    try {
      UserCredential userCredential = await _auth.signInAnonymously();
      User? user = userCredential.user;
      return _firebaseUser(user);
    } catch (e) {
     return FirebaseUser(code: e.toString(), uid: null);
    }
  }


  Future signInEmailPassword(LoginUser _login) async {
    try {
      UserCredential userCredential = await FirebaseAuth.instance
          .signInWithEmailAndPassword(
              email: _login.email.toString(),
              password: _login.password.toString());
      User? user = userCredential.user;
      return _firebaseUser(user);
    } on FirebaseAuthException catch (e) {
      return FirebaseUser(code: e.code, uid: null);
    }
  }


  Future registerEmailPassword(LoginUser _login) async {
    try {
      UserCredential userCredential = await FirebaseAuth.instance
          .createUserWithEmailAndPassword(
              email: _login.email.toString(),
              password: _login.password.toString());
      User? user = userCredential.user;
      return _firebaseUser(user);
    } on FirebaseAuthException catch (e) {
      return FirebaseUser(code: e.code, uid: null);
    } catch (e) {
      return FirebaseUser(code: e.toString(), uid: null);
    }
  }


  Future signOut() async {
    try {
      return await _auth.signOut();
    } catch (e) {
      return null;
    }
  }
}
Initialize Firebase in a Flutter Project
1. Navigate to your main.dart file and initialize firebase by invoking Firebase.initiaizeApp(). See the code snippet below.
import 'package:firebase_core/firebase_core.dart';

void main() async{
  WidgetsFlutterBinding.ensureInitialized();
      await Firebase.initializeApp();
     runApp(MyApp());
}
2. Replace your MyApp class with the code snippet below. On the code below I use StreamProvider and call AuthService().user method from the AuthService, whenever the Firebase auth changes this will automatically repopulate the FirebaseUser property.
class MyApp extends StatelessWidget{
  @override
  Widget build(BuildContext context) {

    return StreamProvider<FirebaseUser?>.value(
      value: AuthService().user,
       initialData: null,
       child: MaterialApp(
      theme: ThemeData(
        brightness: Brightness.light,
        primaryColor: Colors.black,
        buttonTheme: ButtonThemeData(
          buttonColor: Colors.black,
          textTheme: ButtonTextTheme.primary,
          colorScheme:
              Theme.of(context).colorScheme.copyWith(secondary: Colors.white),
        ),
        fontFamily: 'Georgia',
        textTheme: const TextTheme(
          headline1: TextStyle(fontSize: 72.0, fontWeight: FontWeight.bold),
          headline6: TextStyle(fontSize: 20.0, fontStyle: FontStyle.italic),
          bodyText2: TextStyle(fontSize: 14.0, fontFamily: 'Hind'),
        ),
        // colorScheme: ColorScheme.fromSwatch().copyWith(secondary: Colors.cyan[600]),
      ),
      home: Wrapper(),
    ),);

  }
}
To retrieve the value from the StreamProvider you can call it using this syntax. See the code below.
final user = Provider.of<FirebaseUser?>(context);main.dart Full Source Code
import 'package:flutter/material.dart';
import 'package:firebase_core/firebase_core.dart';
import 'package:provider/provider.dart';

import 'services/auth.dart';
import 'models/FirebaseUser.dart';
import 'screens/wrapper.dart';
void main() async{
  WidgetsFlutterBinding.ensureInitialized();
      await Firebase.initializeApp();
     runApp(MyApp());
}

class MyApp extends StatelessWidget{
  @override
  Widget build(BuildContext context) {

    return StreamProvider<FirebaseUser?>.value(
      value: AuthService().user,
       initialData: null,
       child: MaterialApp(
      theme: ThemeData(
        brightness: Brightness.light,
        primaryColor: Colors.black,
        buttonTheme: ButtonThemeData(
          buttonColor: Colors.black,
          textTheme: ButtonTextTheme.primary,
          colorScheme:
              Theme.of(context).colorScheme.copyWith(secondary: Colors.white),
        ),
        fontFamily: 'Georgia',
        textTheme: const TextTheme(
          headline1: TextStyle(fontSize: 72.0, fontWeight: FontWeight.bold),
          headline6: TextStyle(fontSize: 20.0, fontStyle: FontStyle.italic),
          bodyText2: TextStyle(fontSize: 14.0, fontFamily: 'Hind'),
        ),
        ),
      home: Wrapper(),
    ),);

  }
}
Create Authentication Middleware
The wrapper will act as middleware that will filter authenticated users and redirect them to either the Home page or the login page (handler.dart) . Create a screens folder and create wrapper.dart file. Use the code snippet below.
import 'package:provider/provider.dart';
import '../screens/home/home.dart';
import 'package:flutter/material.dart';

import '../models/FirebaseUser.dart';
import 'authenticate/handler.dart';

class Wrapper extends StatelessWidget{

  @override
  Widget build(BuildContext context) {

    final user =  Provider.of<FirebaseUser?>(context);

     if(user == null)
     {
       return Handler();
     }else
     {
       return Home();
     }

  }
}
Create an Authentication Handler
Inside the screens folder, create authenticate folder and create handler.dart and use the code snippet below. The function of this handler would be to toggle the login and registration forms depending on the button clicked by the user.
import 'package:fl_logindemo/screens/authenticate/login.dart';
import 'package:fl_logindemo/screens/authenticate/register.dart';
import 'package:flutter/material.dart';

class Handler extends StatefulWidget {
  @override
  State<StatefulWidget> createState() {
    return _Handler();
  }
}

class _Handler extends State<Handler> {

  bool showSignin = true;

  void toggleView(){
    setState(() {
      showSignin = !showSignin;
    });
  }
  @override
  Widget build(BuildContext context) {
    if(showSignin)
    {
       return Login(toggleView : toggleView);
    }else
    {
      return Register(toggleView : toggleView);
    }
  }
}
Create a Login screen
Now, let’s create a login form and call the signinonymous and signinEmailPassword method from AuthService class. Here’s how I call the method from the button onpressed event.
1. _auth.signInAnonymous()
AuthService _auth = AuthService();
dynamic result = await _auth.signInAnonymous();

          if (result.uid == null) { //null means unsuccessfull authentication
            showDialog(
                context: context,
                builder: (context) {
                  return AlertDialog(
                    content: Text(result.code),
                  );
                });
          }
2. _auth.signInEmailPassword(LoginUser(email: _email.text,password: _password.text)
AuthService _auth = AuthService();
dynamic result = await _auth.signInEmailPassword(LoginUser(email: _email.text,password: _password.text));
              if (result.uid == null) { //null means unsuccessfull authentication
                showDialog(
                    context: context,
                    builder: (context) {
                      return AlertDialog(
                        content: Text(result.code),
                      );
                    });
          }
Login.dart Source Code
import 'package:fl_logindemo/models/loginuser.dart';
import 'package:fl_logindemo/services/auth.dart';
import 'package:flutter/material.dart';

class Login extends StatefulWidget {
  final Function? toggleView;
  Login({this.toggleView});

  @override
  State<StatefulWidget> createState() {
    return _Login();
  }
}

class _Login extends State<Login> {
  bool _obscureText = true;

  final _email = TextEditingController();
  final _password = TextEditingController();
  final GlobalKey<FormState> _formKey = GlobalKey<FormState>();
  final AuthService _auth = AuthService();

  @override
  Widget build(BuildContext context) {
    final emailField = TextFormField(
        controller: _email,
        autofocus: false,
        validator: (value) {
          if (value != null) {
            if (value.contains('@') && value.endsWith('.com')) {
              return null;
            }
            return 'Enter a Valid Email Address';
          }
        },
        decoration: InputDecoration(
            contentPadding: const EdgeInsets.fromLTRB(20.0, 15.0, 20.0, 15.0),
            hintText: "Email",
            border:
                OutlineInputBorder(borderRadius: BorderRadius.circular(32.0))));

    final passwordField = TextFormField(
        obscureText: _obscureText,
        controller: _password,
        autofocus: false,
        validator: (value) {
          if (value == null || value.trim().isEmpty) {
            return 'This field is required';
          }
          if (value.trim().length < 8) {
            return 'Password must be at least 8 characters in length';
          }
          // Return null if the entered password is valid
          return null;
        },
        decoration: InputDecoration(
            contentPadding: const EdgeInsets.fromLTRB(20.0, 15.0, 20.0, 15.0),
            hintText: "Password",
            suffixIcon: IconButton(
              icon:
                  Icon(_obscureText ? Icons.visibility : Icons.visibility_off),
              onPressed: () {
                setState(() {
                  _obscureText = !_obscureText;
                });
              },
            ),
            border: OutlineInputBorder(
              borderRadius: BorderRadius.circular(32.0),
            )));

    final txtbutton = TextButton(
        onPressed: () {
          widget.toggleView!();
        },
        child: const Text('New? Register here'));

    final loginAnonymousButon = Material(
      elevation: 5.0,
      borderRadius: BorderRadius.circular(30.0),
      color: Theme.of(context).primaryColor,
      child: MaterialButton(
        minWidth: MediaQuery.of(context).size.width,
        padding: const EdgeInsets.fromLTRB(20.0, 15.0, 20.0, 15.0),
        onPressed: () async {
          dynamic result = await _auth.signInAnonymous();

          if (result.uid == null) { //null means unsuccessfull authentication
            showDialog(
                context: context,
                builder: (context) {
                  return AlertDialog(
                    content: Text(result.code),
                  );
                });
          }
        },
        child: Text(
          "Log in Anonymously",
          style: TextStyle(color: Theme.of(context).primaryColorLight),
          textAlign: TextAlign.center,
        ),
      ),
    );

    final loginEmailPasswordButon = Material(
      elevation: 5.0,
      borderRadius: BorderRadius.circular(30.0),
      color: Theme.of(context).primaryColor,
      child: MaterialButton(
        minWidth: MediaQuery.of(context).size.width,
        padding: const EdgeInsets.fromLTRB(20.0, 15.0, 20.0, 15.0),
        onPressed: () async {
          if (_formKey.currentState!.validate()) {

             dynamic result = await _auth.signInEmailPassword(LoginUser(email: _email.text,password: _password.text));
              if (result.uid == null) { //null means unsuccessfull authentication
                showDialog(
                    context: context,
                    builder: (context) {
                      return AlertDialog(
                        content: Text(result.code),
                      );
                    });
          }
          }
        },
        child: Text(
          "Log in",
          style: TextStyle(color: Theme.of(context).primaryColorLight),
          textAlign: TextAlign.center,
        ),
      ),
    );

    return Scaffold(
      resizeToAvoidBottomInset: false,
      appBar: AppBar(
        title: const Text('Login Demo Page'),
        backgroundColor: Theme.of(context).primaryColor,
      ),
      body: Column(
        mainAxisAlignment: MainAxisAlignment.center,
        children: [
          Form(
            key: _formKey,
            child: Padding(
              padding: const EdgeInsets.all(16.0),
              child: Column(
                crossAxisAlignment: CrossAxisAlignment.center,
                mainAxisAlignment: MainAxisAlignment.center,
                children: <Widget>[
                  loginAnonymousButon,
                  const SizedBox(height: 45.0),
                  emailField,
                  const SizedBox(height: 25.0),
                  passwordField,
                  txtbutton,
                  const SizedBox(height: 35.0),
                  loginEmailPasswordButon,
                  const SizedBox(height: 15.0),
                ],
              ),
            ),
          ),
        ],
      ),
    );
  }
}
Create a Register Screen
Same procedure as the login create a form and call registerEmailPassword method from AuthService class on the Register button.
Register button onpressed event:
AuthService _auth = AuthService();
dynamic result = await _auth.registerEmailPassword(LoginUser(email: _email.text,password: _password.text));
               if (result.uid == null) { //null means unsuccessfull authentication
                showDialog(
                    context: context,
                    builder: (context) {
                      return AlertDialog(
                        content: Text(result.code),
                      );
                    });
          }
Register.dart Source Code
import 'package:fl_logindemo/models/loginuser.dart';
import 'package:fl_logindemo/services/auth.dart';
import 'package:flutter/material.dart';


class Register extends StatefulWidget{

  final Function? toggleView;
   Register({this.toggleView});

   @override
  State<StatefulWidget> createState() {
    return _Register();
  }
}

class _Register extends State<Register>{
  final AuthService _auth = AuthService();

  bool _obscureText = true;
  final _email = TextEditingController();
  final _password = TextEditingController();
  final GlobalKey<FormState> _formKey = GlobalKey<FormState>();
  @override
  Widget build(BuildContext context) {

  final emailField = TextFormField(
        controller: _email,
        autofocus: false,
        validator: (value) {
          if (value != null) {
            if (value.contains('@') && value.endsWith('.com')) {
              return null;
            }
            return 'Enter a Valid Email Address';
          }
        },
        decoration: InputDecoration(
            contentPadding: const EdgeInsets.fromLTRB(20.0, 15.0, 20.0, 15.0),
            hintText: "Email",
            border:
                OutlineInputBorder(borderRadius: BorderRadius.circular(32.0))));

    final passwordField = TextFormField(
        obscureText: _obscureText,
        controller: _password,
        autofocus: false,
        validator: (value) {
         if (value == null || value.trim().isEmpty) {
                            return 'This field is required';
                          }
                          if (value.trim().length < 8) {
                            return 'Password must be at least 8 characters in length';
                          }
                          // Return null if the entered password is valid
                          return null;
        } ,
        decoration: InputDecoration(
            contentPadding: const EdgeInsets.fromLTRB(20.0, 15.0, 20.0, 15.0),
            hintText: "Password",
             suffixIcon: IconButton(icon: Icon(_obscureText ? Icons.visibility : Icons.visibility_off),
            onPressed: (){
              setState(() {
                _obscureText = !_obscureText;
              });
            },),
            border:
                OutlineInputBorder(borderRadius: BorderRadius.circular(32.0))));

    final txtbutton = TextButton(
        onPressed: () {
         widget.toggleView!();
        },
        child: const Text('Go to login'));

    final registerButton = Material(
      elevation: 5.0,
      borderRadius: BorderRadius.circular(30.0),
      color: Theme.of(context).primaryColor,
      child: MaterialButton(
        minWidth: MediaQuery.of(context).size.width,
        padding: const EdgeInsets.fromLTRB(20.0, 15.0, 20.0, 15.0),
        onPressed: () async {
          if (_formKey.currentState!.validate()) {
              dynamic result = await _auth.registerEmailPassword(LoginUser(email: _email.text,password: _password.text));
               if (result.uid == null) { //null means unsuccessfull authentication
                showDialog(
                    context: context,
                    builder: (context) {
                      return AlertDialog(
                        content: Text(result.code),
                      );
                    });
          }
          }
        },
        child: Text(
          "Register",
          style: TextStyle(color: Theme.of(context).primaryColorLight),
          textAlign: TextAlign.center,
        ),
      ),
    );


   return Scaffold(
      resizeToAvoidBottomInset: false,
      appBar: AppBar(
          title: const Text('Registration Demo Page'),
          backgroundColor: Theme.of(context).primaryColor,
        ),
        body: Column(
      mainAxisAlignment: MainAxisAlignment.center,
      children: [
        Form(
          autovalidateMode: AutovalidateMode.always,
          key: _formKey,
          child: Padding(
            padding: const EdgeInsets.all(16.0),
            child: Column(
              crossAxisAlignment: CrossAxisAlignment.center,
              mainAxisAlignment: MainAxisAlignment.center,
              children: <Widget>[
                const SizedBox(height: 45.0),
                emailField,
                const SizedBox(height: 25.0),
                passwordField,
                const SizedBox(height: 25.0),
                txtbutton,
                const SizedBox( height: 35.0),
                registerButton,
                const SizedBox(height: 15.0),
              ],
            ),
          ),
        ),
      ],
    ),
    );
  }
}
Create Home Screen with a sign-out button
Create a home folder inside the screens folder and create home.dart file. This will be the home screen for users who is successfully authenticated. We will also add a sign-out button on the Home screen.
SignOut button code :
  final SignOut = Material(
      elevation: 5.0,
      borderRadius: BorderRadius.circular(30.0),
      color: Theme.of(context).primaryColor,
      child: MaterialButton(
        minWidth: MediaQuery.of(context).size.width,
        padding: const EdgeInsets.fromLTRB(20.0, 15.0, 20.0, 15.0),
        onPressed: () async {
           await _auth.signOut();
        },
        child: Text(
          "Log out",
          style: TextStyle(color: Theme.of(context).primaryColorLight),
          textAlign: TextAlign.center,
        ),
      ),
    );
home.dart Source Code
import 'package:fl_logindemo/services/auth.dart';
import 'package:flutter/material.dart';

class Home extends StatefulWidget{
  @override
  State<StatefulWidget> createState() {
    return _Home();
  }
}

class _Home extends State<Home>{
  final AuthService _auth = new AuthService();

  @override
  Widget build(BuildContext context) {


  final SignOut = Material(
      elevation: 5.0,
      borderRadius: BorderRadius.circular(30.0),
      color: Theme.of(context).primaryColor,
      child: MaterialButton(
        minWidth: MediaQuery.of(context).size.width,
        padding: const EdgeInsets.fromLTRB(20.0, 15.0, 20.0, 15.0),
        onPressed: () async {
           await _auth.signOut();
        },
        child: Text(
          "Log out",
          style: TextStyle(color: Theme.of(context).primaryColorLight),
          textAlign: TextAlign.center,
        ),
      ),
    );

    return Scaffold(
      appBar: AppBar(
        title: const Text('Login Demo App - HomePage'),
          backgroundColor: Theme.of(context).primaryColor,
      ),
      body: Center(child: SignOut),
    );
  }
}
Now, you can test your application by using the “flutter run” command. You need to have an emulator or an android phone connected to your machine to test the application.
You may also check out the source code from my Github account @coderbugzz or download directly using the link below.
To download our free source code from this tutorial, you can use the button below.
Note: Extract the file using 7Zip and use password: freecodespot
Summary
We have learned from this article how we can create flutter login and registration using Firebase. From creating a flutter project to setting up a new firebase account and integrating it into our project. We have successfully implemented a firebase sign-in anonymous, sign-in, and registration using email and password. This is just a simple flutter project but hopefully, you can use this as a reference for your future project.
KEEP CODING!
