In this article, we’ll explore how to use Livewire to create an inventory management app that supports importing and exporting Excel files.
- Tutorial Preview:
- I. Setting Up the Laravel Project
- II. Database Setup
- III. Creating the Inventory Model and Livewire Component
- IV. Building the Livewire Component
- V. Implementing Import and Export Logic
- VI. Creating the Blade View
- VII. Create App Layout
- VIII. Adding Routes and Including Livewire Component
- IX. Run Application
- Summary
Before we begin, ensure you have installed the following:
Visit this article to guide you to configure Laravel on your local environment
Tutorial Preview:
I. Setting Up the Laravel Project
Let’s start by setting up a new Laravel app. To do that, follow the steps below.
1. Create a New Laravel Project:
composer create-project --prefer-dist laravel/laravel inventory-appcd inventory-app2. Install Livewire:
composer require livewire/livewire3. Install Laravel Excel:
composer require maatwebsite/excel:^3.14. Or install maatwebsite without the version and manually update the composer file and run
composer update5. Install Tailwind CSS (optional for styling):
The latest Laravel uses Tailwind as the default styling, so for this tutorial, we are going to utilize it. If it is missing on your project you can install it by executing the following command.
npm installnpm install -D tailwindcss postcss autoprefixernpx tailwindcss init -p6. Configure Tailwind in your tailwind.config.js
The tailwind config file can be found in your project root directory. Open the file and replace the content with the source code provided below.
/** @type {import('tailwindcss').Config} */
import defaultTheme from 'tailwindcss/defaultTheme';

export default {
  content: [
    './vendor/laravel/framework/src/Illuminate/Pagination/resources/views/*.blade.php',
        './storage/framework/views/*.php',
        './resources/views/**/*.blade.php',
        "./resources/**/*.js",
        "./resources/**/*.vue",
  ],
  theme: {
    extend: {
    },
  },
  plugins: [],
}
7. To apply the tailwind in your project register it’s dependency by adding it to your resources/css/app.css:
@tailwind base;
@tailwind components;
@tailwind utilities;
II. Database Setup
Let’s set which database provider we will use in our project. To do that, open .env file and set up the database connection by replacing the following line with your actual MySQL connection.
DB_CONNECTION=mysql
DB_HOST=127.0.0.1
DB_PORT=3306
DB_DATABASE=inventory_db
DB_USERNAME=root
DB_PASSWORD=
Then, create a migration for the inventory items:
php artisan make:migration create_inventory_items_tableThe code above will generate a migration file located inside the database » migration and look for the file that contains the name you provided which in my case is “2024_05_27_013244_create_inventory_items_table.php”.
Open the file and define the schema using the columns you need for the table.
    public function up(): void
    {
        Schema::create('inventory_items', function (Blueprint $table) {
            $table->id();
            $table->string('code');
            $table->string('name');
            $table->string('category');
            $table->integer('quantity');
            $table->decimal('price', 8, 2);
            $table->timestamps();
        });
    }
Run the migration:
php artisan migrateIf you downloaded the source code from this tutorial, it might not work. You need to create the database with the name you set on your .env file and run the following command.
php artisan migrate:refresh --seedThis will run all the migration and you are good to go.
III. Creating the Inventory Model and Livewire Component
Let’s start creating the component. To do that, follow the steps below.
1. Create the InventoryItem model:
php artisan make:model InventoryItemYou can locate the file by navigating to the folder app » Models.
2. Open InventoryItem and add fillable columns.
  protected $fillable = [
        'code',
        'name',
        'category',
        'quantity',
        'price',
    ];
3. Create a Livewire Component:
php artisan make:livewire InventoryManagerThe command above will create a new folder Livewire inside the app folder. This is where InventoryManager component can be found. This will also make a livewire view under resources » livewire » inventory-manager.blade.php.
After that, we can modify the code and apply the function we need for this demo.
IV. Building the Livewire Component
Open the Livewire component (InventoryManager.php) and edit the content to handle file import and export:
<?php


namespace App\Livewire;


use Livewire\Component;
use Livewire\WithFileUploads;
use App\Models\InventoryItem;
use Maatwebsite\Excel\Facades\Excel;
use Livewire\Attributes\Layout;
use App\Imports\InventoryImport;
use App\Exports\InventoryExport;
use Livewire\WithPagination;


#[Layout('layouts.app')]
class InventoryManager extends Component
{
    use WithFileUploads;
    use WithPagination;


    public $file;


    public function import()
    {
        $this->validate([
            'file' => 'required|mimes:xls,xlsx',
        ]);


        Excel::import(new InventoryImport, $this->file->path());


        session()->flash('message', 'Inventory imported successfully.');
    }


    public function export()
    {
        return Excel::download(new InventoryExport, 'inventory.xlsx');
    }


    public function render()
    {
        $items = InventoryItem::paginate(5);
        return view('livewire.inventory-manager', [
            'items' => $items,
        ]);
    }


    public function delete($id)
    {
        InventoryItem::find($id)->delete();
        session()->flash('message', 'Inventory Deleted Successfully.');
    }
}
V. Implementing Import and Export Logic
Create the import and export classes:
php artisan make:import InventoryImport --model=InventoryItemphp artisan make:export InventoryExport --model=InventoryItemNavigate to the app » Imports and edit the InventoryImport class:
<?php


namespace App\Imports;


use App\Models\InventoryItem;
use Maatwebsite\Excel\Concerns\ToModel;
use Maatwebsite\Excel\Concerns\WithHeadingRow;


class InventoryImport implements ToModel, WithHeadingRow
{
    /**
    * @param array $row
    *
    * @return \Illuminate\Database\Eloquent\Model|null
    */
    public function model(array $row)
    {
        info($row);


        return new InventoryItem([
            'code' => $row['code'],
            'name' => $row['name'],
            'category' => $row['category'],
            'quantity' => $row['quantity'],
            'price' => $row['price'],
            ]);

    }

}
Next, navigate to the app » Export folder and edit the InventoryExport class:
<?php


namespace App\Exports;


use App\Models\InventoryItem;
use Maatwebsite\Excel\Concerns\FromCollection;
use Maatwebsite\Excel\Concerns\WithHeadings;


class InventoryExport implements FromCollection, WithHeadings
{
    public function headings(): array
    {
        return [
            'ID',
            'Code',
            'Name',
            'Category',
            'Quantity',
            'Price',
            'Created Date',
            'Updated Date'
        ];
    }

    /**
    * @return \Illuminate\Support\Collection
    */
    public function collection()
    {
        return InventoryItem::all();
    }
}
VI. Creating the Blade View
Create a Blade view for the Livewire component (resources/views/livewire/inventory-manager.blade.php):
<div class="p-10">
    <h1 class="text-2xl mb-4">Inventory Management</h1>


    @if (session()->has('message'))
        <div class="alert alert-success">{{ session('message') }}</div>
    @endif


    <div class="flex mb-4">
        <div class="w-1/2 h-12">
            <form wire:submit.prevent="import" class="mb-4">
                <input type="file" wire:model="file">
                @error('file')
                    <span class="error">{{ $message }}</span>
                @enderror
                <button type="submit" class="bg-blue-500 hover:bg-blue-700 text-white font-bold py-2 px-4 rounded">Import</button>
            </form>
        </div>
        <div class="w-1/2 h-12">
            <button wire:click="export" class="bg-blue-500 hover:bg-blue-700 text-white font-bold py-2 px-4 rounded">Export</button>
        </div>
      </div>


    <table class="table-auto w-full">
        <thead>
            <tr>
                <th class="px-4 py-2"><div class="flex items-center">Name</div></th>
                <th class="px-4 py-2"><div class="flex items-center">Quantity</div></th>
                <th class="px-4 py-2"><div class="flex items-center">Price</div></th>
                <th class="px-4 py-2">
                    <div class="flex items-center">Actions</div>
                </th>
            </tr>
        </thead>
        <tbody>
            @foreach ($items as $item)
                <tr>
                    <td class="border px-4 py-2">{{ $item->name }}</td>
                    <td class="border px-4 py-2">{{ $item->quantity }}</td>
                    <td class="border px-4 py-2">{{ $item->price }}</td>
                    <td class="border px-4 py-2">
                        <button wire:click="delete({{ $item->id }})"  class="bg-red-500 hover:bg-red-700 text-white text-sm font-bold py-1 px-2 rounded">Delete</button>
                    </td>
                </tr>
            @endforeach
        </tbody>
    </table>
    <div class="mt-4">
        {{ $items->links() }}
     </div>
</div>
VII. Create App Layout
If you have no existing App layout blade template you can create by running this command.
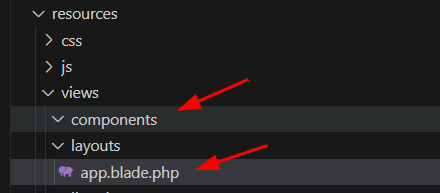
php artisan make:component AppLayoutThe command above will create a component inside app/Views/Components with the name you provided during the creation which in my case is AppLayout. Open the file and make sure you return the right view.
public function render(): View|Closure|string
    {
        return view('layouts.app');
    }
The make:component command also creates a blade template inside resources/views/components named components.app-layout. Create a new folder named layouts. Transfer the file and rename it as app.blade.php.

VIII. Adding Routes and Including Livewire Component
1. Add a route to display the Livewire component in web.php:
use App\Livewire\InventoryManager;


Route::get('/inventory', InventoryManager::class);
2. Include Livewire scripts in your resources/views/layouts/app.blade.php:
<!DOCTYPE html>
<html lang="{{ str_replace('_', '-', app()->getLocale()) }}">
<head>
    <meta charset="utf-8">
        <meta name="viewport" content="width=device-width, initial-scale=1">
        <meta name="csrf-token" content="{{ csrf_token() }}">


    <title>Inventory App</title>
    @livewireStyles
    @vite(['resources/css/app.css', 'resources/js/app.js'])
</head>


<body>
    <div class="container mx-auto">
       <main>
        {{ $slot }}
       </main>
    </div>
    @livewireScripts
</body>

</html>
IX. Run Application
Now, it’s time to run and test the application.
1. Open a new terminal and run:
npm run devThis will compile our development resources to apply style seamlessly.
2. Open another terminal and run:
php artisan serve
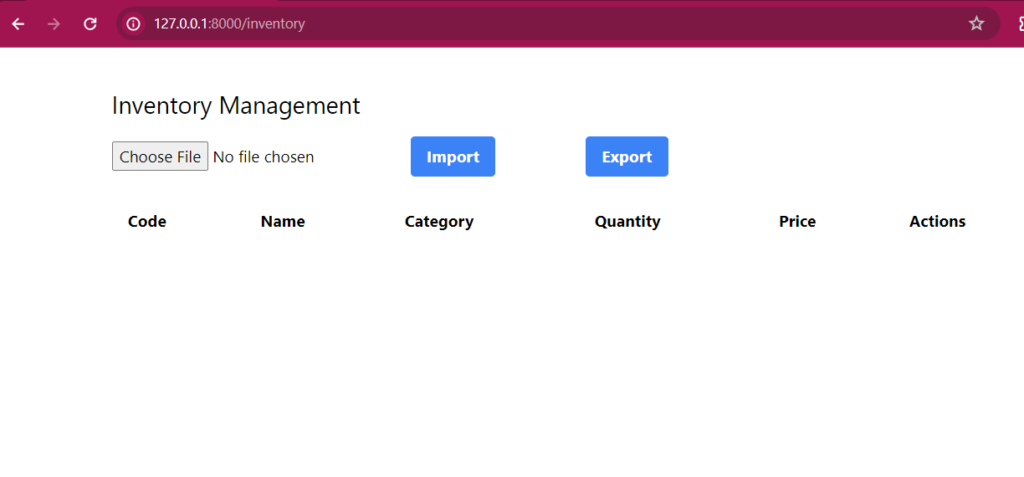
3. Browse http://127.0.0.1:8000/Inventory and you will see this simple straightforward UI.

4. Create an Excel file with this format.

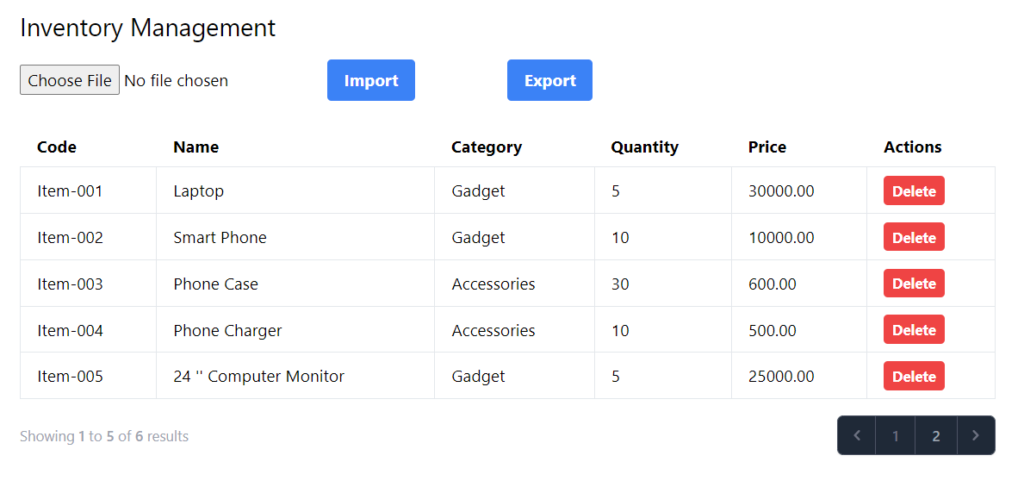
5. Perform upload by clicking the Choose File button and look for your sample Excel file. Then click import.

6. Now, test export you should be able to download the file with this content.

Now to download our free source code from this tutorial, you can use the button below.
Note: Extract the file using 7Zip and use password: freecodespot
You can also use this link to download the demo project: Laravel Livewire Excel Upload & Download Demo.
Summary
In this article, we’ve built a simple inventory management application using Laravel Livewire and Laravel Excel. The app allows users to import and export inventory data through Excel files. This approach leverages Livewire’s powerful real-time capabilities and Laravel’s robust ecosystem, resulting in a seamless and efficient user experience. With this foundation, you can further extend the application to include more features like search, pagination, and advanced data analytics. Happy coding!
