In this tutorial, we’ll explore how to use JWT (JSON Web Tokens) in a Slimphp Slim Skeleton API. We’ll walk through the steps for implementing JWT authentication to secure your API endpoints. Additionally, we’ll cover how to generate and validate tokens efficiently. By the end, you’ll have a comprehensive understanding of how to integrate JWT into your Slimphp Slim Skeleton API to enhance security and manage user authentication. Let’s get started and see how it all comes together!
Introduction to JWT and Slimphp
What is JWT (JSON Web Tokens)?
JSON Web Tokens (JWT) are a compact and self-contained way for securely transmitting information between parties as a JSON object. JWTs are widely used for authentication and information exchange. They consist of three parts:
- Header: Contains metadata about the token.
- Payload: Contains the claims. This is the data you want to transmit.
- Signature: Verifies the token’s integrity and authenticity.
Importance of JWT in API Authentication
JWTs are essential in API authentication because they enable stateless authentication mechanisms. This means that the server does not need to keep track of user sessions. Once a user is authenticated, the server generates a JWT and sends it to the client. The client then includes this token in the Authorization header of subsequent requests.
Overview of Slimphp
Slimphp is a micro-framework for PHP that helps you quickly write simple yet powerful web applications and APIs. Slim provides a fast and powerful router, middleware architecture, and support for dependency injection, making it a popular choice for building APIs.
Setting Up the Slim Skeleton
Installing Slim Skeleton
To get started with Slim Skeleton, you need to have Composer installed on your machine. You can install Slim Skeleton by running the following command.
composer create-project slim/slim-skeleton jwt-slimphp-demoAfter the installation change directory to the newly created project using this command.
cd jwt-slimphp-demoConfiguring the Slim Skeleton Application
Once the Slim Skeleton is set up, you need to configure it for JWT implementation. The configuration involves setting up dependencies and middleware.
Required Dependencies for JWT Implementation
You’ll need the following dependencies.
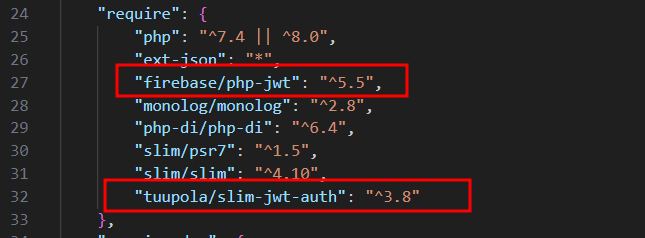
firebase/php-jwt: A library for creating and validating JWTs.tuupola/slim-jwt-auth: Middleware for Slim that helps with JWT authentication.
Install these dependencies using Composer.
composer require firebase/php-jwt tuupola/slim-jwt-authTo verify open composer.json and look for require section and verify if the dependencies were added.

Generating and Configuring JWT
Step-by-Step Guide on Generating JWT
First, create a secret key that will be used to sign the JWT. Then replace the secret key value inside the code snippet given below.
Register JWT Config Setting
Open settings.php inside the app directory and register the following JWT config.
  'jwt' => [
                    'secret' => 'secret key value',
                    'attribute' => 'token',
                    'secure' => false, // Set to true in production
                    'relaxed' => ['localhost', 'your-domain.com'],
                    'algorithm' => ['HS256'],
                ],
Generating JWT
Create a new folder named Helper inside the src directory. Then create a file named JwtHelper.php.
<?php
namespace App\Helper;

use Firebase\JWT\JWT;
use Firebase\JWT\Key;
use Psr\Log\LoggerInterface;

class JwtHelper
{
    private $secretKey;
    private $logger;

    public function __construct(string $secretKey, LoggerInterface $logger)
    {
        $this->secretKey = $secretKey;
        $this->logger = $logger;
    }

    public function encode(array $data): string
    {
        $this->logger->info('Encoding JWT', ['data' => $data]);
        $token = JWT::encode($data, $this->secretKey, 'HS256');
        $this->logger->info('JWT encoded', ['token' => $token]);
        return $token;
    }

    public function decode(string $jwt): object
    {
        $this->logger->info('Decoding JWT', ['jwt' => $jwt]);
        try {
            $decoded = JWT::decode($jwt, new Key($this->secretKey, 'HS256'));
            $this->logger->info('JWT decoded', ['decoded' => (array)$decoded]);
            return $decoded;
        } catch (\Exception $e) {
            $this->logger->error('JWT decoding failed', ['error' => $e->getMessage()]);
            throw $e;
        }
    }
}
Configuring Slimphp to Use JWT for Authentication
Create JwtMiddleware
Now, let’s create a class that will validate the header in each request and validate if the token is valid. To do that, create a file named JwtMiddleware.php inside the directory src/Application/Middleware and use the code snippet below.
<?php

namespace App\Application\Middleware;

use Firebase\JWT\JWT;
use Firebase\JWT\Key;
use Psr\Http\Message\ResponseInterface as Response;
use Psr\Http\Message\ServerRequestInterface as Request;
use Psr\Http\Server\MiddlewareInterface;
use Psr\Http\Server\RequestHandlerInterface;
use Psr\Container\ContainerInterface;

class JwtMiddleware implements MiddlewareInterface
{
    private $container;
    private $jwtSecret;

    public function __construct(ContainerInterface $container, string $jwtSecret)
    {
        $this->container = $container;
        $this->jwtSecret = $jwtSecret;
    }

    public function process(Request $request, RequestHandlerInterface $handler): Response
    {
        $authHeader = $request->getHeader('Authorization');

        if ($authHeader) {
            $token = trim(str_replace('Bearer', '', $authHeader[0]));


            try {
                $decoded = JWT::decode($token, new Key($this->jwtSecret, 'HS256'));
                $request = $request->withAttribute('jwt', $decoded);
            } catch (\Exception $e) {
                return $this->unauthorizedResponse($request);
            }
        } else {
            return $this->unauthorizedResponse($request);
        }


        return $handler->handle($request);
    }

    private function unauthorizedResponse(Request $request): Response
    {
        $response = new \Slim\Psr7\Response();
        $response->getBody()->write(json_encode(['error' => 'Unauthorized']));
        return $response->withStatus(401)->withHeader('Content-Type', 'application/json');
    }
}
The code snippet above retrieves the bearer token sent with each request, granting access to the method if the token is valid. If the token is invalid, it returns an unauthorized error.
Configure Slimphp Dependency
Modify dependencies.php inside the app directory to include the JWT middleware.
<?php

declare(strict_types=1);


use App\Application\Settings\SettingsInterface;
use DI\ContainerBuilder;
use Monolog\Handler\StreamHandler;
use Monolog\Logger;
use Monolog\Processor\UidProcessor;
use Psr\Container\ContainerInterface;
use Psr\Log\LoggerInterface;
use Tuupola\Middleware\JwtAuthentication;
use App\Helper\JwtHelper;
use App\Application\Middleware\JwtMiddleware;


return function (ContainerBuilder $containerBuilder) {
    $containerBuilder->addDefinitions([
         //add existing code here
       ,
        JwtAuthentication::class => function (ContainerInterface $c) {
            $settings = $c->get(SettingsInterface::class);
            $jwtSettings = $settings->get('jwt');


            return new JwtAuthentication([
                "secret" => $jwtSettings['secret'],
                "attribute" => $jwtSettings['attribute'],
                "secure" => $jwtSettings['secure'],
                "relaxed" => $jwtSettings['relaxed'],
                "algorithm" => $jwtSettings['algorithm'],
                "error" => function ($response, $arguments) {
                    $data = ['error' => 'Unauthorized', 'message' => $arguments['message']];
                    return $response
                        ->withHeader('Content-Type', 'application/json')
                        ->getBody()->write(json_encode($data));
                }
            ]);
        },
        JwtHelper::class => function (ContainerInterface $c) {
            $settings = $c->get(SettingsInterface::class);
            $jwtSettings = $settings->get('jwt');
            $logger = $c->get(LoggerInterface::class);
            return new JwtHelper($jwtSettings['secret'], $logger);
        },
         JwtMiddleware::class => function (ContainerInterface $c) {
            $settings = $c->get(SettingsInterface::class);
            $jwtSettings = $settings->get('jwt');
            return new JwtMiddleware($c, $jwtSettings['secret']);
        },
       // add other class here
    ]);
};
Implementing JWT Authentication
Login Action Class
Create a login endpoint to generate and return a JWT upon successful authentication. Create a folder named Auth inside the src/Application/Actions directory then create a file named LoginAction.php. Copy the code snippet below.
<?php
declare(strict_types=1);
namespace App\Application\Actions\Auth;
use App\Helper\JwtHelper;
use Psr\Http\Message\ResponseInterface as Response;
use Psr\Http\Message\ServerRequestInterface as Request;
class LoginAction
{
    private $jwtHelper;
    private $users;
    public function __construct(JwtHelper $jwtHelper)
    {
        $this->jwtHelper = $jwtHelper;
        // Dummy users for demonstration purposes
        $this->users = [
            'user1' => 'password1',
            'user2' => 'password2'
        ];
    }

    public function __invoke(Request $request, Response $response, $args): Response
    {
        $data = (array)$request->getParsedBody();
        $username = $data['username'] ?? '';
        $password = $data['password'] ?? '';


        // Validate credentials
        if (isset($this->users[$username]) && $this->users[$username] === $password) {
            // Generate JWT token
            $token = $this->jwtHelper->encode([
                'sub' => $username,
                'iat' => time(),
                'exp' => time() + 3600, // 1 hour expiration
            ]);

            $response->getBody()->write(json_encode(['token' => $token]));
            return $response->withHeader('Content-Type', 'application/json');
        }

        // Invalid credentials
        $response->getBody()->write(json_encode(['error' => 'Invalid credentials']));
        return $response->withStatus(401)->withHeader('Content-Type', 'application/json');
    }
}
The code above uses a dummy user to verify the incoming request once validated we generate a token for the user to use to access another method that is protected by the JWT middleware.
Login Endpoint
First, let’s register LoginAction in dependencies.php by adding the following line.
use App\Application\Actions\Auth\LoginAction;Second, register LoginAction class.
 LoginAction::class => function (ContainerInterface $c) {
            return new LoginAction($c->get(JwtHelper::class));
 },
Lastly, register the login endpoint. Open routes.php inside the app directory then use the code snippet below to add /login endpoint.
use App\Application\Actions\Auth\LoginAction;
$app->post('/login', LoginAction::class);
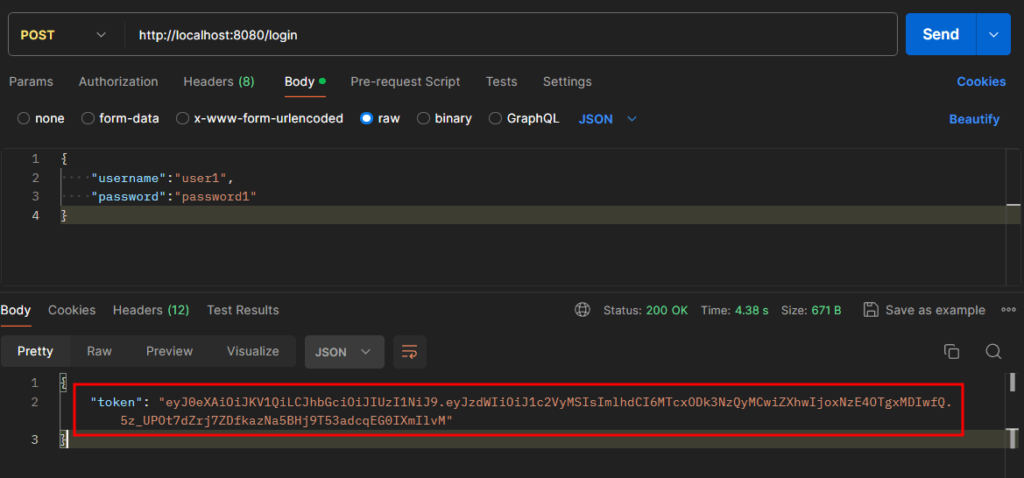
Generate Token Request
To test the login endpoint, run the project using this command
php -S localhost:8080 -t publicOpen Postman and create a request using this endpoint http://localhost:8080/login. See the image below.

Best Practices for Handling Tokens
Token Generation
Ensure tokens are generated with an appropriate expiration time to minimize risk in case of token leakage.
Token Validation
Always validate the token’s signature and expiration time.
Token Refreshing
Implement a token refresh mechanism to provide a new token before the current one expires.
Securing API Endpoints
Techniques for Securing API Endpoints Using JWT
We have two options to enable the JWT middleware that we configured a while ago.
First, we can register the middleware globally, this way all endpoints created inside routes.php will be protected by the JWT middleware. Open middleware.php and add the JWTMiddleware.php.
use App\Application\Middleware\SessionMiddleware;
use Slim\App;
use App\Application\Middleware\JwtMiddleware;


return function (App $app) {
    $app->add(SessionMiddleware::class);
    $app->add(JwtMiddleware::class);
};
Second, we can apply the middleware in a selected group.
use App\Application\Middleware\JwtMiddleware;
return function (App $app) {
    $container = $app->getContainer();
    $jwtMiddleware = $container->get(JwtMiddleware::class);

    $app->group('/users', function (Group $group) {
        $group->get('', ListUsersAction::class);
        $group->get('/{id}', ViewUserAction::class);
    })->add($jwtMiddleware);
};
->add($jwtMiddleware) This line is added to the /users route group. If you are wondering why I have /users route, this is the default endpoint created in a fresh installation of Slimphp.
Testing using Postman
Now, if you don’t have Postman installed yet, you can download it from here.
Open a terminal and run the project using the built-in php server.
php -S localhost:8080 -t publicOpen Postman and generate a JWT token.

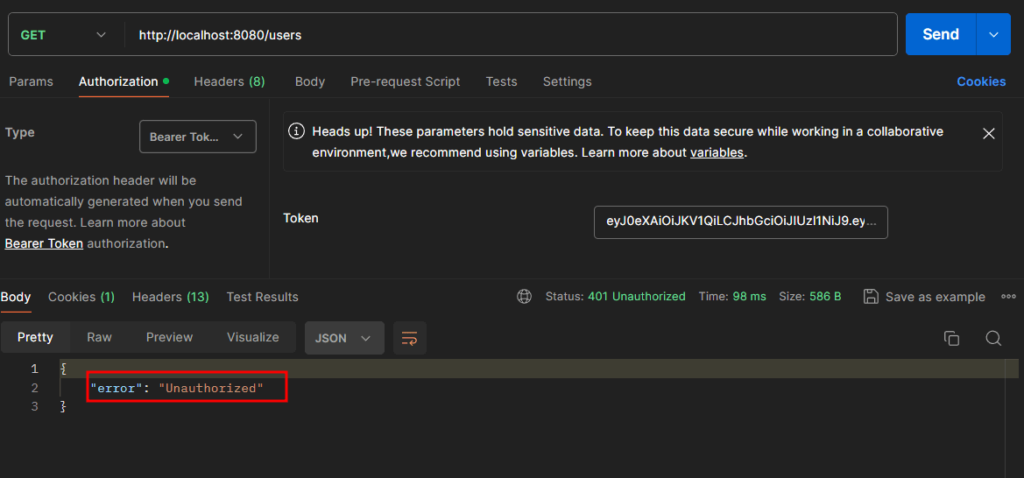
Copy the token and make another GET request using the /users endpoint. Open Authorization tab and select Bearer Token then paste the token value.

If the token is invalid or expired you will receive an unauthorized message.

Tools and Methods for Testing JWT Implementation
- Postman: A popular tool for testing APIs.
- Curl: Command-line tool for making HTTP requests.
- JWT.io: An online tool for decoding, verifying, and generating JWTs.
FAQs and Additional Resources
Answers to Common Questions About Using JWT in Slimphp
Q1: Can I use RSA for JWT instead of HMAC? A: Yes, you can use RSA algorithms (RS256) for signing JWTs by generating a public and private key pair.
Q2: How can I refresh JWT tokens? A: Implement a refresh token mechanism where a new JWT is issued before the current one expires.
Q3: How do I handle JWT in a mobile application? A: Store the token securely in the device’s secure storage and include it in the Authorization header for API requests.
Links to Additional Resources and Official Documentation
- JWT.io Documentation
- Slimphp Documentation
- Firebase JWT Library
- Slim JWT Auth Middleware
Summary
In this article, we cover how using JWT with SlimPHP offers a secure method for API authentication, ensuring authorized access to endpoints. Keep your secret key private, regularly refresh tokens, and set appropriate expiration times to minimize risks. Properly validate tokens by checking their signature, expiration, and claims. Following these practices will help you create a reliable authentication system, safeguarding your application and its users.
Now to download our free source code from this tutorial, you can use the button below.
Note: Extract the file using 7Zip and use password: freecodespot
