Creating RESTful API is essential skill for modern web development, allowing applications to communicate with each other over the internet. In this detailed guide we’ll explore how to create a RESTful API using SlimPHP and MySQL. We’ll cover everything from setting up your development environment to building and testing your API endpoints.
- What is a RESTful API?
- Overview of SlimPHP
- Benefits of Using MySQL
- Setting Up the Development Environment
- Project Setup
- Database Configuration
- Create Product Model
- Create a Product Repository Interface
- Create a Product Not Found Exception
- Create a Product Repository
- Map Product Repository
- Create Action/Controller
- Create Route/API Endpoint
- Testing the API
- Additional Tips
- FAQ
- Summary
What is a RESTful API?
A RESTful API (Representational State Transfer API) is a way to design networked applications. It uses HTTP requests that will handle CRUD (Create, Read, Update, Delete) operations on data. RESTful APIs are essential for letting different software systems talk to each other making data exchange and integration smooth and efficient.
Overview of SlimPHP
SlimPHP is a lightweight micro-framework for PHP that helps you quickly write simple yet powerful web applications and APIs. Its advantages include:
- SlimPHP focuses on being simple and fast, making it ideal for small to medium-sized applications.
- It provides a strong routing system, middleware support, and dependency injection, offering flexibility in application structure.
With a strong community and extensive documentation, SlimPHP makes it easier to find solutions and resources.
Benefits of Using MySQL
MySQL is a popular open-source relational database management system known for its reliability, performance, and ease of use. Benefits of using MySQL include:
- MySQL can handle large volumes of data and high user loads.
- It offers robust data security features.
- MySQL works seamlessly with PHP, making it a preferred choice for web applications.
Before we start, ensure you have the following prerequisites:
- Install PHP 7.4 or higher.
- A dependency manager for PHP.
- Set up a MySQL database.
Setting Up the Development Environment
- Download and install PHP from the official PHP website.
- Follow the instructions on the Composer website to install Composer.
How to Install Apache Server on windows.. » Read More.
Project Setup
To get started, let’s create a new SlimPHP project. To do that, follow the steps below.
1. Create a New SlimPHP Project.
composer create-project slim/slim-skeleton slimdemo-api2. After creating the project you will observe the following folder structure.
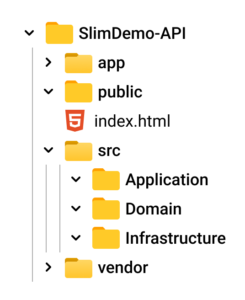
To briefly explain each folder, here’s a list of usages for the main folders.
2.1 app » Contains configuration files for your app. Such as routes and settings.
2.2 public » Contains the front controller (index.php).
2.3 src » This is typically the root directory for your application’s source code.
Application» This folder often contains the application layer of your project.- It usually includes code that directly interacts with the user interface, handles HTTP requests, and orchestrates high-level application flow.
Domain» The domain layer typically holds the core business logic and domain entities of your application.- This folder might contain classes that represent entities (like User, Product, etc.), value objects, domain services, and repositories.
- This folder might contain classes that represent entities (like User, Product, etc.), value objects, domain services, and repositories.
- The domain layer is where you encapsulate the rules and behaviors that govern the core functionality of your application.
Infrastructure» This folder usually houses infrastructure-related code.- It includes implementations of external interfaces, like database access, email services, caching mechanisms, etc.
- It includes implementations of external interfaces, like database access, email services, caching mechanisms, etc.
- Here, you might find database repositories, third-party API clients, caching services, and any other infrastructure-specific code.
2.4 vendor: Contains Composer dependencies.
Database Configuration
Now, we need to configure the database connection. Follow the steps below.
1. Install MySQL Database
If you haven’t done it yet, download and install the MySQL server on your local machine.
Assuming you have already installed MySQL, we can create a new database using a tool like phpMyAdmin, MySQL Workbench, or via the command line. If you choose to create the database using the command line. Here’s how you can do it. Assuming you have installed MySQL on your machine.
2. Create a Database using the command line
Open your terminal and log in to MySQL using the following command.
mysql -u root -pPasswordReplace “root” with the actual username you set for your MySQL server and -p is for password.
This is the format for connecting to MySQL.
mysql -u USERNAME -pPASSWORD -h HOSTNAMEORIP DATABASENAMEThen create the database using the following command.
CREATE DATABASE slimdb_api;Verify it using this command. This will display all the available databases.
SHOW DATABASES;
Select the database name where you want to create a new table or simply copy and run the command below.
USE slimdb_api;
Now, create a product table. We will be using this for our demo API app.
CREATE TABLE products
(
  id INT unsigned NOT NULL AUTO_INCREMENT,
  item VARCHAR(150) NOT NULL,
  description VARCHAR(150) NOT NULL,
  quantity int NOT NULL,
  PRIMARY KEY(id)
);
3. Create a Database using MySQL Workbench
Alternatively, you can use Visual tools for MySQL Database like MySQL workbench, to visually create the database.
Step 1. Launch MySQL Workbench and click Create New Schema.
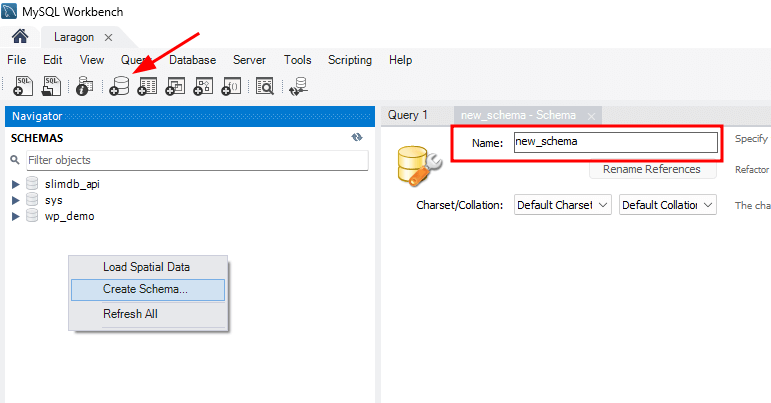
Step 2. Input your database name and click the Apply button.
Step 3. Open a new SQL query and copy the code snippet below to create a new table.
USE slimdb_api;

CREATE TABLE products
(
  id INT unsigned NOT NULL AUTO_INCREMENT,
  item VARCHAR(150) NOT NULL,
  description VARCHAR(150) NOT NULL,
  quantity int NOT NULL,
  PRIMARY KEY(id)
);
And we are all set, we have the database and table that we can use for this demo. The next step is to create a database connection from our app to our database.
4. Configure Database Connection.
Now, we need to install the required packages. These are the following.
- slim/psr7 » Provides PSR-7 compliant HTTP message implementations required for handling requests and responses in a Slim application.
- vlucas/phpdotenv » Manages environment variables, allowing you to store sensitive configuration data securely and flexibly.
To verify, look for a file named composer.json. Go to “require” section and check if the package exists.
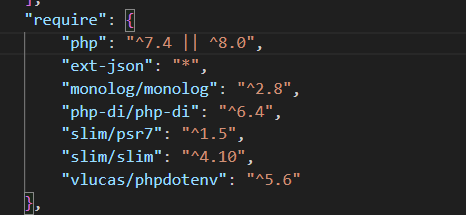
If it is missing, you can install using the composer. Open the terminal and execute this command.
composer require slim/psr7
composer require vlucas/phpdotenv
5. Create .env file in your project root.
Copy the code snippet below and paste it on your .env file. Don’t forget to change the credentials that will match your local MySQL Server.
DB_HOST=127.0.0.1
DB_NAME=slimdb_api
DB_USER=root
DB_PASS=password
6. Load environment variables in public/index.php.
Declare the following code snippet on top of the index.php file.
use Dotenv\Dotenv;Then place the code below after the line “require __DIR__ . '/../vendor/autoload.php';”
$dotenv = Dotenv::createImmutable(__DIR__ . '/../');
$dotenv->load();
7. Now, set the database configuration by adding this line in app/settings.php
'db'=> function(){
                    $host = $_ENV['DB_HOST'];
                    $dbname = $_ENV['DB_NAME'];
                    $user = $_ENV['DB_USER'];
                    $pass = $_ENV['DB_PASS'];

                    $pdo = new PDO("mysql:host=$host;dbname=$dbname", $user, $pass);
                    $pdo->setAttribute(PDO::ATTR_ERRMODE, PDO::ERRMODE_EXCEPTION);
                    return $pdo;
                }
8. Navigate back to public/index.php and scroll down to SettingsInterface section and paste the following code.
$db = $settings->get('db');
$container->set('db',$db);
Create Product Model
Now, create a model property which in this case it’s the product model. To do that, follow the steps below.
Navigate to src/Domain then create a Product folder. Inside the folder create a new file Product.php. Use the code snippet below.
<?php
declare(strict_types=1)

namespace App\Domain\Product;
use JsonSerializable;

class Product implements JsonSerializable
{
    private ?int $id;
    private string $item;
    private string $description;
    private int $quantity;
    public function __construct(?int $id, string $item, string $description, int $quantity)
    {
        $this->id = $id;
        $this->item = strtolower($item);
        $this->description = ucfirst($description);
        $this->quantity = $quantity;
    }
    public function getId(): ?int
    {
        return $this->id;
    }

    public function getItem(): string
    {
        return $this->item;
    }

    public function getDescription(): string
    {
        return $this->description;
    }

    public function getQuantity(): int
    {
        return $this->quantity;
    }

    #[\ReturnTypeWillChange]
    public function jsonSerialize(): array
    {
        return [
            'id' => $this->id,
            'item' => $this->item,
            'description' => $this->description,
            'quantity' => $this->quantity,
        ];
    }
}
Create a Product Repository Interface
In the same directory(src/Domain/Product), create ProductRepositoryInterface.php file. This file contains all the methods we will be implementing later in this demo project.
<?php
declare(strict_types=1);

namespace App\Domain\Product;
interface ProductRepositoryInterface
{
    public function getAllProducts(): array;
    public function getProductById(int $id): Product;
    public function createProduct(Product $data): ?int;
    public function updateProduct(int $id, Product $data): bool;
    public function deleteProduct(int $id): bool;
}
Create a Product Not Found Exception
This step is just optional, but we can use this later to display an error if a product request is not found. In the same folder, create a new file ProductNotFoundException.php. Then paste the code snippet below.
<?php
namespace App\Domain\Product;

class ProductNotFoundException extends \Exception
{
    protected $message = 'Product not found';
}
Create a Product Repository
This step is where we create the implementation of the interface that we created in the previous step. Navigate to src/Infrastructure and create a new folder Product. Inside the Product folder create a new file named ProductRepository.php.
1. Let’s start by initializing the class and constructor we need.
<?php

declare(strict_types=1);

namespace App\Infrastructure\Product;
use App\Domain\Product\Product;
use App\Domain\Product\ProductNotFoundException;

use App\Domain\Product\ProductRepositoryInterface;

class ProductRepository implements ProductRepositoryInterface
{
    private $db;
    public function __construct($db)
    {
        $this->db = $db;
    }
}
2. Create New product Implementation
public function createProduct(Product $data): ?int {
        $stmt = $this->db->prepare("INSERT INTO products (item, description,quantity) VALUES (:item, :description, :quantity)");

         $item = $data->getItem();
         $description = $data->getDescription();
         $quantity = $data->getQuantity();

         $stmt->bindParam(':item', $item);
         $stmt->bindParam(':description', $description);
         $stmt->bindParam(':quantity', $quantity);


        if ($stmt->execute()) {
            return (int) $this->db->lastInsertId();
        } else {
            return null;
        }
    }
3. Create implementation for getAllProducts.
 public function getAllProducts(): array
    {
        $stmt = $this->db->prepare("SELECT * FROM products");
        $stmt->execute();
        return $stmt->fetchAll();
    }
4. getProductById Implementation
public function getProductById(int $id): Product
    {
        $stmt = $this->db->prepare("SELECT * FROM products WHERE id = :id");
        $stmt->bindParam(':id', $id);
        $stmt->execute();
        $result = $stmt->fetch(\PDO::FETCH_ASSOC);

        if ($result) {
            return new Product(
                $result['id'],
                $result['item'],
                $result['description'],
                (int)$result['quantity']
            );
        }

        throw new ProductNotFoundException("Product with ID {$id} not found");
    }
5. Update Product Implementation
public function updateProduct($id, $data) : bool {
        $stmt = $this->db->prepare("UPDATE products SET item = :item, description = :description, quantity = :quantity WHERE id = :id");
        $item = $data->getItem();
        $description = $data->getDescription();
        $quantity = $data->getQuantity();


        $stmt->bindParam(':item', $item);
        $stmt->bindParam(':description', $description);
        $stmt->bindParam(':quantity', $quantity);
        $stmt->bindParam(':id', $id);

         return $stmt->execute();
    }
6. Lastly, create the deleteProduct Implementation
   public function deleteProduct($id) : bool {
        $stmt = $this->db->prepare("DELETE FROM products WHERE id = :id");
        $stmt->bindParam(':id', $id);
        return $stmt->execute();
    }
Map Product Repository
Now, map the repository interface with the Implementation. Open app/repositories.php and then add the following line.
   $containerBuilder->addDefinitions([
        ProductRepositoryInterface::class => function ($container) {
            $db = $container->get('db');
            return new ProductRepository($db);
        },
    ]);
As observed in the code snippet above, the following line was added: $db = $container->get(‘db’);. This retrieves the database configuration set in the previous step and passes it to the Product repository for interaction with the actual database.
Create Action/Controller
Since we have fully implemented our Database CRUD operations, we can now create the action/controller. This controller class will handle the logic for our API endpoints and manage interactions between the client and the database. By defining various methods in this class, we can handle different HTTP requests (GET, POST, PUT, DELETE) corresponding to our CRUD operations.
This class will be accessible from the `routes.php` file, where we can map specific API endpoints to the appropriate controller actions. For instance, we can define routes for creating, reading, updating, and deleting records, ensuring that each request is directed to the correct method in our controller. This setup allows us to structure our application efficiently and maintain a clear separation of concerns between different parts of our codebase.
Let’s start:
Step 1. Navigate to src/Application/Action then create a folder named “Product”
Step 2. Create a file named ProductAction.php. This file will serve as the base Action class for all the product action classes that we are about to create.
<?php

declare(strict_types=1);

namespace App\Application\Actions\Product;

use App\Application\Actions\Action;
use App\Domain\Product\ProductRepositoryInterface;
use Psr\Log\LoggerInterface;

abstract class ProductAction extends Action
{
    protected ProductRepositoryInterface $product;

    public function __construct(LoggerInterface $logger, ProductRepositoryInterface $product)
    {
        parent::__construct($logger);
        $this->product = $product;
    }
}
Step 3. Create a CreateProductAction.php file. This file will contain an action class that will handle the create product POST request.
<?php

declare(strict_types=1);

namespace App\Application\Actions\Product;

use App\Domain\Product\Product;
use Psr\Http\Message\ResponseInterface as Response;
class CreateProductAction extends ProductAction
{

    protected function action(): Response
    {
         $data = $this->request->getParsedBody();
         $product = new Product(null,$data['item'],$data['description'],$data['quantity']);
         $productId = $this->product->createProduct($product);
         $this->logger->info("Product created with ID:  `{$productId}`");
         return $this->respondWithData("Product created with ID: $productId");
    }
}
Step 4. Next, create a file named ListProductAction.php. This file will contain an action class that will handle the GET request that will return all products from the database.
<?php

declare(strict_types=1);

namespace App\Application\Actions\Product;
use Psr\Http\Message\ResponseInterface as Response;

class ListProductsAction extends ProductAction
{
    /**
     * {@inheritdoc}
     */
    protected function action(): Response
    {
        $products = $this->product->getAllProducts();
        $this->logger->info("Product list was viewed.");
        return $this->respondWithData($products);
    }
}
Step 5. Create a file named ViewProductAction.php. This file will contain an action class that will handle GET requests that will return products based on the Id parameter pass.
<?php

declare(strict_types=1);

namespace App\Application\Actions\Product;
use Psr\Http\Message\ResponseInterface as Response;

class ViewProductAction extends ProductAction
{
    protected function action(): Response
    {
        $productId = (int) $this->resolveArg('id');
        $product = $this->product->getProductById($productId);
        $this->logger->info("Product with id `{$productId}` was viewed.");
        return $this->respondWithData($product);
    }
}
Step 6. Create another file named UpdateProductAction and use the code snippet below.
<?php

declare(strict_types=1);

namespace App\Application\Actions\Product;

use App\Domain\Product\Product;
use Psr\Http\Message\ResponseInterface as Response;

class UpdateProductAction extends ProductAction
{
    protected function action(): Response
    {
        $productId = (int) $this->resolveArg('id');
        $data = $this->request->getParsedBody();
         $product = new Product(null,$data['item'],$data['description'],$data['quantity']);

        $result = $this->product->updateProduct($productId, $product);
        if($result){
            $this->logger->info("Product with id `{$productId}` was succesfully updated");
            return $this->respondWithData("Product with id `{$productId}` was succesfully updated");
        }else{
            return $this->respondWithData("Unable to update product {$productId}");
        }

    }
}
Step 7. Lastly, create the DeleteProductAction.php.
<?php

declare(strict_types=1);

namespace App\Application\Actions\Product;

use App\Domain\Product\Product;
use Psr\Http\Message\ResponseInterface as Response;

class DeleteProductAction extends ProductAction
{
    protected function action(): Response
    {
        $productId = (int) $this->resolveArg('id');
        $result = $this->product->deleteProduct($productId);
        if($result){
            $this->logger->info("Product with id `{$productId}` was deleted");
            return $this->respondWithData("Product with id `{$productId}` was deleted");
        }else{
            return $this->respondWithData("Unable to delete product {$productId}");
        }

    }
}
Create Route/API Endpoint
The last thing that we need at this moment is to create the endpoint. To do so, we need to set the routes to each action that we created in the previous step.
CreateProductAction
use App\Application\Actions\Product\CreateProductAction;

     $app->group('/products', function (Group $group) {
        $group->post('', CreateProductAction::class);
    });
ListProductsAction
use App\Application\Actions\Product\ListProductsAction;
   $app->group('/products', function (Group $group) {
        $group->get('', ListProductsAction::class);
    });
ViewProductAction
use App\Application\Actions\Product\ViewProductAction;
    $app->group('/products', function (Group $group) {
        $group->get('/{id}', ViewProductAction::class);
    });
UpdateProductAction
  use App\Application\Actions\Product\UpdateProductAction;
     $app->group('/products', function (Group $group) {
        $group->put('/{id}', UpdateProductAction::class);
    });
DeleteProductAction
use App\Application\Actions\Product\DeleteProductAction;
    $app->group('/products', function (Group $group) {
        $group->delete('/{id}', DeleteProductAction::class);
    });
This is what the final routes look like.
    $app->group('/products', function (Group $group) {
        $group->get('', ListProductsAction::class);
        $group->post('', CreateProductAction::class);
        $group->get('/{id}', ViewProductAction::class);
        $group->put('/{id}', UpdateProductAction::class);
        $group->delete('/{id}', DeleteProductAction::class);
    });
Testing the API
Now, you run it with PHP’s built-in webserver. Make sure that you are inside the project directory. If not, you can change the directory by using the following command.
$ cd [my-app-name];To run the slimphp API using the built-in webserver, you can execute the following command.
php -S localhost:8080 -t publicYou can use Postman to test the API, If you haven’t installed it yet, Use the link below to download.
- Download and install Postman.
Before we start to test it, here’s the list of Endpoint:
| Request Method | URL |
| POST | http://localhost:8080/products |
| GET | http://localhost:8080/products |
| GET | http://localhost:8080/products/{productID} |
| PUT | http://localhost:8080/products/{productID} |
| DELETE | http://localhost:8080/products/{productID} |
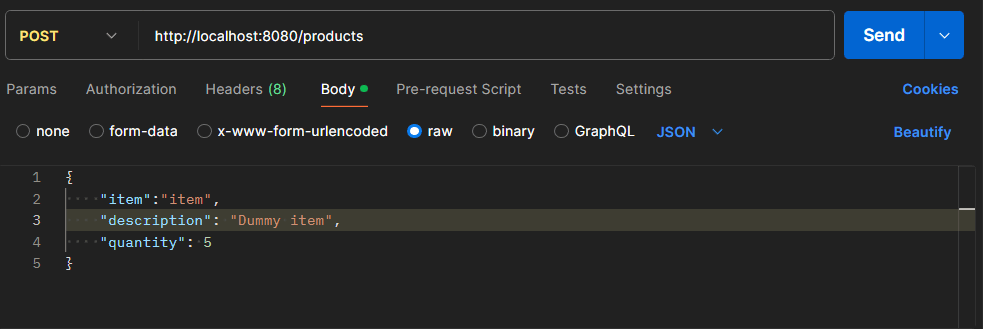
Here’s the JSON parameter needed for POST and PUT requests.
{
    "item":"item 2",
    "description": "Dummy item 2",
    "quantity": 5
}
See the screenshot below, for reference on how to add the parameters to your request.
Additional Tips
Best Practices for API Development
- Error Handling: Use try-catch blocks and return meaningful error messages.
- Data Validation: Validate input data to ensure it meets the required formats and constraints.
Securing the API
JWT Authentication: Use JSON Web Tokens for securing your API endpoints. Install the firebase/php-jwt package:
composer require firebase/php-jwt
Implement JWT in your application by creating middleware to validate tokens.
FAQ
What is SlimPHP?
SlimPHP is a lightweight micro-framework for PHP that helps you quickly write simple yet powerful web applications and APIs.
Why use MySQL with SlimPHP?
MySQL is a reliable, performant, and easy-to-use database that integrates well with PHP, making it an ideal choice for building APIs with SlimPHP.
How do I secure my RESTful API?
Implement authentication mechanisms like JWT and ensure proper data validation and error handling to secure your API.
Summary
In this article, we’ve covered how to create a RESTful API using SlimPHP and MySQL. From setting up your development environment to building and testing your API endpoints, you now have a solid foundation for creating reliable APIs. Explore more advanced features of SlimPHP and consider checking out additional tutorials and resources to further enhance your skills. Keep coding!
To download our free source code from this tutorial, you can use the button below.
Note: Extract the file using 7Zip and use password: freecodespot