In this tutorial, we’ll walk through how to create a secure SignalR connection using JWT authentication in an ASP.NET Core 8.0 application. This tutorial covers the complete setup, including creating a Web API back-end, a front-end client using ASP.NET Core MVC, and configuring a SQL Server database. By the end of this guide, you will have a fully functional, secure SignalR chat application ready for testing.
1. Project Setup
In this section, we’ll set up two projects: the Web API (back-end) and a front-end client using ASP.NET Core MVC. The Web API will handle authentication and the SignalR hub, while the front-end will connect to the SignalR hub and display messages.
Step 1: Setting Up Your ASP.NET Core Web API Project
To get started with securing SignalR using JWT in ASP.NET Core 8.0, let’s first create the Web API project. We’ll be using Visual Studio for this setup. Follow the steps below to ensure everything is configured correctly:
1. Open Visual Studio Launch Visual Studio and select Create a new project. In the project templates list, search for and select ASP.NET Core Web API.
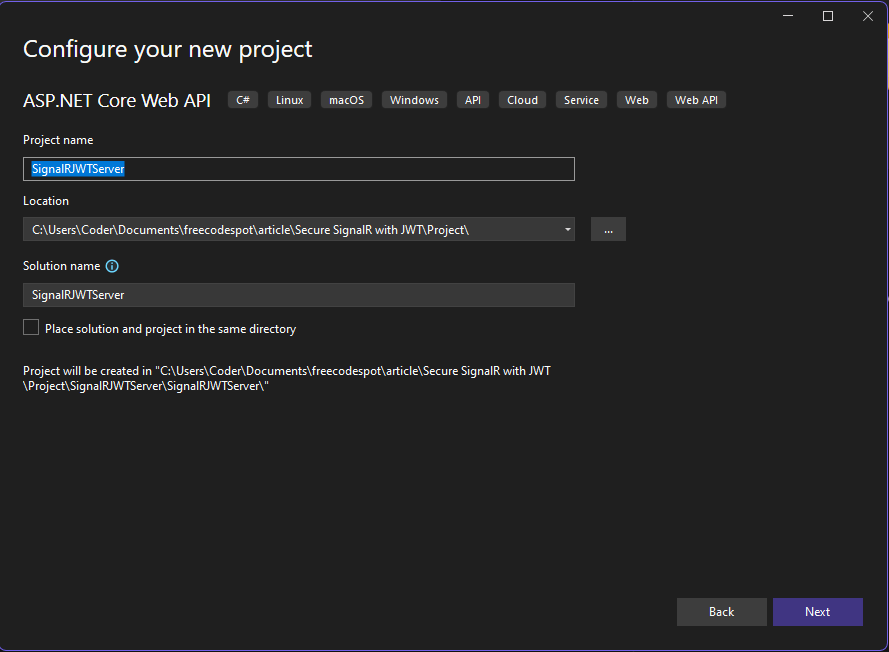
2. Configure Your New Project
- Enter SignalRJWTServer as the name for your project.
- Choose an appropriate folder location for your project files.
- The solution name will default to SignalRJWTServer, but you can adjust it if needed.
- Make sure to select .NET 8.0 as the target framework to leverage the latest features of ASP.NET Core.
- For this tutorial, we will manually implement JWT authentication later on, so set Authentication to None.
Click Create to generate the project.
Step 2: Setting Up the ASP.NET Core MVC Front-End Client
Now that we have our Web API project set up, we need to add a front-end client to the solution. This will be an ASP.NET Core MVC project that will interact with the SignalR server.
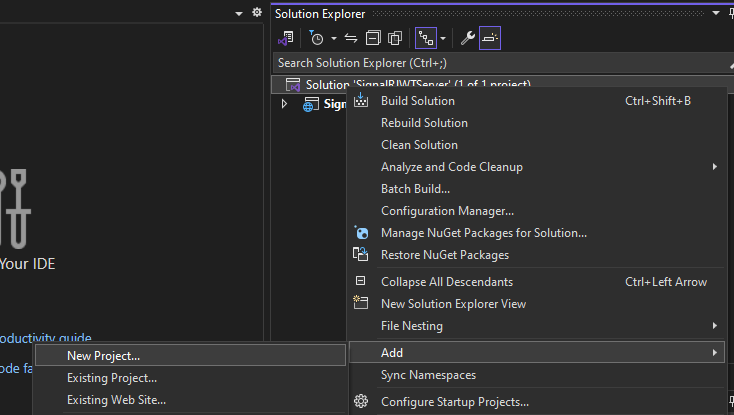
1. Add a New Project to the Solution In Visual Studio, right-click on the solution name (SignalRJWTServer) in the Solution Explorer, and select Add > New Project.
2. Select Project Type In the project templates list, select ASP.NET Core Web Application (Model-View-Controller).
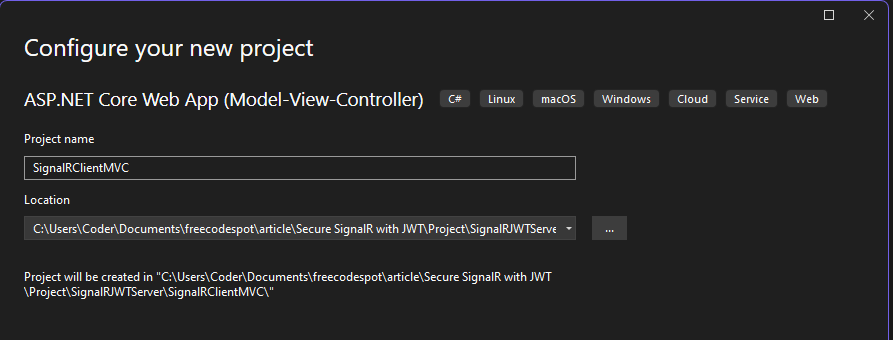
3. Configure the New MVC Project
- Project Name: Enter SignalRClientMVC as the name for your front-end client project.
- Location: Choose the same folder location where the solution is located.
- Framework: Make sure to select .NET 8.0 as the target framework.
Click Create to generate the MVC project.
With both the Web API and MVC projects set up, we are ready to move forward to implementing JWT authentication and configuring SignalR for secure real-time communication.
2. Configuring SQL Server
We’ll use SQL Server to store user data and manage authentication. Follow these steps to create a database and a Users table.
Step 1: Open SQL Server Management Studio and create a new database named ‘SignalRChatDB’.
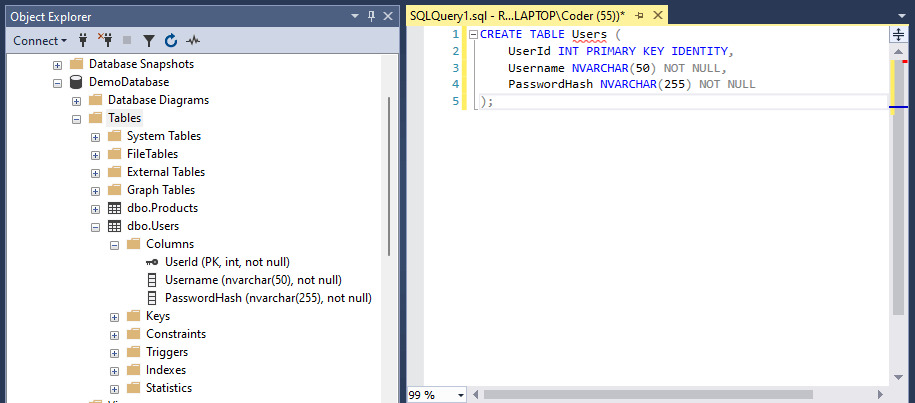
Step 2: In the database, create a table named ‘Users’ with the following columns:
UserId (INT, Primary Key, Identity)
Username (NVARCHAR(50))
PasswordHash (NVARCHAR(255))
Run the SQL script below to create the table:
CREATE TABLE Users (
    UserId INT PRIMARY KEY IDENTITY,
    Username NVARCHAR(50) NOT NULL,
    PasswordHash NVARCHAR(255) NOT NULL
);
3. Implementing JWT Authentication and Creating the Login Endpoint
To secure the SignalR connection, we’ll implement JWT authentication in the Web API project.
Step 1: Install the following NuGet packages in the SignalRJWTServer project:
- Microsoft.AspNetCore.Authentication.JwtBearer
- System.Data.SqlClient
- Dapper
Step 2: In the ‘Program.cs’ file, configure JWT authentication with the code below:
// Add JWT Authentication
builder.Services.AddAuthentication(JwtBearerDefaults.AuthenticationScheme)
    .AddJwtBearer(options =>
    {
        options.TokenValidationParameters = new TokenValidationParameters
        {
            ValidateIssuerSigningKey = true,
            IssuerSigningKey = new SymmetricSecurityKey(Encoding.UTF8.GetBytes("v9yR6TpZ8NfXq3aKs2mBx4D7gE5PwQjV")),
            ValidateIssuer = false,
            ValidateAudience = false
        };

        options.Events = new JwtBearerEvents
        {
            OnAuthenticationFailed = context =>
            {
                Console.WriteLine("Authentication failed: " + context.Exception.Message);
                return Task.CompletedTask;
            },
            OnTokenValidated = context =>
            {
                Console.WriteLine("Token validated successfully for user: " + context.Principal.Identity.Name);
                return Task.CompletedTask;
            }
        };

    });
Step 3: Create an ‘AuthController’ with a ‘/auth/login’ endpoint to handle user authentication using the Users table.
This endpoint will validate user credentials and return a JWT token.
Add the following code in ‘AuthController.cs’:
 [Route("api/auth")]
 [ApiController]
 public class AuthController : ControllerBase
 {
     private readonly string _connectionString = @"Server=REGIE-LAPTOP\LOCALSERVER;Database=DemoDatabase;Trusted_Connection=True;Connection Timeout=30;";


     [HttpPost("login")]
     public IActionResult Login([FromBody] LoginRequest request)
     {
         using (var connection = new SqlConnection(_connectionString))
         {
             var user = connection.QueryFirstOrDefault<User>(
                 "SELECT * FROM Users WHERE Username = @Username", new { request.Username });

             if (user == null || user.PasswordHash != request.Password)
             {
                 return Unauthorized();
             }

             var tokenHandler = new JwtSecurityTokenHandler();
             var key = Encoding.UTF8.GetBytes("v9yR6TpZ8NfXq3aKs2mBx4D7gE5PwQjV");
             var tokenDescriptor = new SecurityTokenDescriptor
             {
                 Subject = new ClaimsIdentity(new[]
                 {
             new Claim(ClaimTypes.Name, request.Username), // Identifies the user
             new Claim(JwtRegisteredClaimNames.Sub, request.Username), // Subject claim (identifies principal)
             new Claim(JwtRegisteredClaimNames.Jti, Guid.NewGuid().ToString()) // Unique identifier for the token
             }),
                 Expires = DateTime.UtcNow.AddHours(1), // Token expiration time
                 SigningCredentials = new SigningCredentials(new SymmetricSecurityKey(key), SecurityAlgorithms.HmacSha256Signature)
             };

             var token = tokenHandler.CreateToken(tokenDescriptor);
             var tokenString = tokenHandler.WriteToken(token);

             return Ok(new { Token = tokenString });
         }
     }


     [HttpPost("register")]
     public IActionResult Register([FromBody] RegisterRequest request)
     {
         try
         {
             using (var connection = new SqlConnection(_connectionString))
             {
                 // Check if the user already exists
                 var existingUser = connection.QueryFirstOrDefault<User>(
                     "SELECT * FROM Users WHERE Username = @Username", new { request.Username });

                 if (existingUser != null)
                 {
                     return BadRequest("Username already exists.");
                 }

                 // Create new user - ideally, the password should be hashed here before storing
                 var newUser = new User
                 {
                     Username = request.Username,
                     PasswordHash = request.Password // Replace with a hashed password before saving
                 };

                 // Insert new user into the database
                 var insertQuery = "INSERT INTO Users (Username, PasswordHash) VALUES (@Username, @PasswordHash)";
                 connection.Execute(insertQuery, new { newUser.Username, newUser.PasswordHash });

                 return Ok("User registered successfully.");
             }
         }
         catch(Exception ex)
         {
             return BadRequest();
         }

     }
 }
public class RegisterRequest
{
public string Username { get; set; }
public string Password { get; set; }
}
public class LoginRequest
{
public string Username { get; set; }
public string Password { get; set; }
}
public class User
{
public int UserId { get; set; }
public string Username { get; set; }
public string PasswordHash { get; set; }
}We also added a register method to add new users for testing.
4. Creating SignalR Hubs and Sending a Welcome Message
Now, let’s set up the SignalR hub in the Web API project and send a meaningful message to the user upon successful connection.
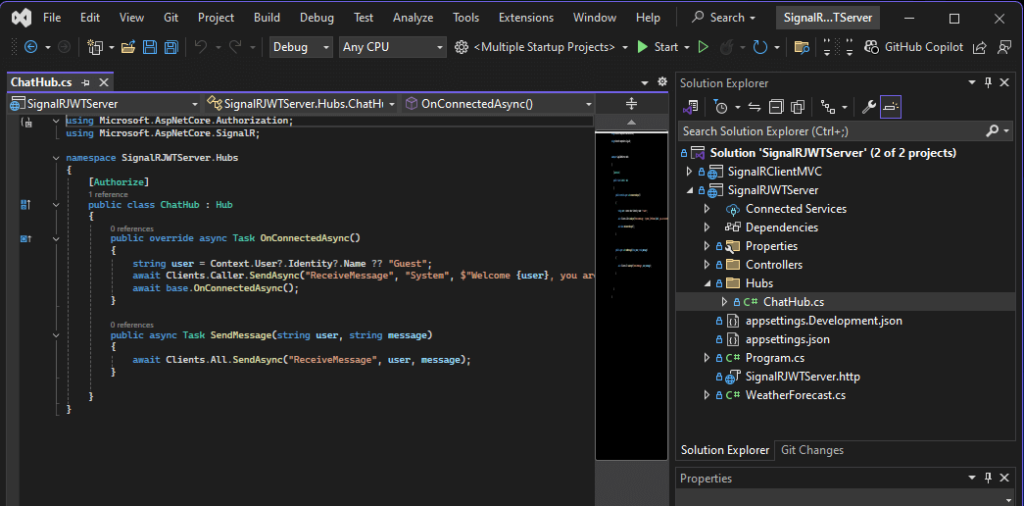
Step 1: In the SignalRJWTServer project, create a new folder named ‘Hubs’ and add a new class called ‘ChatHub.cs’.
Step 2: Implement the following code in ‘ChatHub.cs’:
[Authorize]
public class ChatHub : Hub
{
    public override async Task OnConnectedAsync()
    {
        string user = Context.User?.Identity?.Name ?? "Guest";
        await Clients.Caller.SendAsync("ReceiveMessage", "System", $"Welcome {user}, you are successfully connected to the chat!");
        await base.OnConnectedAsync();
    }

    public async Task SendMessage(string user, string message)
    {
        await Clients.All.SendAsync("ReceiveMessage", user, message);
    }
}
In this code, when a user connects to the SignalR hub, a welcome message will be sent to them with their username, confirming the successful connection.
5. Setting Up the ASP.NET Core MVC Front-End
In this section, we’ll set up the ASP.NET Core MVC front-end to interact with the back-end for user authentication and for using SignalR to connect to the chat hub.
Step 1: In the SignalRClientMVC project, create a new Controller named ‘HomeController’. This will handle the login and chat pages.
Step 2: Add a new view named ‘Login.cshtml’ under the ‘Views/Home’ directory.
Step 3: In the ‘Login.cshtml’ file, add the following code:
@{
    ViewData["Title"] = "Login";
}
<h2>Login</h2>
<form id="loginForm">
    <label for="username">Username:</label>
    <input type="text" id="username" name="username">
    <label for="password">Password:</label>
    <input type="password" id="password" name="password">
    <button type="button" onclick="login()">Login</button>
</form>
<script src="~/js/login.js"></script>
Make sure you also added Login action result inside HomeController which makes the URL “/home/login”.
   public IActionResult Login()
   {
       return View();
   }
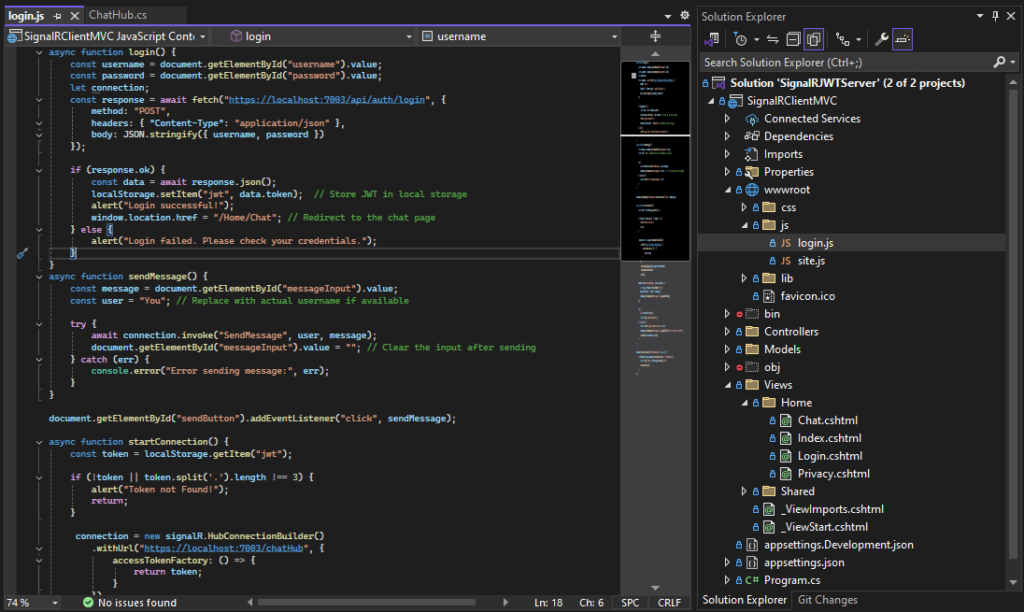
Step 4: Create a new JavaScript file named ‘login.js’ in the ‘wwwroot/js’ directory with the following code to handle login and connect to SignalR:
async function login() {
    const username = document.getElementById("username").value;
    const password = document.getElementById("password").value;
    let connection;
    const response = await fetch("https://localhost:7003/api/auth/login", {
        method: "POST",
        headers: { "Content-Type": "application/json" },
        body: JSON.stringify({ username, password })
    });

    if (response.ok) {
        const data = await response.json();
        localStorage.setItem("jwt", data.token);  // Store JWT in local storage
        alert("Login successful!");
        window.location.href = "/Home/Chat"; // Redirect to the chat page
    } else {
        alert("Login failed. Please check your credentials.");
    }
}
async function sendMessage() {
    const message = document.getElementById("messageInput").value;
    const user = "You"; // Replace with actual username if available

    try {
        await connection.invoke("SendMessage", user, message);
        document.getElementById("messageInput").value = ""; // Clear the input after sending
    } catch (err) {
        console.error("Error sending message:", err);
    }
}

document.getElementById("sendButton").addEventListener("click", sendMessage);

async function startConnection() {
    const token = localStorage.getItem("jwt");

    if (!token || token.split('.').length !== 3) {
        alert("Token not Found!");
        return;
    }

     connection = new signalR.HubConnectionBuilder()
        .withUrl("https://localhost:7003/chatHub", {
            accessTokenFactory: () => {
                return token;
            }
        })
        .configureLogging(signalR.LogLevel.Information)
        .withAutomaticReconnect()
        .build();

    connection.on("ReceiveMessage", (user, message) => {
        const msg = document.createElement("div");
        msg.textContent = `${user}: ${message}`;
        document.getElementById("messagesList").appendChild(msg);
    });

    try {
        await connection.start();
        console.log("SignalR Connected");
    } catch (err) {
        console.error("SignalR Connection Error:", err);
        document.getElementById("messagesList").appendChild("Unable to connect to server");
        setTimeout(startConnection, 5000);
    }
}

document.addEventListener("DOMContentLoaded", function () {
    if (window.location.pathname.toLocaleLowerCase() === "/home/chat") {
        console.log("Token", localStorage.getItem("jwt"));
        startConnection();
    }
});
Step 5: Add a new view named ‘Chat.cshtml’ under the ‘Views/Home’ directory. This will be used to display the chat interface with the messages.
Add the following HTML to ‘Chat.cshtml’:
@{
    ViewData["Title"] = "Chat";
}
<h2>Chat Room</h2>
<div id="messagesList"></div>
<input type="text" id="messageInput" placeholder="Type your message here" />
<button id="sendButton">Send</button>

<script src="https://cdnjs.cloudflare.com/ajax/libs/microsoft-signalr/8.0.0/signalr.min.js"></script>
<script src="~/js/login.js"></script>
Open “HomeController” and add Chat action result which make the chat URL “/home/chat”
   public IActionResult Chat()
   {
       return View();
   }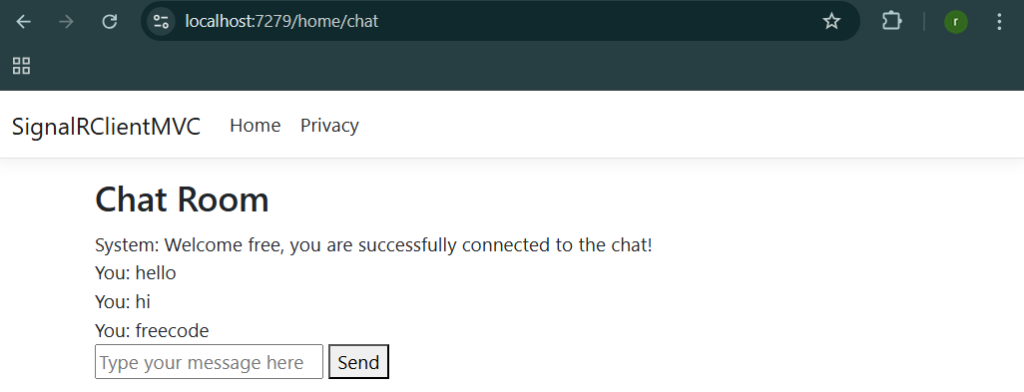
This view will allow users to see messages from others and send their own messages to the chat.
6. Running Both Projects for Testing
Now that we have set up both the Web API and the MVC front-end, let’s test the complete solution.
Step 1: Start the SignalRJWTServer project by pressing the ‘Run’ button in Visual Studio.
Step 2: Once the Web API is running, start the SignalRClientMVC project.
- Ensure both projects are running on different ports to avoid conflicts.
Step 3: Open the browser and navigate to the front-end MVC application (usually ‘http://localhost:5001’).
Step 4: You should see the login page. Enter your username and password to log in.
- After successful login, you will be redirected to the chat page, where you can interact with the SignalR hub.
- Upon connection, you will receive a welcome message from the server.
Step 5: Open multiple browser tabs to see how the chat messages are broadcasted to all connected clients.
Download Source Code
To download free source code from this tutorial, you can use the button below.
Note: Extract the file using 7Zip and use password: freecodespot
Conclusion
Congratulations! You have successfully set up a secure SignalR connection using JWT authentication in ASP.NET Core 8.0. We started by setting up a SQL Server database for storing user credentials, then built both a Web API for handling authentication and a SignalR hub. Afterwards, we created a front-end MVC application to communicate with the back-end services, authenticate users, and provide real-time chat functionality.
This comprehensive project gives you an end-to-end understanding of how to secure real-time communications using SignalR and JWT, providing a solid foundation for more advanced and scalable applications. Feel free to expand on this by adding more features, such as user registration, user-specific rooms, or even advanced security options like refresh tokens.
If you found this tutorial helpful, be sure to explore other articles on the site for more in-depth guides on ASP.NET Core and web development. Happy coding!
