In this tutorial, we’ll walk through building a social media authentication system using ASP.NET Core Identity. You’ll learn how to integrate social login (e.g., Google and Facebook) into an ASP.NET Core project, allowing users to log in through popular platforms. By the end, you’ll have a fully functional login system ready to use.
- Step 1: Setting Up the ASP.NET Core Project
- Step 2: Configuring the Database
- Step 3: Registering Google and Facebook Apps
- Step 4: Adding Social Media Authentication
- Step 5: Modifying the Default Identity UI (Optional)
- Step 6: Create a Custom
AccountControllerand Custom Login Page with Google Sign-In - Important Note: Redirect URI (
https://localhost:5001/signin-google) - Step 7: Testing the Application
- Download Source Code
- Conclusion
Before implementing external logins, ensure you have ASP.NET Core Identity set up with basic login and registration. If you haven’t already done so, follow my ASP.NET Core Login and Registration using Identity guide.
Before starting, ensure you have the following:
- Visual Studio 2022 installed (Community Edition or higher).
- SQL Server installed and running.
- A Google or Facebook Developer Account for API keys.
If you’re new to setting up authentication systems in .NET Core, you may find it helpful to explore Cookie Authentication in .NET Core as a foundational guide for understanding how authentication flows work.
Step 1: Setting Up the ASP.NET Core Project
- Open Visual Studio 2022.
- Click on Create a new project.
- Select ASP.NET Core Web App (Model-View-Controller), then click Next.
- Name your project
SocialMediaAuthApp, choose a location, and click Next. - Choose .NET 7.0 (Standard Term Support), ensure Authentication Type is set to Individual Accounts, and click Create.

Step 2: Configuring the Database
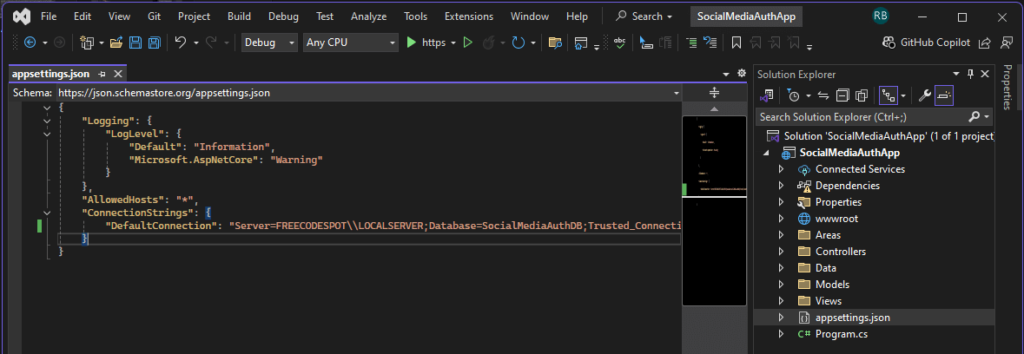
1. Open the appsettings.json file.
2. Update the ConnectionStrings section to match your SQL Server setup:
"ConnectionStrings": {
  "DefaultConnection": "Server=YOUR_SERVER_NAME;Database=SocialMediaAuthDB;Trusted_Connection=True;TrustServerCertificate=True;"
}
Replace YOUR_SERVER_NAME with your SQL Server instance name.
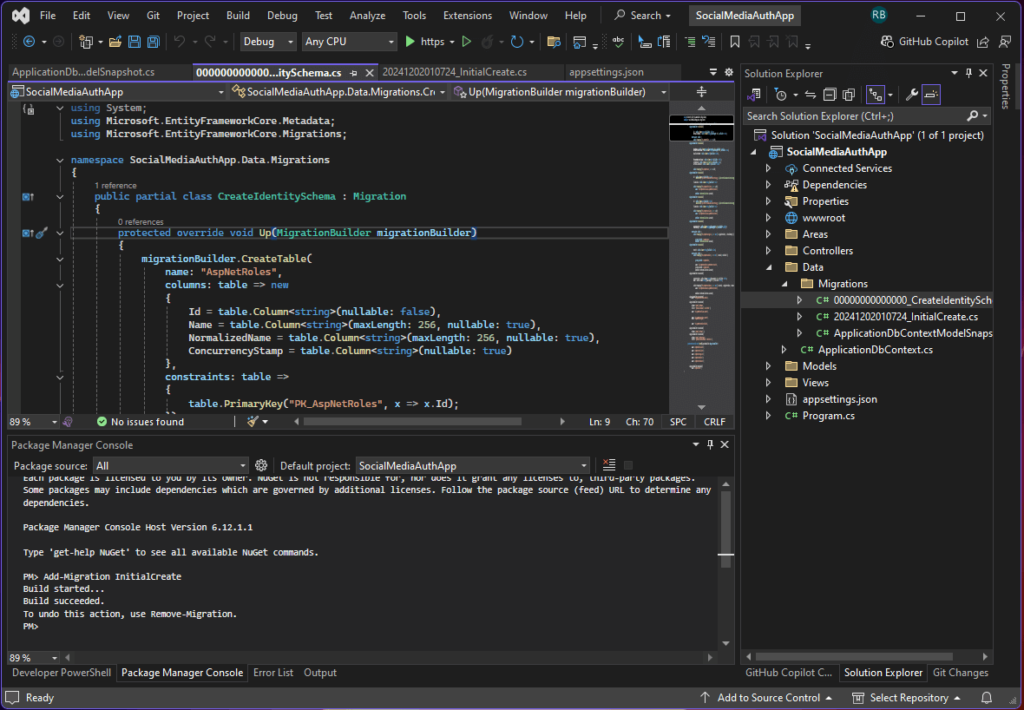
3. Open the Package Manager Console (Tools > NuGet Package Manager > Package Manager Console) and run:
Add-Migration InitialCreateThis will generate SQL schema for the identity.
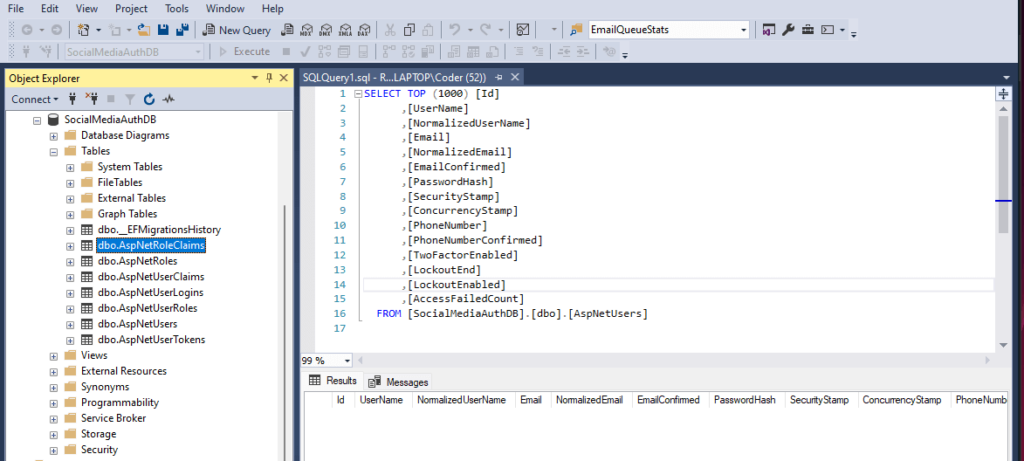
Update-DatabaseThis will create the necessary tables for Identity in your SQL Server database.
Step 3: Registering Google and Facebook Apps
For Google Login
To enable users to log in using their Google accounts, follow these steps:
1. Go to the Google Developer Console
- Visit the Google Developer Console.
- Log in using your Google account credentials.
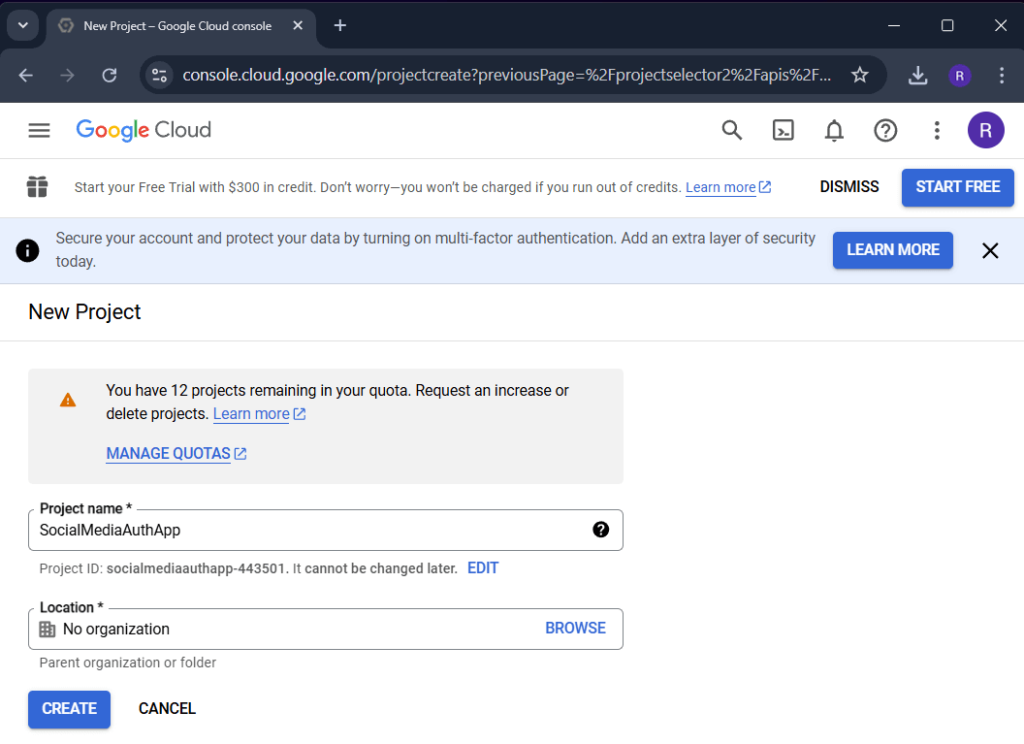
2. Create a New Project
- Click on the “Select a project” dropdown at the top of the page.
- In the pop-up dialog, click on “New Project”.
- Enter a Project Name (e.g.,
SocialMediaAuthApp) and choose your organization if applicable. - Click Create to generate the new project.
3. Configure OAuth Consent Screen
- Go to API & Services > OAuth Consent Screen.
- Choose the User Type:
- Select External if the app will be used by users outside your Google account’s organization.
- Select Internal for apps restricted to users within your organization.
- Click Create.
- Fill in the required fields for the consent screen:
- App Name: Provide a name that users will see during login (e.g.,
Social Media Auth App). - User Support Email: Choose your email address for user queries.
- Developer Contact Information: Add your email address for communication regarding this project.
- App Name: Provide a name that users will see during login (e.g.,
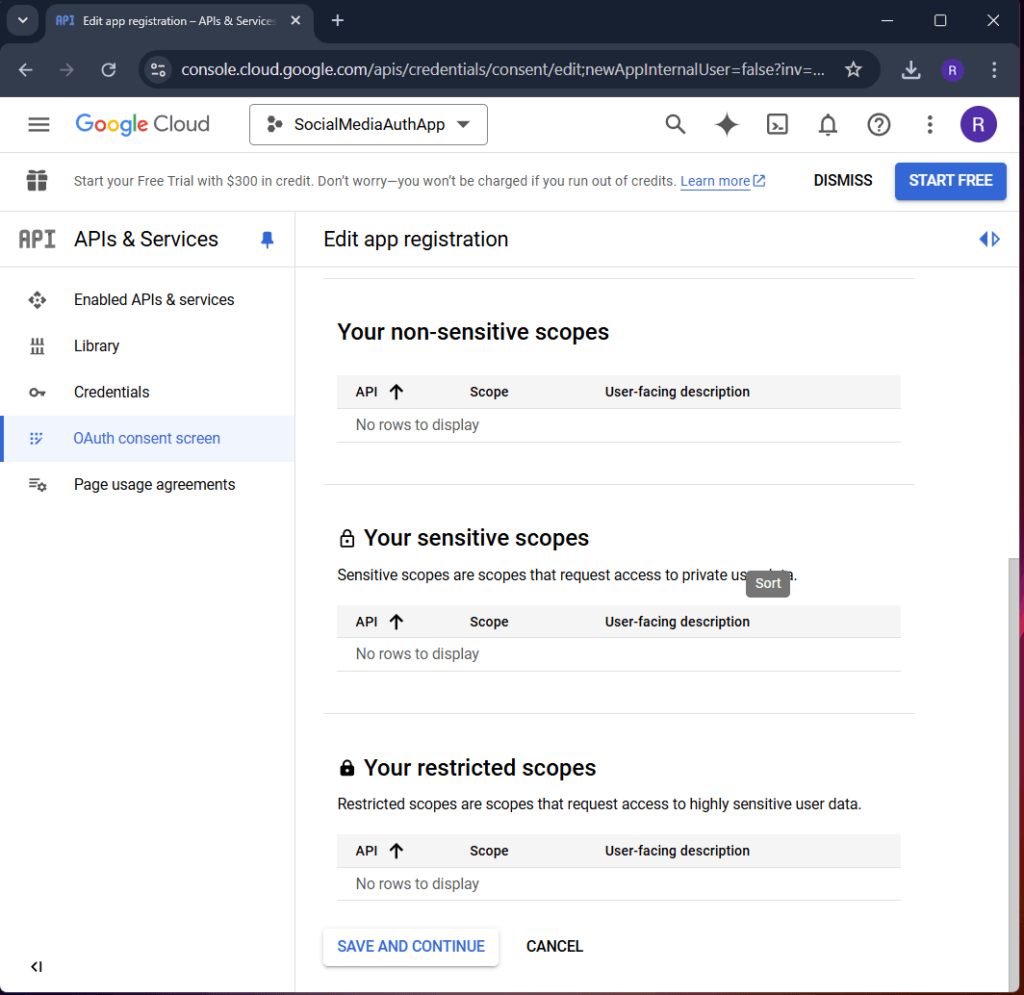
- Click Save and Continue and skip optional scopes for now.
4. Generate Client ID and Client Secret
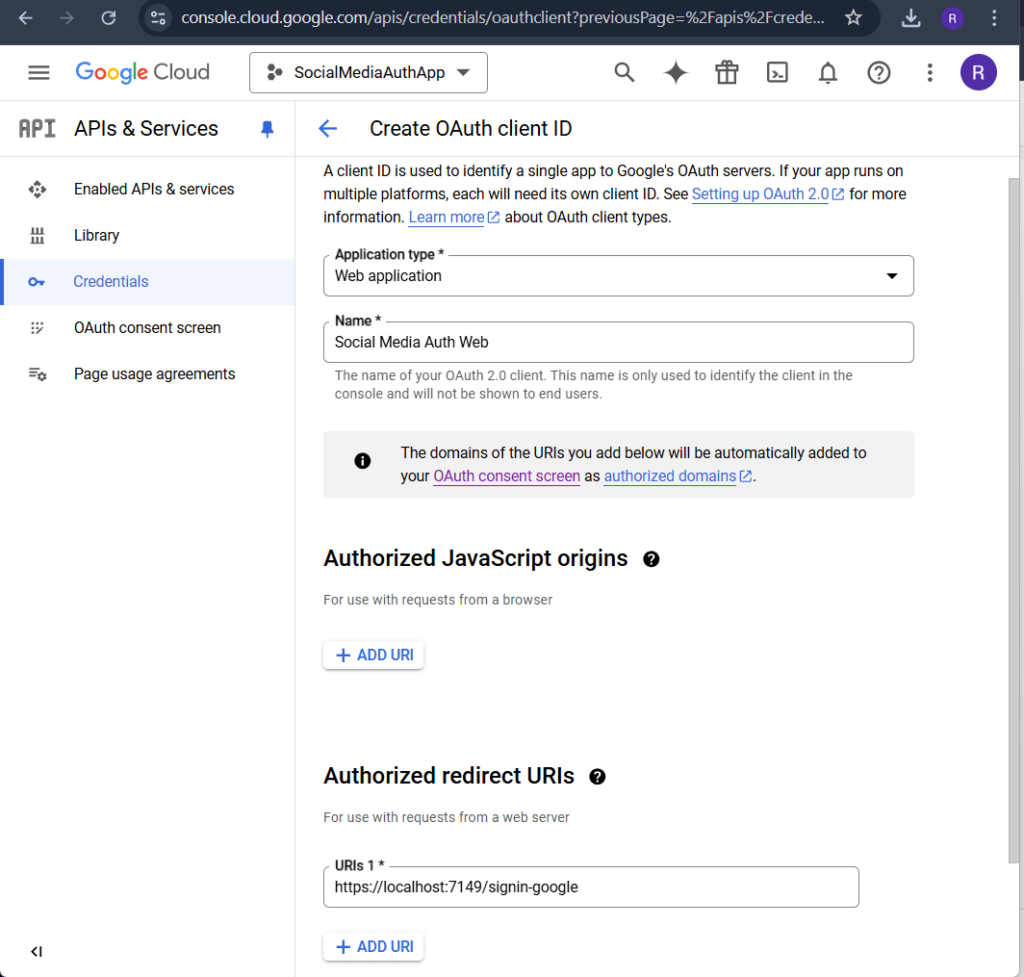
- Go to API & Services > Credentials.
- Click on the “Create Credentials” button and select OAuth Client ID.
- Select Web Application as the application type.
- Fill in the required details:
- Name: Give your credential a descriptive name (e.g.,
Social Media Auth Web). - Authorized Redirect URIs:
- Add the redirect URI where Google will send authentication responses (e.g.,
https://localhost:7149/signin-googlefor local development).
- Add the redirect URI where Google will send authentication responses (e.g.,
- Name: Give your credential a descriptive name (e.g.,
- Click Create to generate the Client ID and Client Secret.
- Save the Client ID and Client Secret, as these will be needed to configure Google authentication in your ASP.NET Core application.
For Facebook Login:
Step 1: Log in to Facebook Developer Account
- Open the Facebook for Developers website.
- Log in using your Facebook account. If you don’t have a Facebook account, create one first.
Step 2: Create a New App
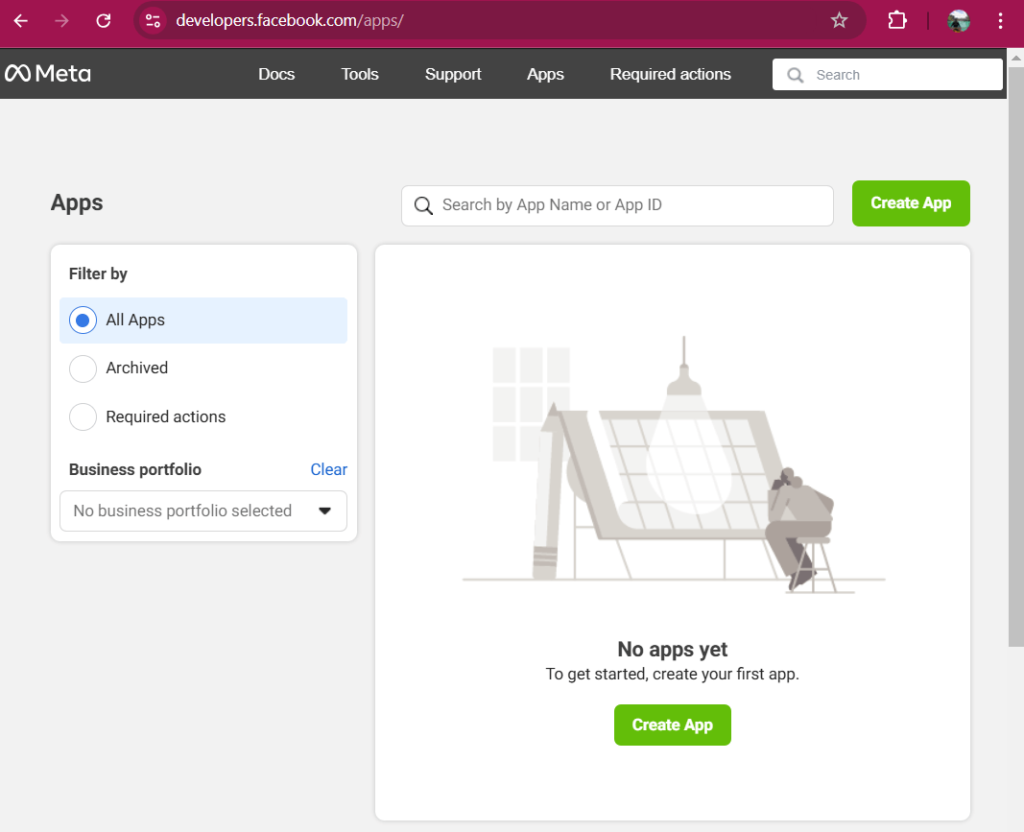
- Click on My Apps in the top-right corner of the page.
- Select Create App.
3. In the pop-up window, choose the app type:
- Select Web and click Next.
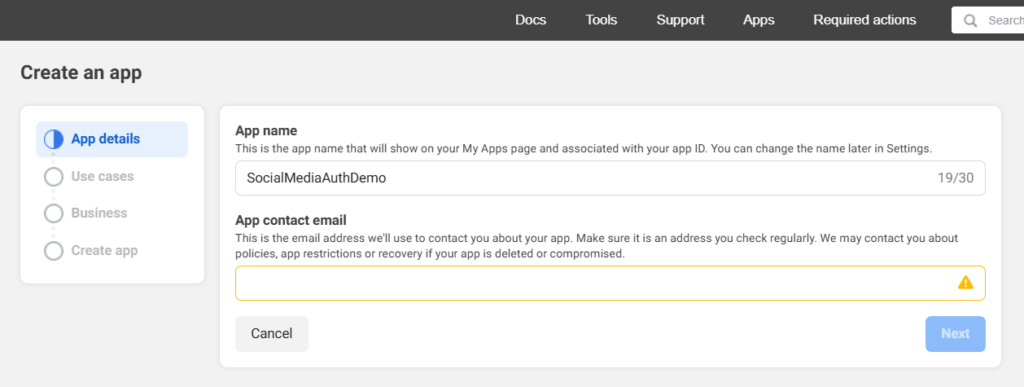
4. Fill in the details:
- App Name: Choose a name for your app (e.g., “MyAppLogin”).
- Contact Email: Enter your email address.
- Click Next.
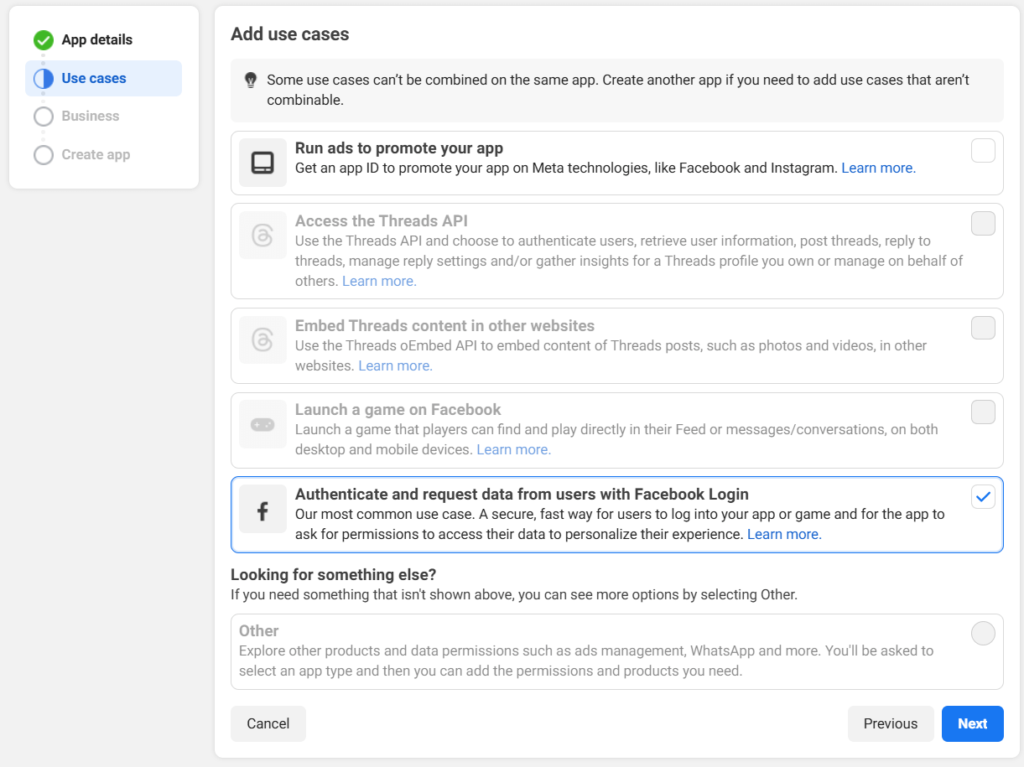
5. Choose Authenticate and request data from users with Facebook Login then click the Next button.
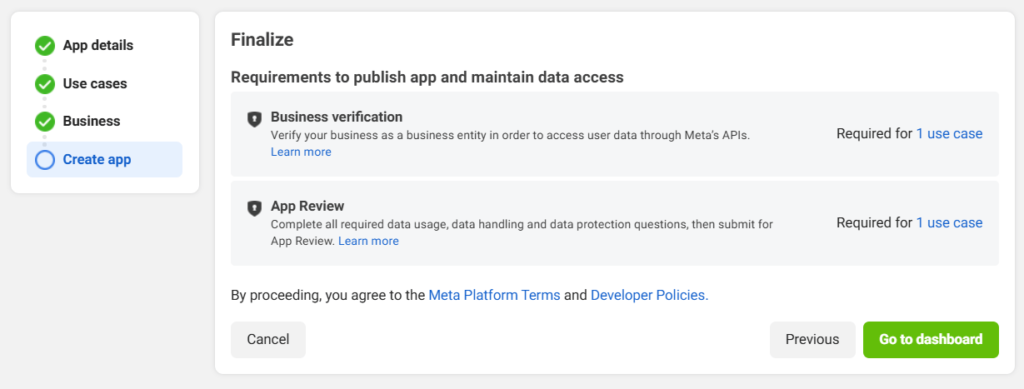
6. In the Business page you can choose “I don’t want to connect a business portfolio yet.” then click Next.
7. Lastly, Go to dashboard by clicking the button.
Step 3: Configure Your App
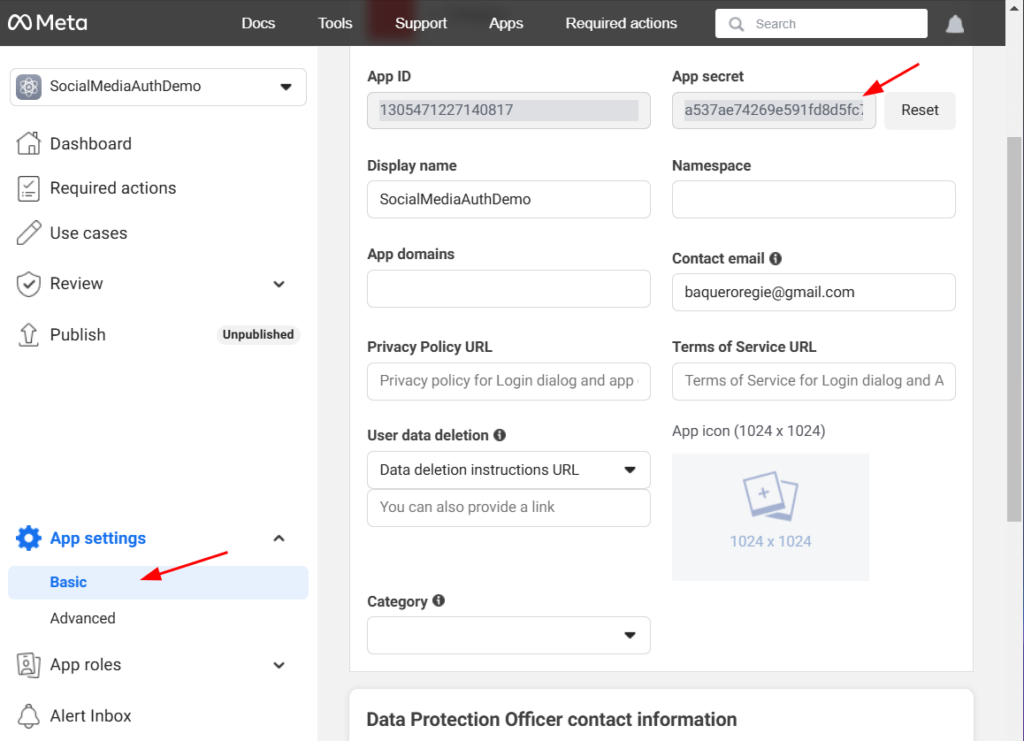
- You’ll be redirected to the App Dashboard.
- From the left menu, select Settings > Basic.
- Here you’ll see the App ID and App Secret.
- The App ID is displayed immediately.
- To view the App Secret, click Show and verify your identity if prompted.
Step 4: Configure Facebook Login
- In the left menu, select Dashboard.
- Find Facebook Login under Add customize use case.
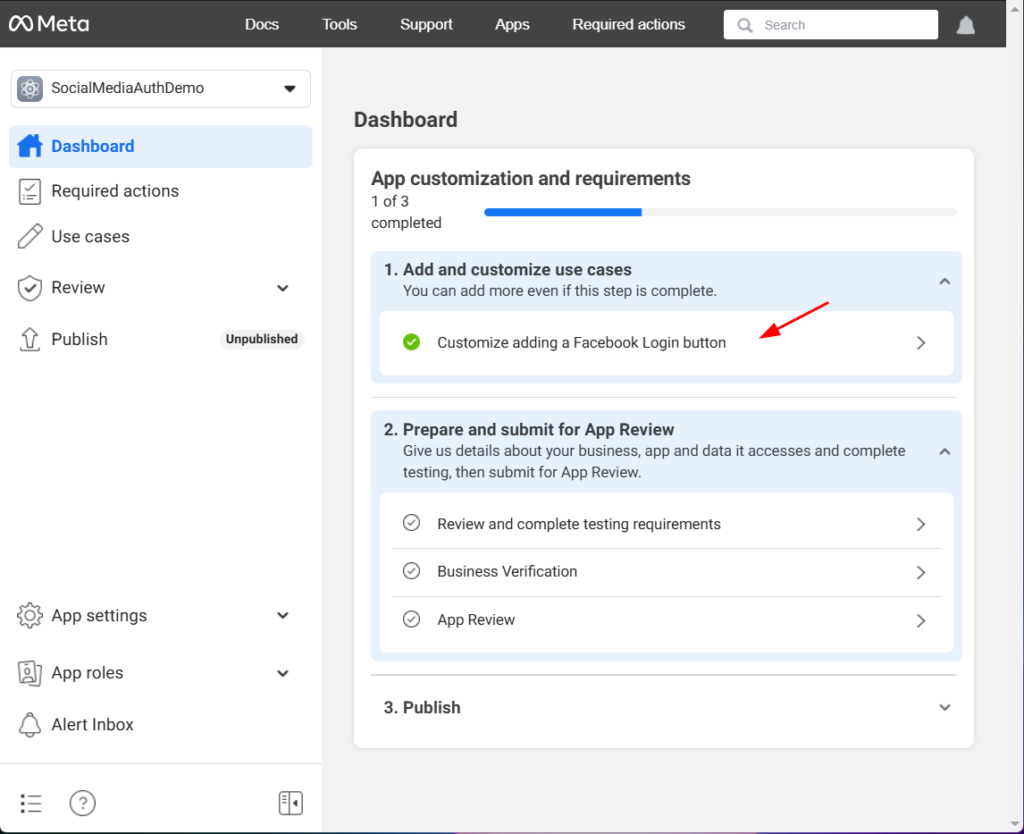
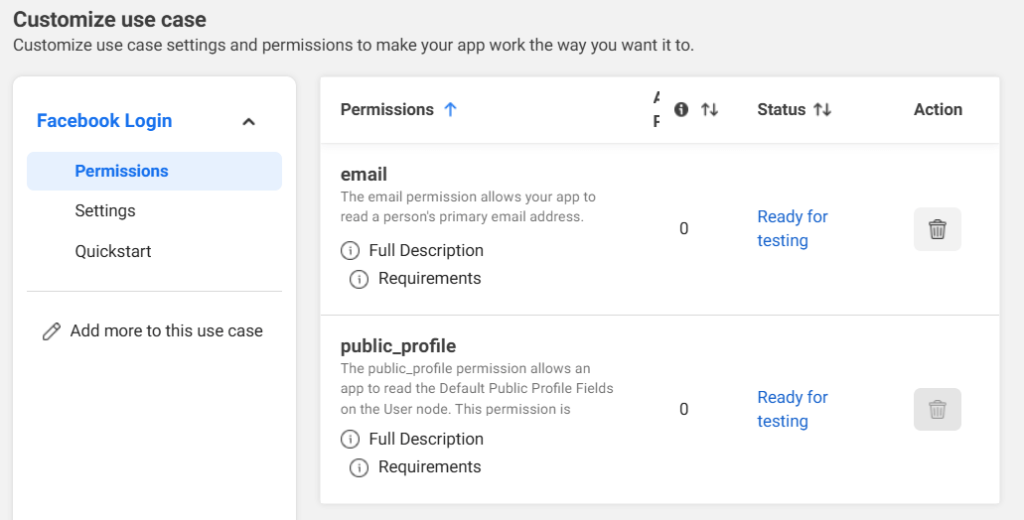
3. Add the permission needed for facebook login
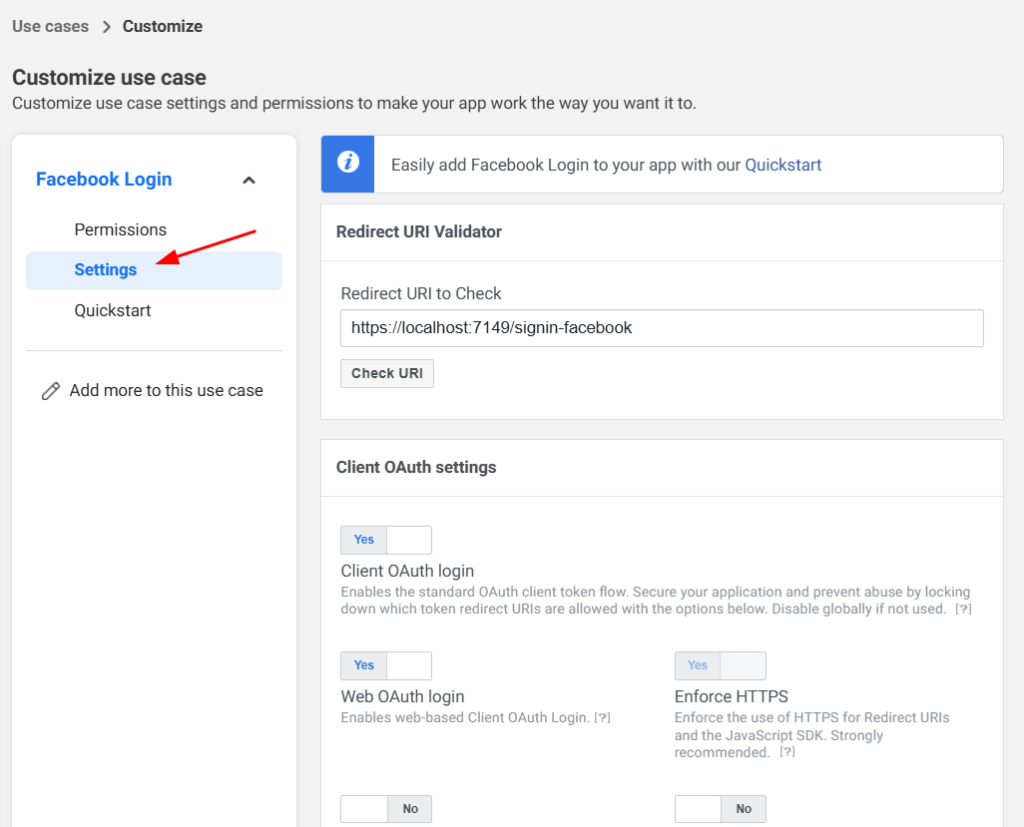
Step 5: Configure Redirect URI
- Under the Facebook Login > Settings section in the left menu, add the redirect URI.
- Enter the redirect URI(
Valid OAuth Redirect URIs) used in your application:
https://localhost:7149/signin-facebookReplace localhost:7149 with your app’s production domain when deploying.
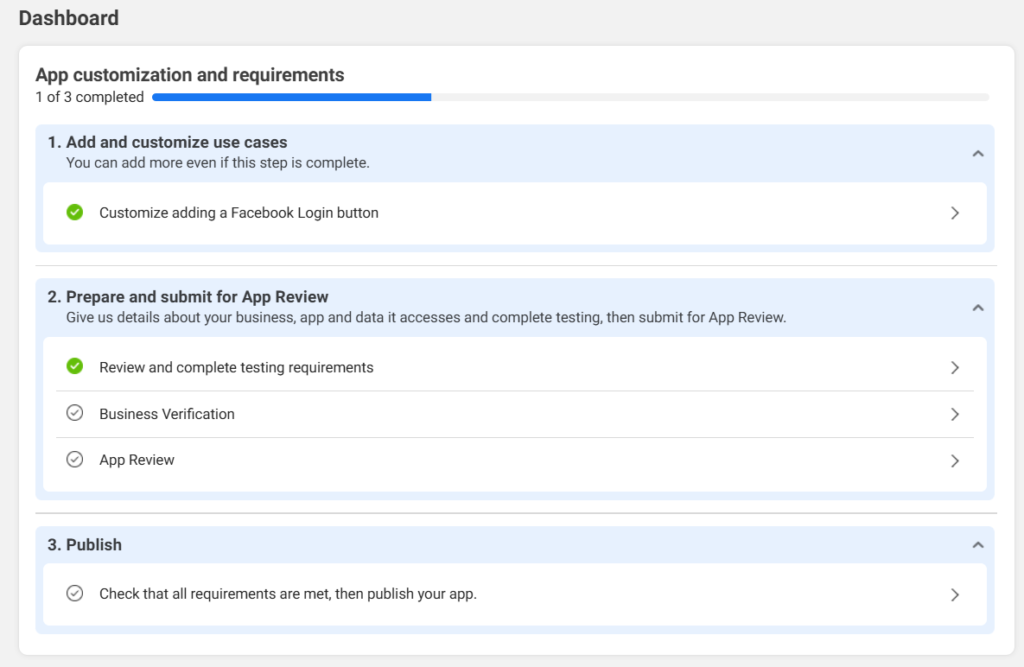
Step 6: Submit for Review
You’ll need to complete all steps before you can submit for review.
Step 4: Adding Social Media Authentication
1. Install the following Nuget Packages.
Install-Package Microsoft.AspNetCore.Authentication.Facebook
Install-Package Microsoft.AspNetCore.Authentication.Google
2. Open the Program.cs file.
3. Add Google and Facebook authentication:
builder.Services.AddAuthentication()
    .AddGoogle(options =>
    {
        options.ClientId = "YOUR_GOOGLE_CLIENT_ID";
        options.ClientSecret = "YOUR_GOOGLE_CLIENT_SECRET";
    })
    .AddFacebook(options =>
    {
        options.AppId = "YOUR_FACEBOOK_APP_ID";
        options.AppSecret = "YOUR_FACEBOOK_APP_SECRET";
    });
Replace placeholders with the credentials you obtained from Google and Facebook.
Pro Tip: If you’re planning to expand your authentication system to support multiple applications or APIs, consider using IdentityServer. This tool provides a robust framework for handling OpenID Connect and OAuth 2.0 standards in a centralized manner. Check out our guide on Securing .NET Core Using IdentityServer for detailed instructions.
5. Ensure the middleware is added.
var app = builder.Build();
app.UseAuthentication();
app.UseAuthorization();
app.MapControllers();
app.Run();
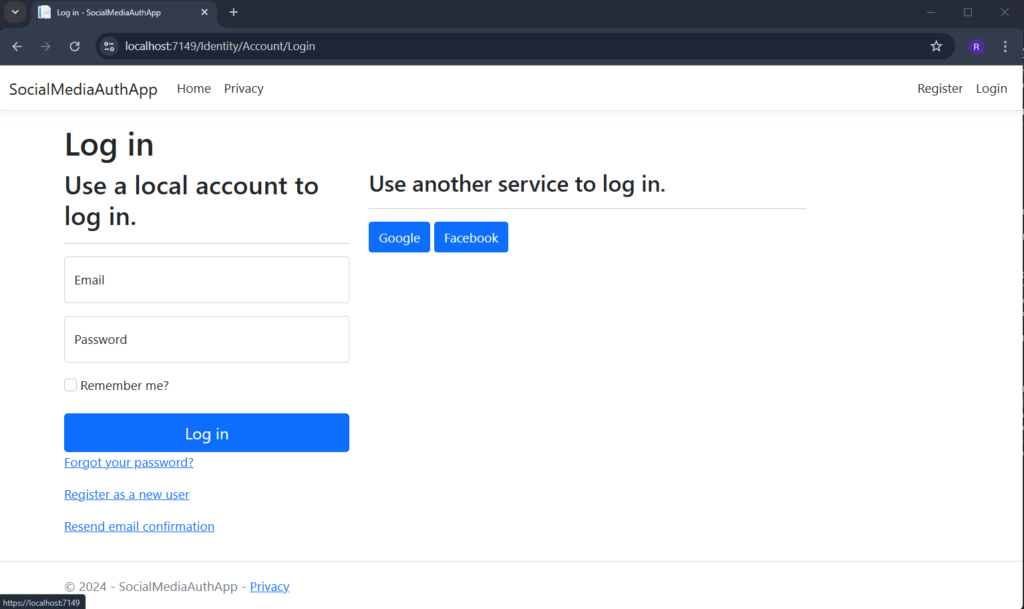
When you run your project again and head over to “https://localhost:7149/Identity/Account/Login,” you’ll notice that the external login option has been added. The best part? It works seamlessly right out of the box!
Step 5: Modifying the Default Identity UI (Optional)
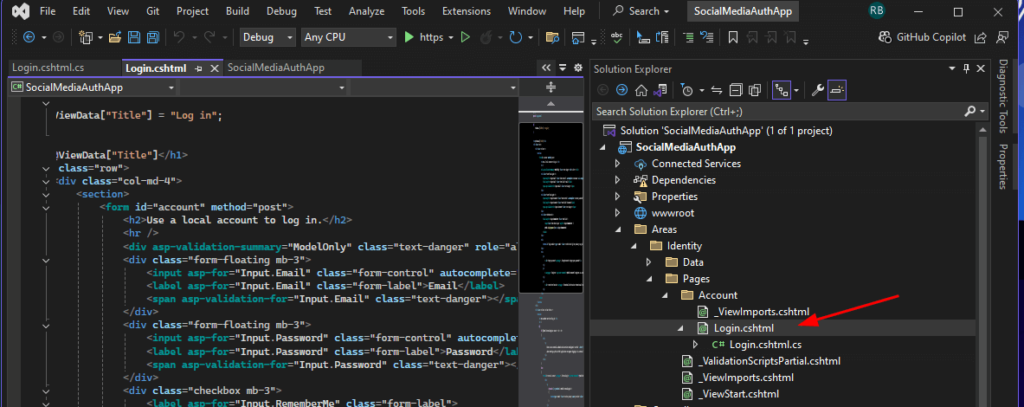
If you want to customize the default UI but avoid creating a custom controller, you can scaffold the Identity UI pages into your project. For example:
dotnet aspnet-codegenerator identity -dc ApplicationDbContext --files "Account.Login"Before running the command make sure you have installed this Nuget Package.
Install-Package Microsoft.VisualStudio.Web.CodeGeneration.Design
This scaffolds the login page (/Areas/Identity/Pages/Account/Login.cshtml) into your project, where you can modify its layout or behavior as needed.
Step 6: Create a Custom AccountController and Custom Login Page with Google Sign-In
1. Create Controllers/AccountController
Add the following code snippet to handle Social Login.
using Microsoft.AspNetCore.Identity;
using Microsoft.AspNetCore.Mvc;
using Microsoft.Win32;

namespace SocialMediaAuthApp.Controllers
{
    public class AccountController : Controller
    {
        private readonly SignInManager<IdentityUser> _signInManager;

        public AccountController(SignInManager<IdentityUser> signInManager)
        {
            _signInManager = signInManager;
        }

        public IActionResult Login(string returnUrl = null)
        {
            ViewData["ReturnUrl"] = returnUrl;
            return View();
        }


        public IActionResult ExternalLogin(string provider, string returnUrl = null)
        {
            var redirectUrl = Url.Action(nameof(ExternalLoginCallback), "Account", new { returnUrl });
            var properties = _signInManager.ConfigureExternalAuthenticationProperties(provider, redirectUrl);
            return Challenge(properties, provider);
        }


        public async Task<IActionResult> ExternalLoginCallback(string returnUrl = null, string remoteError = null)
        {
            if (!string.IsNullOrEmpty(remoteError))
            {
                ModelState.AddModelError(string.Empty, $"Error from external provider: {remoteError}");
                return RedirectToAction(nameof(Login));
            }

            var info = await _signInManager.GetExternalLoginInfoAsync();
            if (info == null)
            {
                return RedirectToAction(nameof(Login));
            }

            var signInResult = await _signInManager.ExternalLoginSignInAsync(info.LoginProvider, info.ProviderKey, isPersistent: false);
            if (signInResult.Succeeded)
            {
                return LocalRedirect(returnUrl ?? "/");
            }

            // Register new user if external login fails
            return RedirectToAction(nameof(Login));
        }
    }
}
2. Create Custom Login Page
Create a Login.cshtml file under Views/Account:
@model LoginViewModel

<div class="container mt-5">
    <div class="row justify-content-center">
        <div class="col-md-6 col-lg-4">
            <div class="card shadow-sm">
                <div class="card-body">
                    <h1 class="text-center mb-4">Login</h1>
                    <form asp-action="Login" method="post">
                        <div class="d-grid gap-2">
                            <a asp-action="ExternalLogin"
                               asp-route-provider="Google"
                               class="btn btn-danger btn-lg">
                                <i class="bi bi-google"></i> Sign in with Google
                            </a>
                        </div>
                    </form>
                </div>
            </div>
        </div>
    </div>
</div>
3. Create View Model inside Models folder
namespace SocialMediaAuthApp.Models
{
    public class LoginViewModel
    {
        public string Email { get; set; }
        public string Password { get; set; }
    }
}
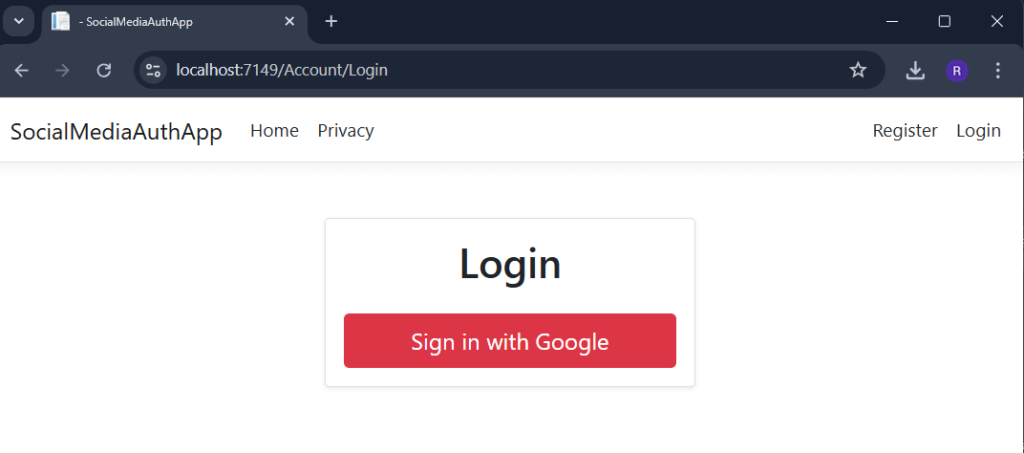
Run your project and Navigate to the new Login UI. (https://localhost:7149/Account/Login). This is how it looks like.
Important Note: Redirect URI (https://localhost:5001/signin-google)
The redirect URI is a critical part of the Google OAuth login flow. It is the endpoint where Google sends the authentication response after the user logs in.
Default Redirect URI
- For local development, the redirect URI is typically:bashCopy code
https://localhost:5001/signin-google
When to Change the Redirect URI
- Local Development:
- Use
https://localhost:5001/signin-googleor the port your app is running on. - Ensure this URI is added in the Google API Console under Authorized Redirect URIs.
- Use
- Production Deployment:
- Update the redirect URI to match your production domain, e.g.:arduinoCopy code
https://yourdomain.com/signin-google - Add this URI in the Google API Console to replace or supplement the local URI.
- Update the redirect URI to match your production domain, e.g.:arduinoCopy code
Why It’s Important
If the redirect URI in your application doesn’t match the one registered in the Google API Console:
- Google will reject the authentication request.
- Users will see an error.
Keep your redirect URIs up-to-date in the Google API Console to avoid issues in different environments.
Step 7: Testing the Application
To verify both the custom login and the default ASP.NET Core Identity login, follow these steps:
- Test the Custom Login Page:
- Navigate to the URL of your custom login page:
https://localhost:7149/Account/Login - Try logging in using Google (or any other external login provider configured in your project).
- Ensure the redirection and user authentication are working as expected.
- Navigate to the URL of your custom login page:
- Test the Default Identity Login Page:
- Navigate to the default Identity UI login page:
https://localhost:7149/Identity/Account/Login - Test the built-in login functionality provided by ASP.NET Core Identity. This includes both username/password login (if enabled) and external provider login, such as Google.
- Navigate to the default Identity UI login page:
- Follow-Up: Add Facebook Login:
- You can follow the steps in this tutorial to integrate other external login providers, like Facebook. Simply replace the Google-specific configuration in
Program.cswith the Facebook app credentials:
- You can follow the steps in this tutorial to integrate other external login providers, like Facebook. Simply replace the Google-specific configuration in
builder.Services.AddAuthentication()
    .AddFacebook(options =>
    {
        options.AppId = "YOUR_FACEBOOK_APP_ID";
        options.AppSecret = "YOUR_FACEBOOK_APP_SECRET";
    });
4. Once configured, Facebook login will appear on both the default and custom login pages if properly implemented.
By testing both login pages, you ensure that the authentication flows are functional and can decide which page better suits your application needs. Extending this tutorial to add Facebook login allows you to support multiple authentication options for your users.
Download Source Code
To download the free source code from this tutorial, click the button below.
Important Notes:
- Ensure you have 7-Zip installed to extract the file. You can download 7-Zip here if you don’t already have it.
- Use the password freecodespot when prompted during extraction.
This source code is designed to work seamlessly with the steps outlined in this tutorial. If you encounter any issues or have questions, feel free to reach out in the comments section below.
Conclusion
You’ve successfully built a social media authentication system in ASP.NET Core using Identity. Users can now log in via Google or Facebook, providing a seamless and secure experience. Explore further by adding additional providers like Twitter or Microsoft, or customize the user experience.
If you’d like to expand your knowledge of authentication in .NET Core, here are two highly recommended resources:
- Cookie Authentication in .NET Core: Learn how to manage login sessions and secure traditional workflows.
- Securing .NET Core Using IdentityServer: Discover how to centralize authentication for multiple applications using IdentityServer.
Happy coding! 🚀
